We’d like to remind Forumites to please avoid political debate on the Forum.
This is to keep it a safe and useful space for MoneySaving discussions. Threads that are – or become – political in nature may be removed in line with the Forum’s rules. Thank you for your understanding.
📨 Have you signed up to the Forum's new Email Digest yet? Get a selection of trending threads sent straight to your inbox daily, weekly or monthly!
The Forum now has a brand new text editor, adding a bunch of handy features to use when creating posts. Read more in our how-to guide
Paint advice needed
Comments
-
When your status changes from NEWBIE to FORUMITE, three dots will appear at the top right of your posts, clicking on there will give you an EDIT button.1
-
bjorn_toby_wilde said:This would be my approach.
For the peeling area, scrape off anything that’s loose then put on a coat of Peelstop which effectively glues down the remaining paint. Use a wide blade filler knife and apply Toupret fine surface filler to the edges of the peeled areas. This will help them blend in so you don’t see a distinct ridge between the peeled and unpeeled areas. Sand down smooth (180 grit paper).
Fill the nail holes with a filler (I like Toupret because it doesn’t flash and sands easily but most fillers will be ok). Hairline cracks - If they’re really fine then paint over them. A mm or more then cut into them with a knife to widen them out. It sounds counterintuitive but they are easier to fill like that and less likely to reopen. Fill then sand flat (180 grit again).
Clean everything down with sugar soap and water. Grease, finger marks and dust from sanding will all stop paint adhering properly.
Mist coat - around 10% dilution is enough. Add the paint to the water, not the other way around. Use a large yoghurt pot or similar. Add a measured 10% of water then gradually add the 90% paint, stirring as you go. You’re looking for a slightly thinner consistency than the paint, not too thin like milk. The idea is that the mist coat will soak into the plaster and not dry too quickly. If it dries quickly it won’t have chance to bond properly with the plaster. Apply this to the filled areas and any bare plaster.
Finally, two coats of the Clean Extreme.
Cut in first around the ceiling edges with a nice wide brush (2 1/2” at least).Tape along the edge of the woodwork with yellow Frog Tape before you cut in. Not essential but I really like the clean edges you get with it.
Paint the walls with a roller and a pole. I’d recommend watching a YouTube video on applying paint with a roller. It’s easy to do but if you want a really nice finish then it’s important to use the right technique and keep a wet edge as you paint. Never stop half way across a wall. The pole isn’t essential for walls but it makes the job so much easier and less back breaking.
Sorry if that’s a lot of info in one go. If any of that’s unclear just ask.
Thank you so so much for the detailed reply this really helps me understand.
I do have some questions.
1) with the mist coat I want to check I'm calculating right if I needed 4 litres of paint for example do I take 90% away from the 4 litres and that will leave me with the number I need for paint and then take 10% away from the 4 litres so I know how much water I need? I am better with Ml or litres than percentage.
2) the cut in the edges of the ceiling you mean start with the edges with a brush then use a roller for the rest? Should I start with the ceiling or alls?
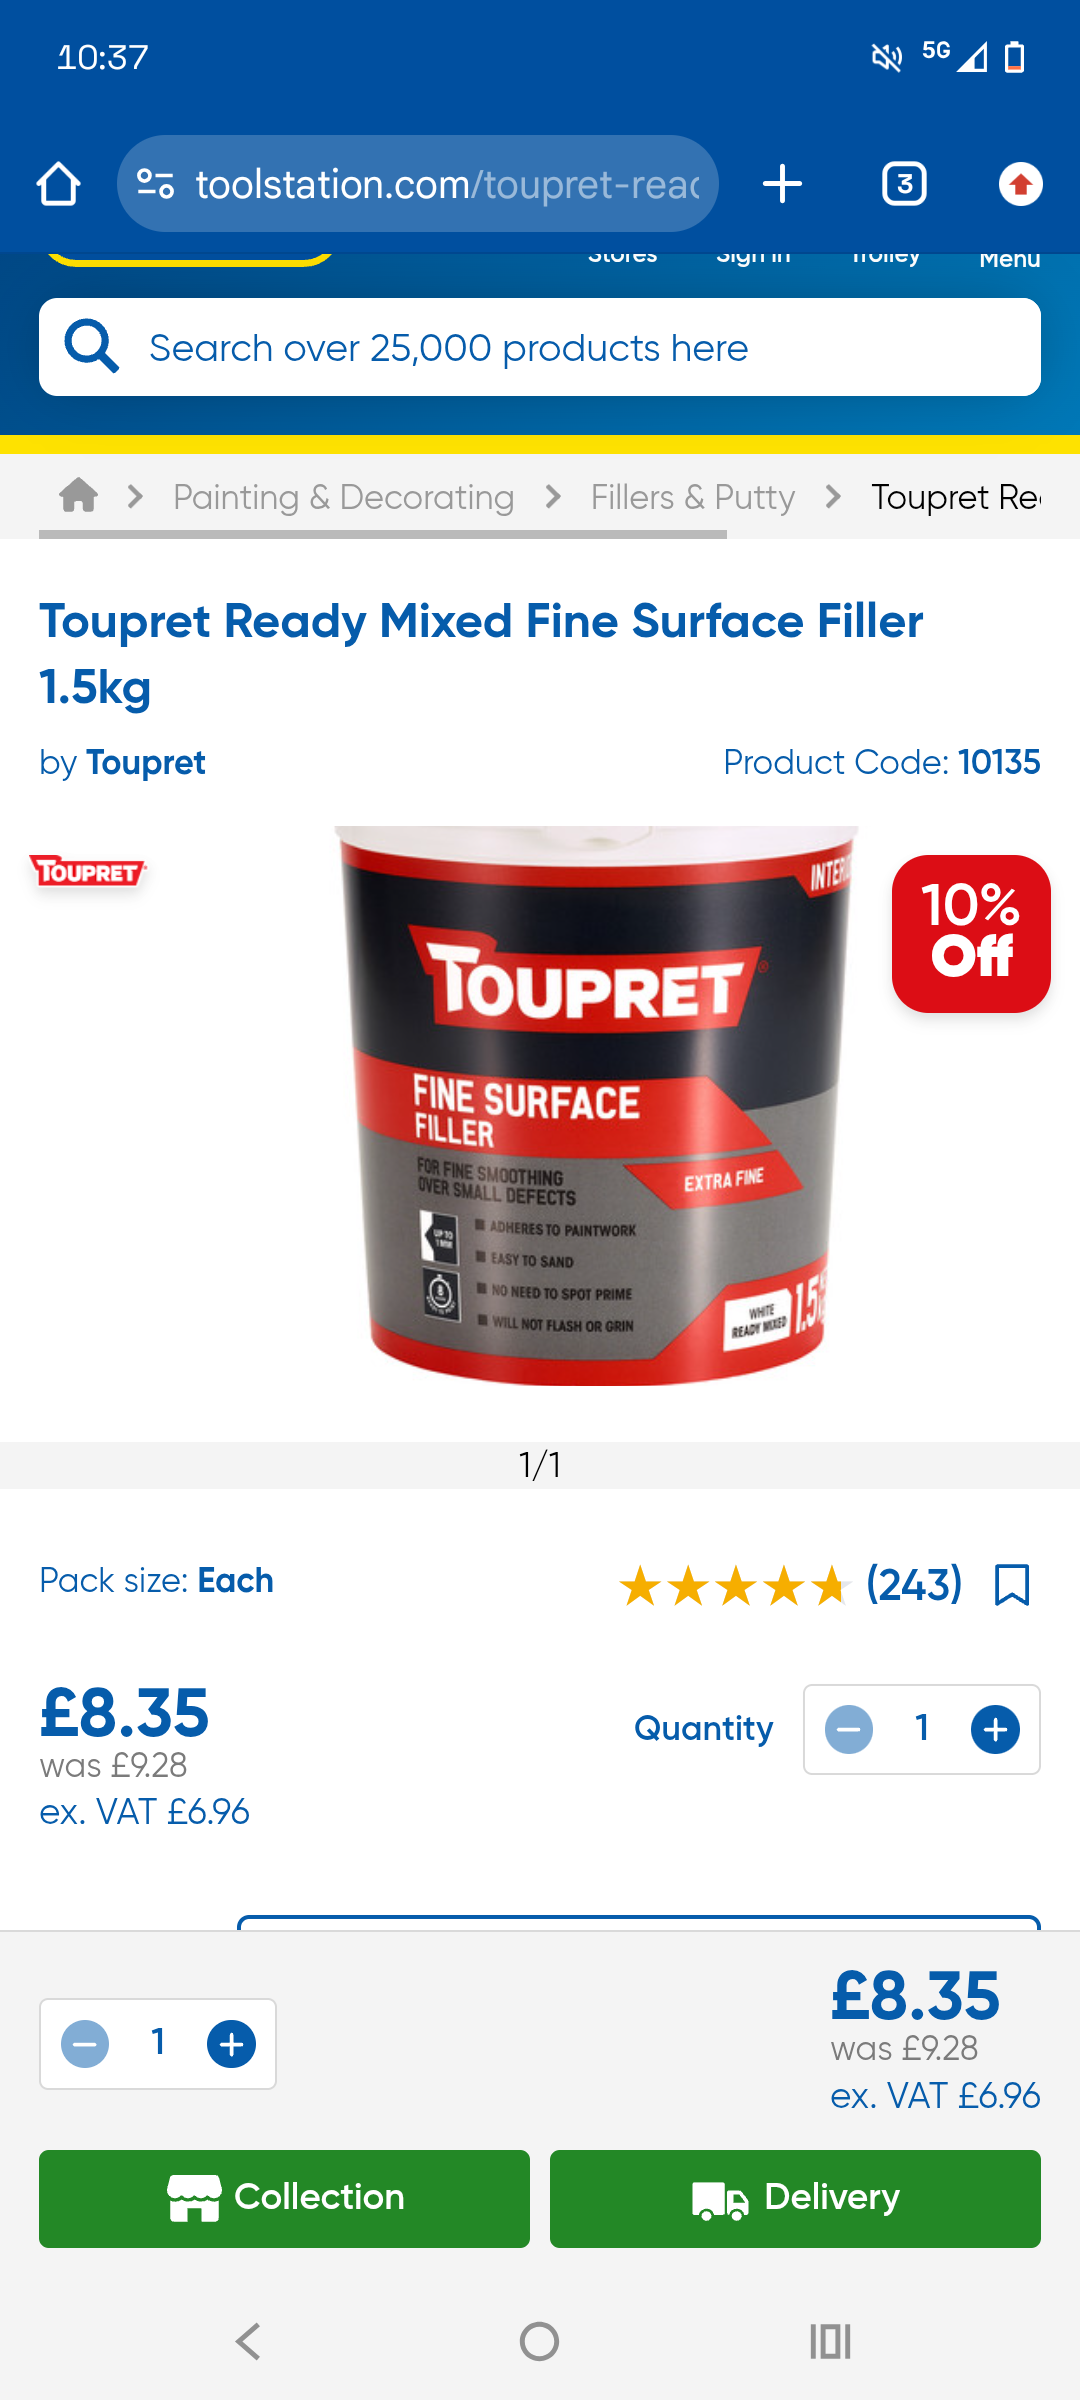
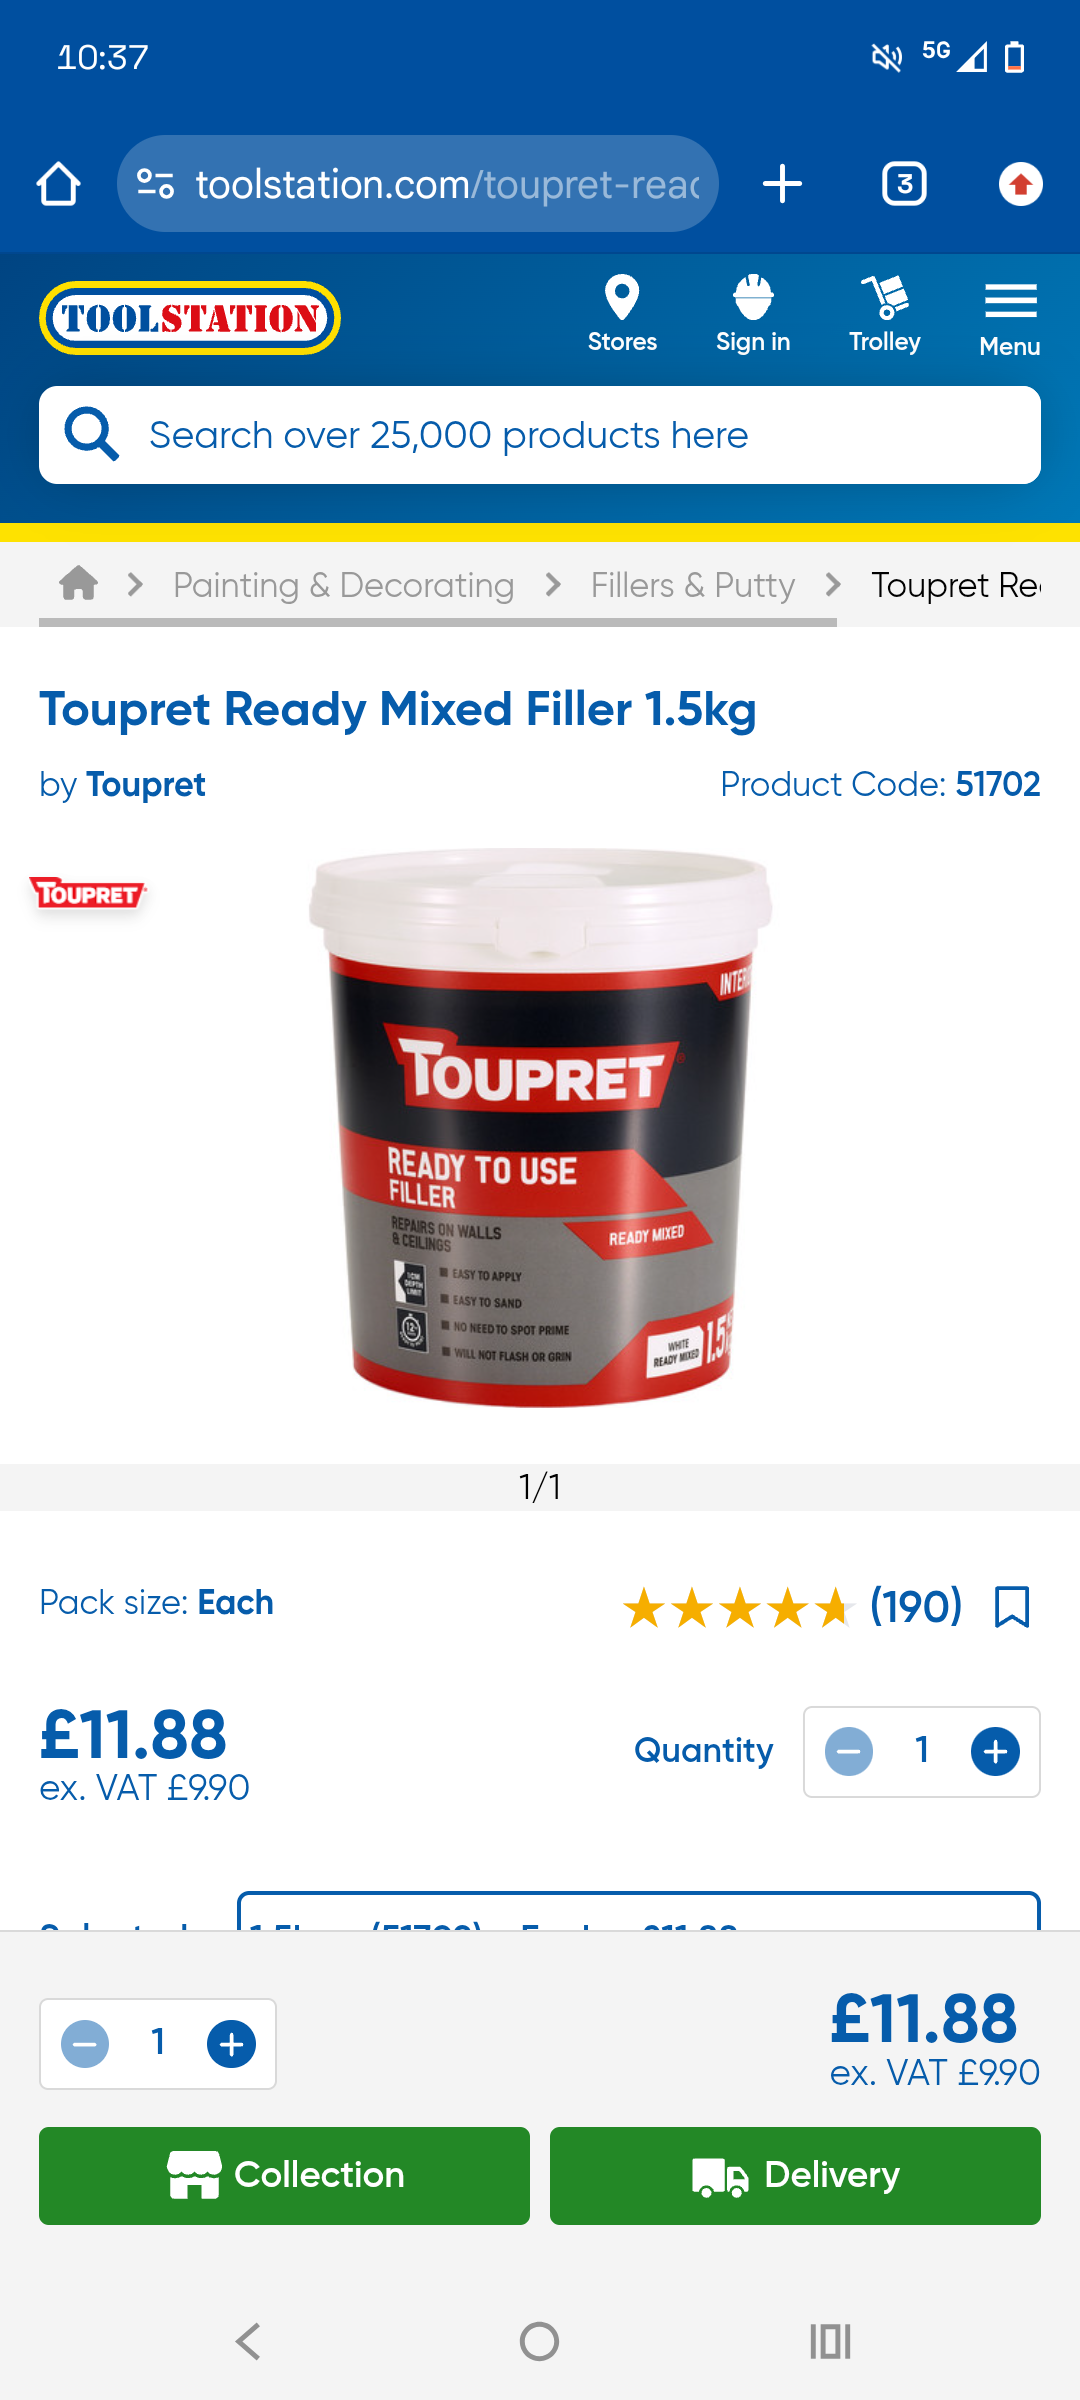
3) I'm going to post screenshots below but which filler out of these 2 do I need?
4) the room I'm starting with has a fire alarm in it and when nan had issues with the fire alarm the landlord at the time as this happened before she owned it put another alarm up and once the other alarm was fixed took the other one off the ceiling and the paint came off with it I'll attach a photo so I need to use no peel over this as it didn't peel it go taken off with a fire alarm or do I just put filler over it or just sand down the edges so it's smooth and just paint over it?
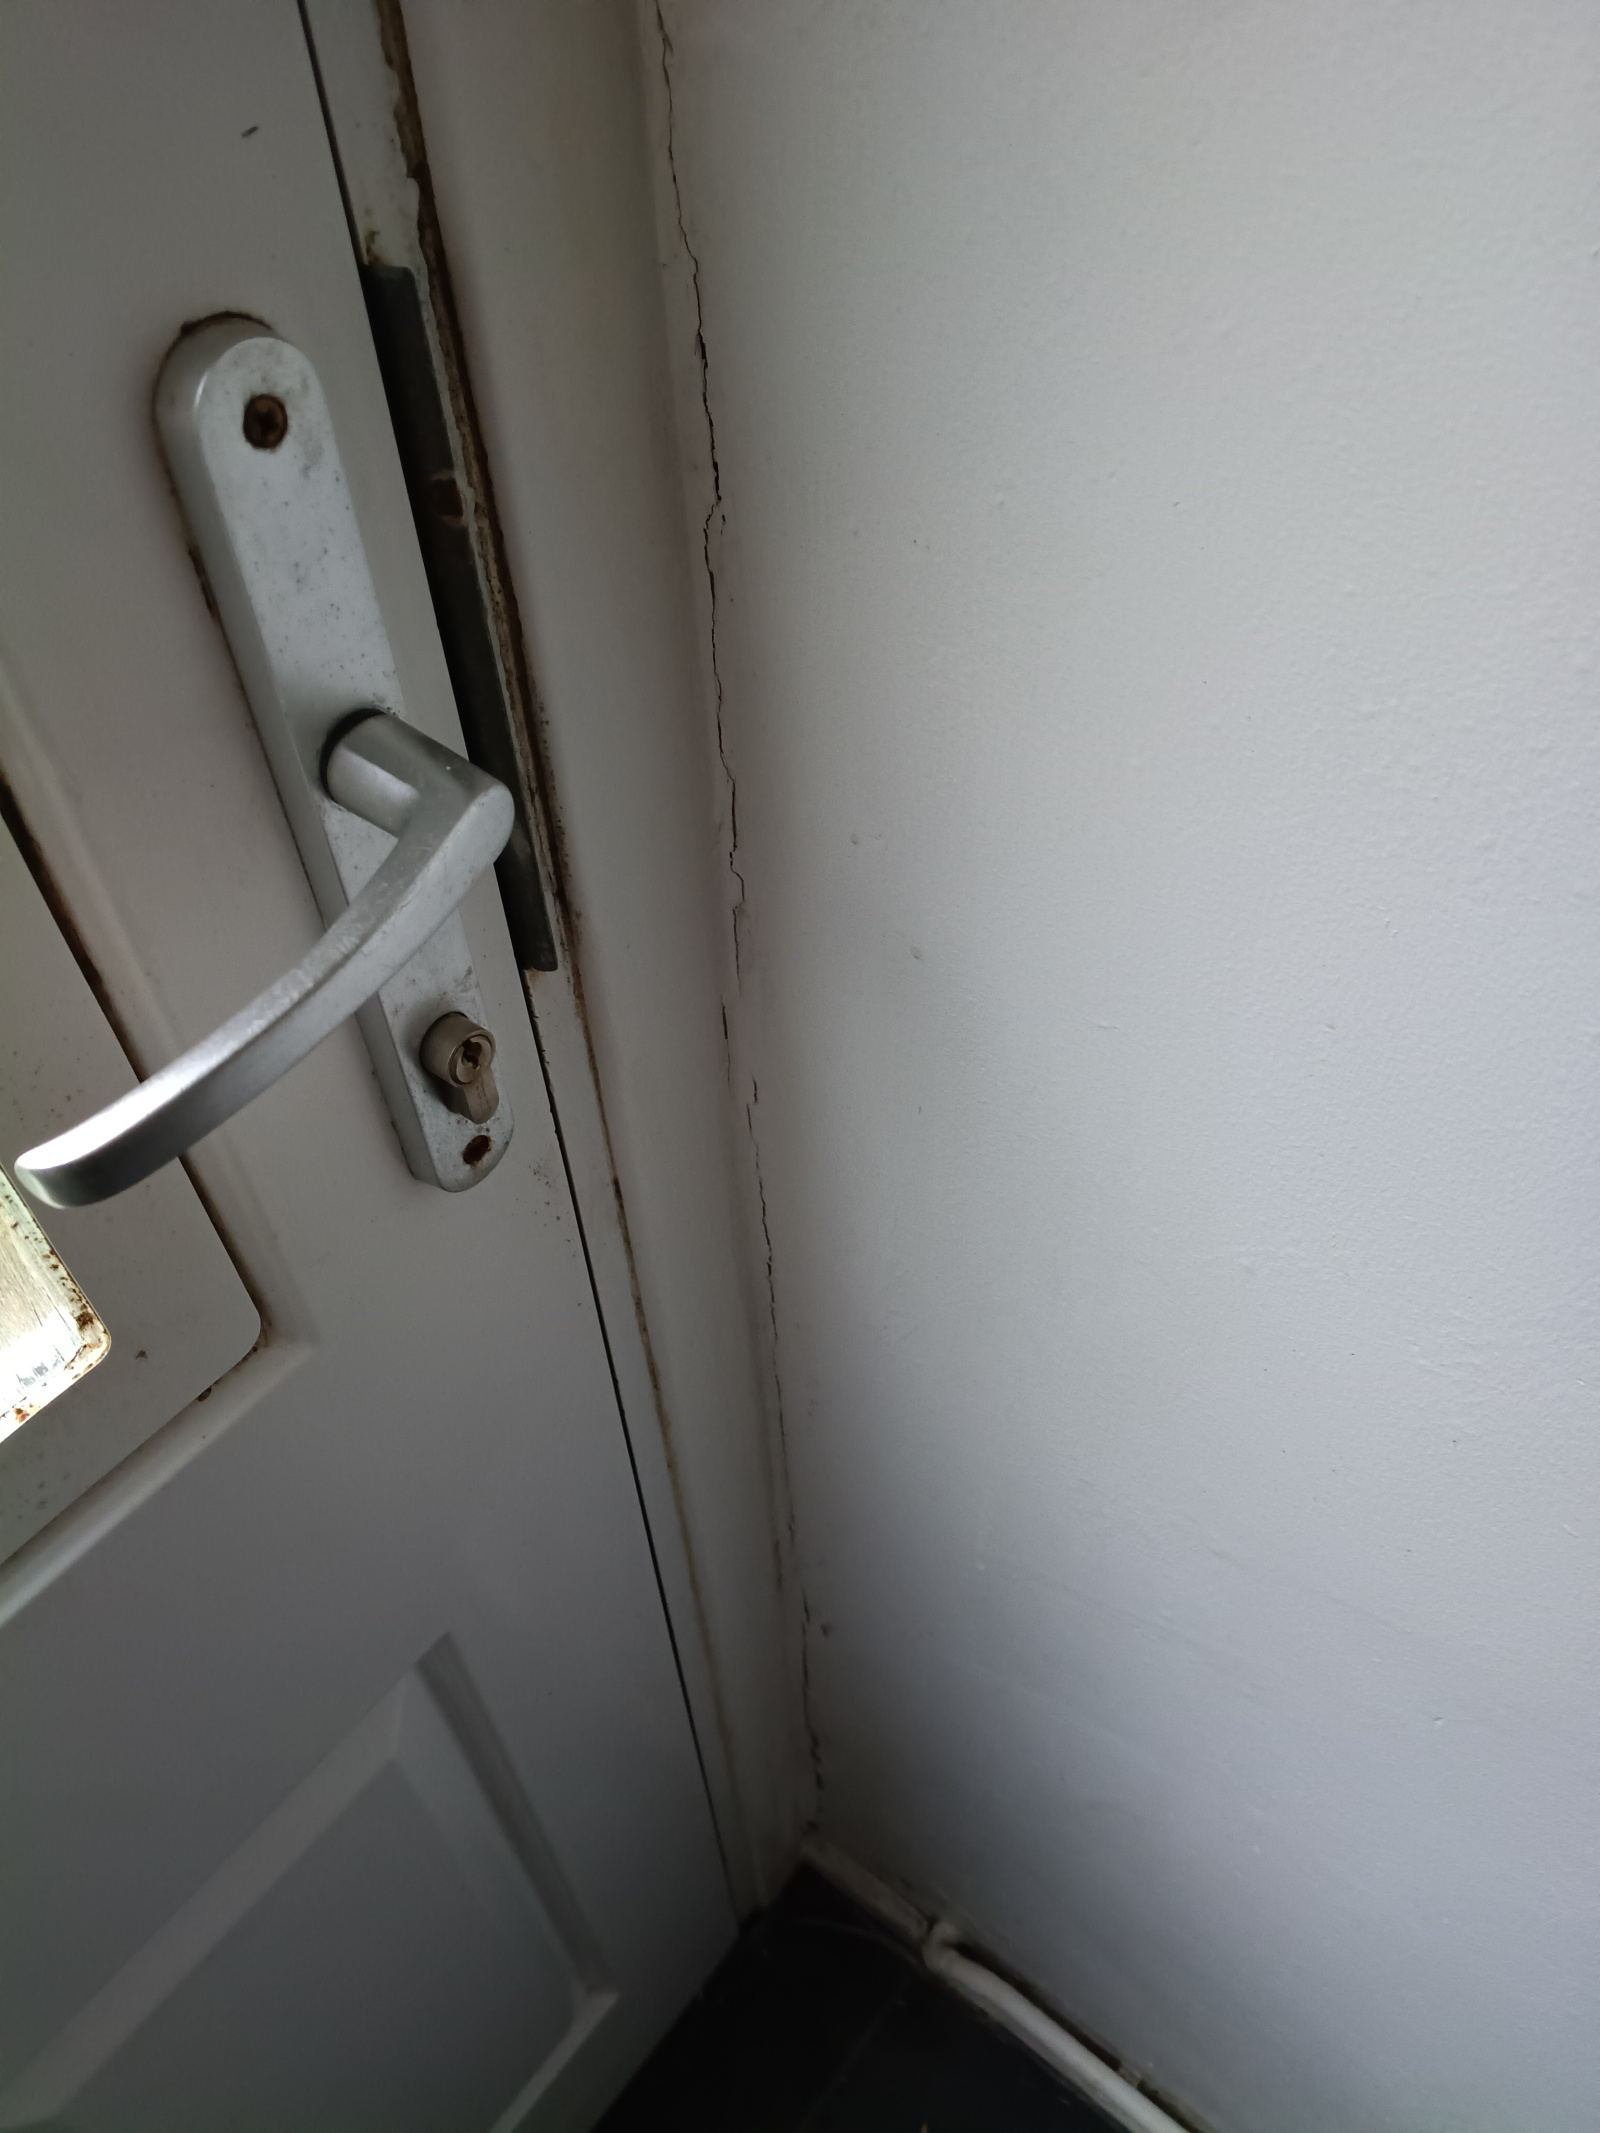
5) I also found a crack near the kitchen door is this something I can fix myself or could it be structural damage? Would I just use filler to fix it like a repair filler for cracks? Again I'll post a photo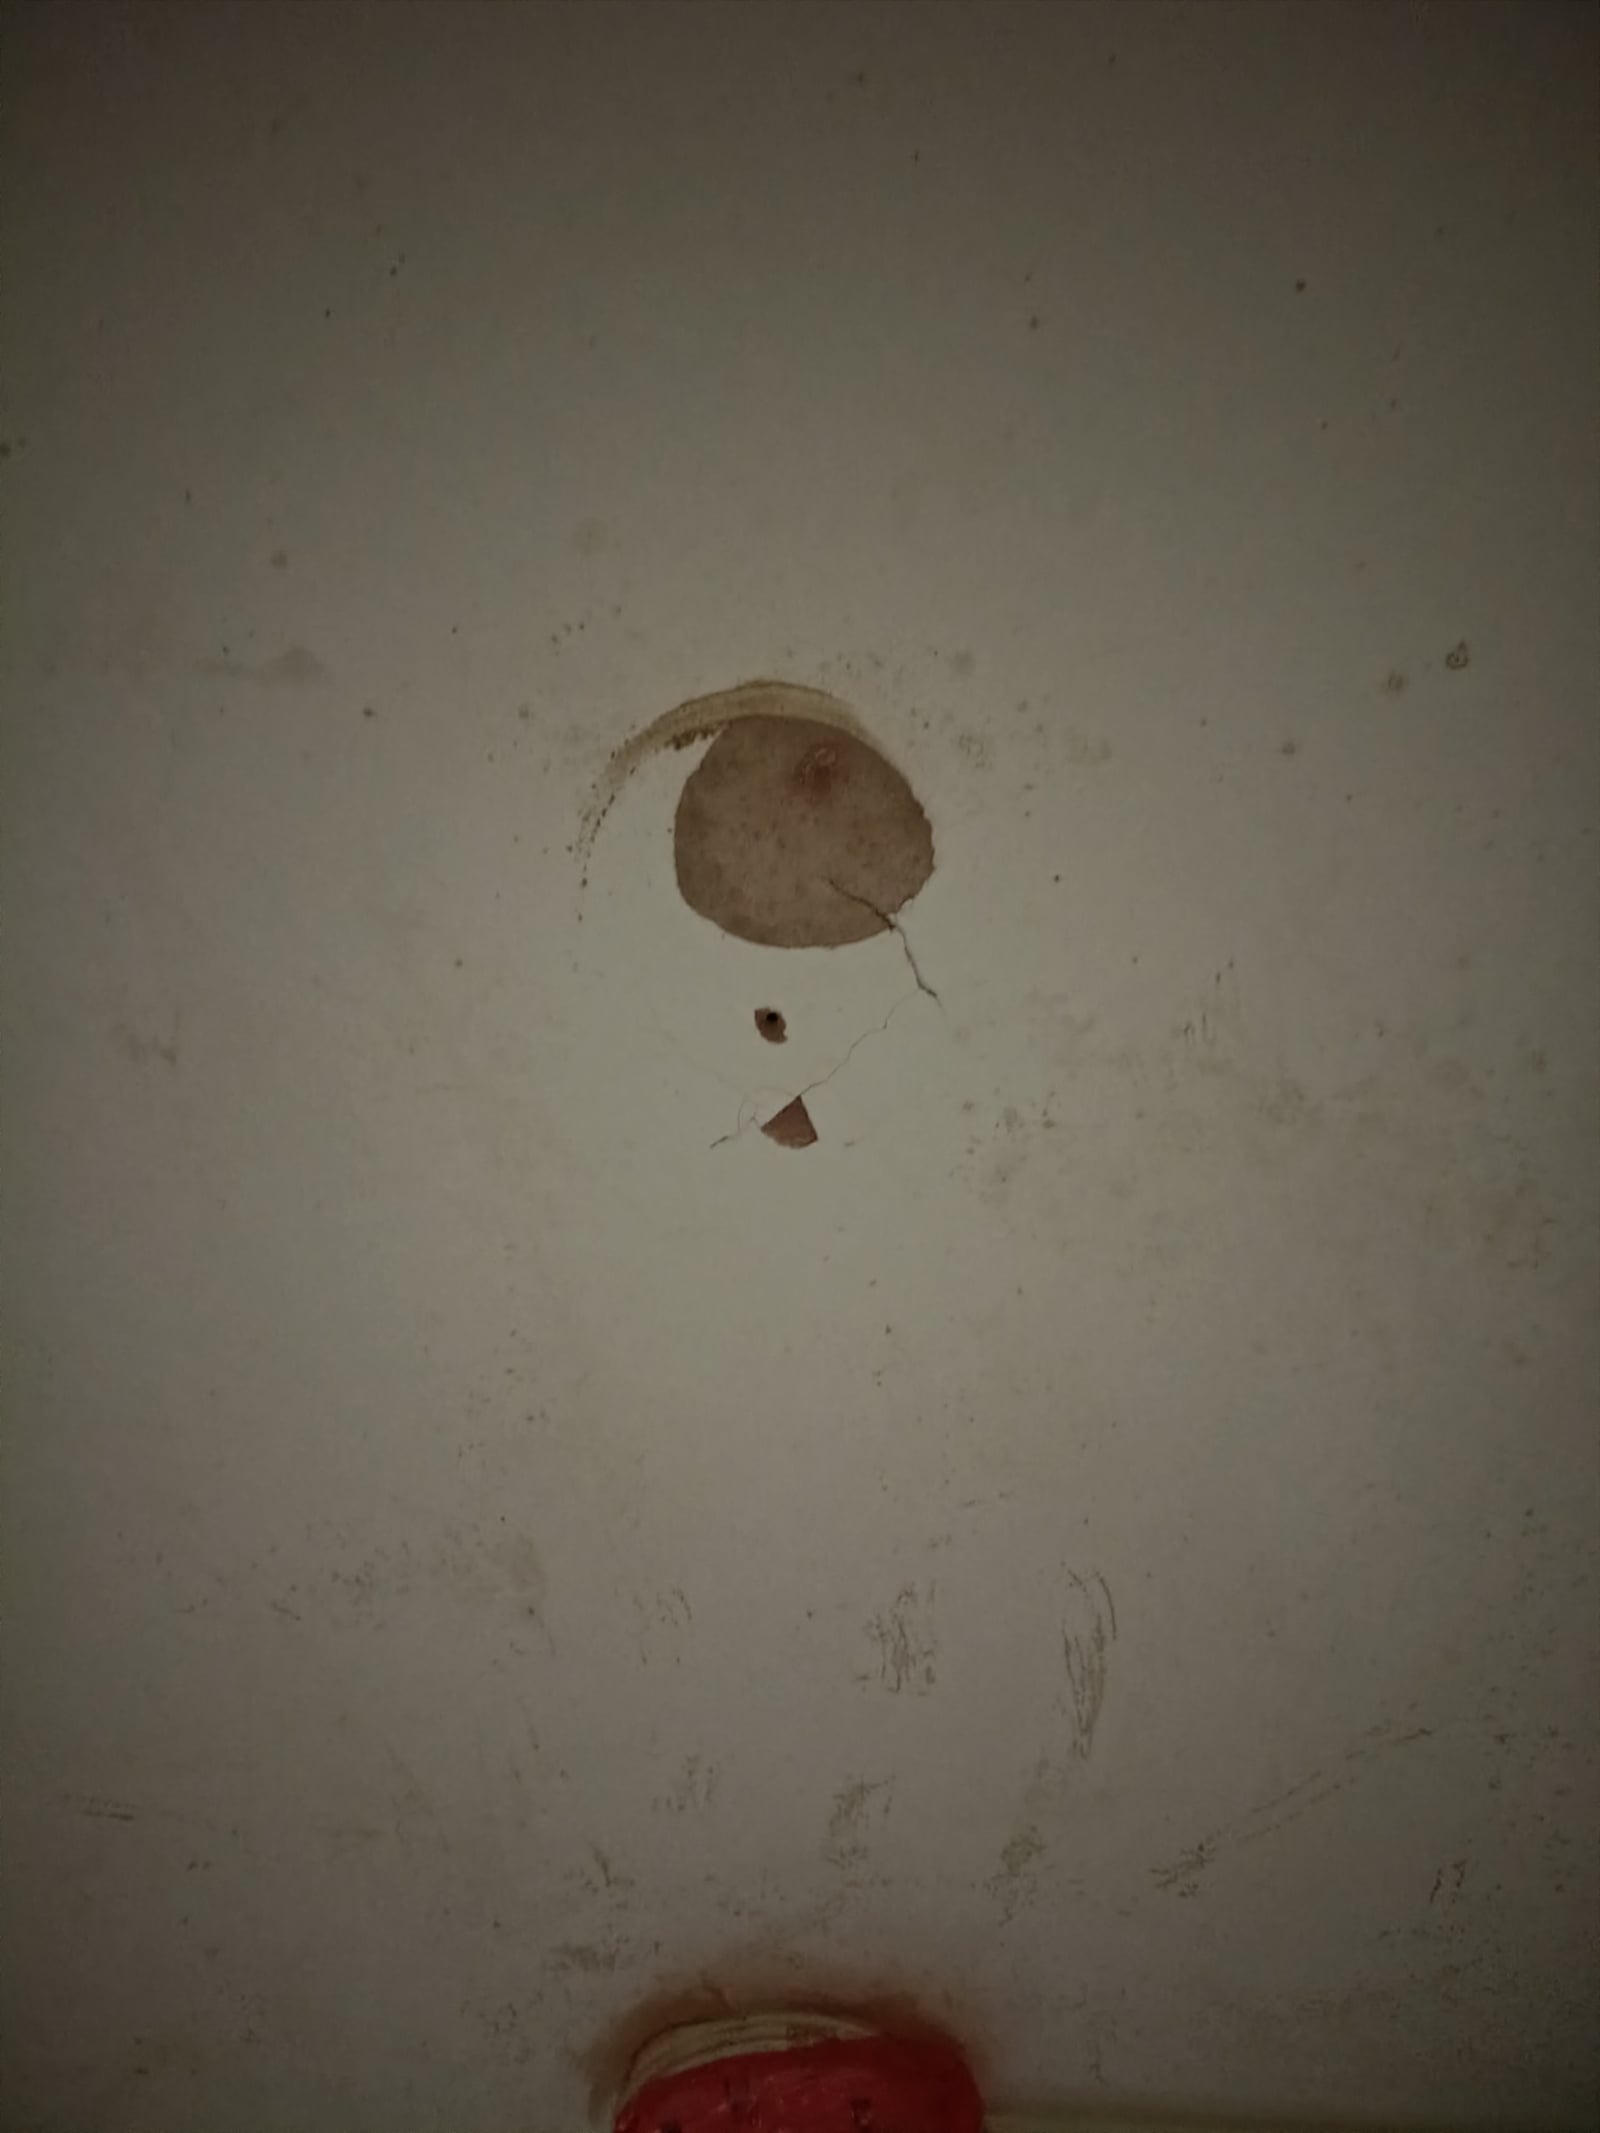

0 -
For the crack near the kitchen door, a triangular scraper would help. Scrape out to depth of around 5mm. Brush out then apply some diluted PVA taking care to not get any on the surrounding paintwork.
Then either use some ready mixed/powder filler or use Toupret Fill-Flex.
With the latter, best fill to just below the surface as it's not suitable for sanding.
Go over with regular filler once dry.
https://www.toolstation.com/prodec-professional-shave-hook/p58907?store=C4&utm_source=googleshopping&utm_medium=feed&utm_campaign=googleshoppingfeed&gad_source=1&gad_campaignid=17816255186&gclid=EAIaIQobChMI0YGBna7-kQMVhaNQBh1FDgFZEAQYASABEgKyk_D_BwE
https://www.screwfix.com/p/toupret-fill-flex-flexible-filler-white-310ml/346HE?tc=ED6&gclsrc=aw.ds&gad_source=1&gad_campaignid=19823510542&gclid=EAIaIQobChMIltqQ7K7-kQMV3olQBh0aKw_LEAQYAiABEgLTbfD_BwE
1 -
The crack next to the door frame is quite common, and normally caused by the opening and closing of the door over the years. It just needs filling.1
-
Hi
1. You’re only mist coating the bare areas so you shouldn’t need too much. 100 ml of water to 90ml of paint is about right. It doesn’t have to be too exact.
2. Cutting in is exactly as you describe. You can’t roll right to the edges or corners so you do those first with a brush. I’m sure there will be videos on YouTube showing how to hold and angle the brush to get a neat edge. It’s kinda hard to describe!
Paint the ceiling first. Opinion varies on whether you do the woodwork second or third. Personally I do the woodwork second then the walls.
3. The ready mixed will cover both if you don’t want to go to too much expense. The fine surface can only be used for 1mm or so depth so it’s really only for feathering the edges of the peeled paint.
4. A bit of Peelstop won’t hurt there but really that just needs filling, sanding then painting over.
5. No, that doesn’t look structural. It looks like a trim has been used when the door was fitted then there’s a bit of movement in the door frame every time the door is shut. Eventually the trim develops a crack down the side. A flexible caulk ought to work there. No Nonsense do an anti crack acrylic, and you’ll need a skeleton gun to apply it. Again there are videos which will show how to use caulk. YouTube is your friend 😁
1 -
1. You’re only mist coating the bare areas so you shouldn’t need too much. 100 ml of water to 90ml of paint is about right. It doesn’t have to be too exact.
Do you mean 10ml of water ( not 100) ?1 -
bjorn_toby_wilde said:Hi
1. You’re only mist coating the bare areas so you shouldn’t need too much. 100 ml of water to 90ml of paint is about right. It doesn’t have to be too exact.
2. Cutting in is exactly as you describe. You can’t roll right to the edges or corners so you do those first with a brush. I’m sure there will be videos on YouTube showing how to hold and angle the brush to get a neat edge. It’s kinda hard to describe!
Paint the ceiling first. Opinion varies on whether you do the woodwork second or third. Personally I do the woodwork second then the walls.
3. The ready mixed will cover both if you don’t want to go to too much expense. The fine surface can only be used for 1mm or so depth so it’s really only for feathering the edges of the peeled paint.
4. A bit of Peelstop won’t hurt there but really that just needs filling, sanding then painting over.
5. No, that doesn’t look structural. It looks like a trim has been used when the door was fitted then there’s a bit of movement in the door frame every time the door is shut. Eventually the trim develops a crack down the side. A flexible caulk ought to work there. No Nonsense do an anti crack acrylic, and you’ll need a skeleton gun to apply it. Again there are videos which will show how to use caulk. YouTube is your friend 😁
Again thank you , is the no nonsense crack acrylic similar to the toupret flex fill as mentioned above?
Also say I got the no nonsense one you mention do I still use PVA first and then the no nonsense one then go over with normal filler? Or is the no nonsense one different so that I only fill with that?0 -
Oops. Sorry, yes I do. Slip of the typing finger.Albermarle said:1. You’re only mist coating the bare areas so you shouldn’t need too much. 100 ml of water to 90ml of paint is about right. It doesn’t have to be too exact.
Do you mean 10ml of water ( not 100) ?0 -
Yes, the no nonsense is very similar to the Toupret. PVA seals dusty surfaces before the filler. It’s belt and braces so good advice. Take great care not to get any PVA on the paintwork though as danrv says. Paint doesn’t stick well to it.HugoandHudsonsmum said:bjorn_toby_wilde said:Hi
1. You’re only mist coating the bare areas so you shouldn’t need too much. 100 ml of water to 90ml of paint is about right. It doesn’t have to be too exact.
2. Cutting in is exactly as you describe. You can’t roll right to the edges or corners so you do those first with a brush. I’m sure there will be videos on YouTube showing how to hold and angle the brush to get a neat edge. It’s kinda hard to describe!
Paint the ceiling first. Opinion varies on whether you do the woodwork second or third. Personally I do the woodwork second then the walls.
3. The ready mixed will cover both if you don’t want to go to too much expense. The fine surface can only be used for 1mm or so depth so it’s really only for feathering the edges of the peeled paint.
4. A bit of Peelstop won’t hurt there but really that just needs filling, sanding then painting over.
5. No, that doesn’t look structural. It looks like a trim has been used when the door was fitted then there’s a bit of movement in the door frame every time the door is shut. Eventually the trim develops a crack down the side. A flexible caulk ought to work there. No Nonsense do an anti crack acrylic, and you’ll need a skeleton gun to apply it. Again there are videos which will show how to use caulk. YouTube is your friend 😁
Again thank you , is the no nonsense crack acrylic similar to the toupret flex fill as mentioned above?
Also say I got the no nonsense one you mention do I still use PVA first and then the no nonsense one then go over with normal filler? Or is the no nonsense one different so that I only fill with that?0 -
Also forgot to ask I'm at the house now and just saw this on one of the window walls for the kitchen it's only one little corner but I think it's gone through to brick so I just put filler here or like the sealant for the door then filler?
And final question so I don't mist coat the entire walls just the areas that are peeling or bare so any areas that still have the old magnolia paint on I can just do two coats of the clean Extreme?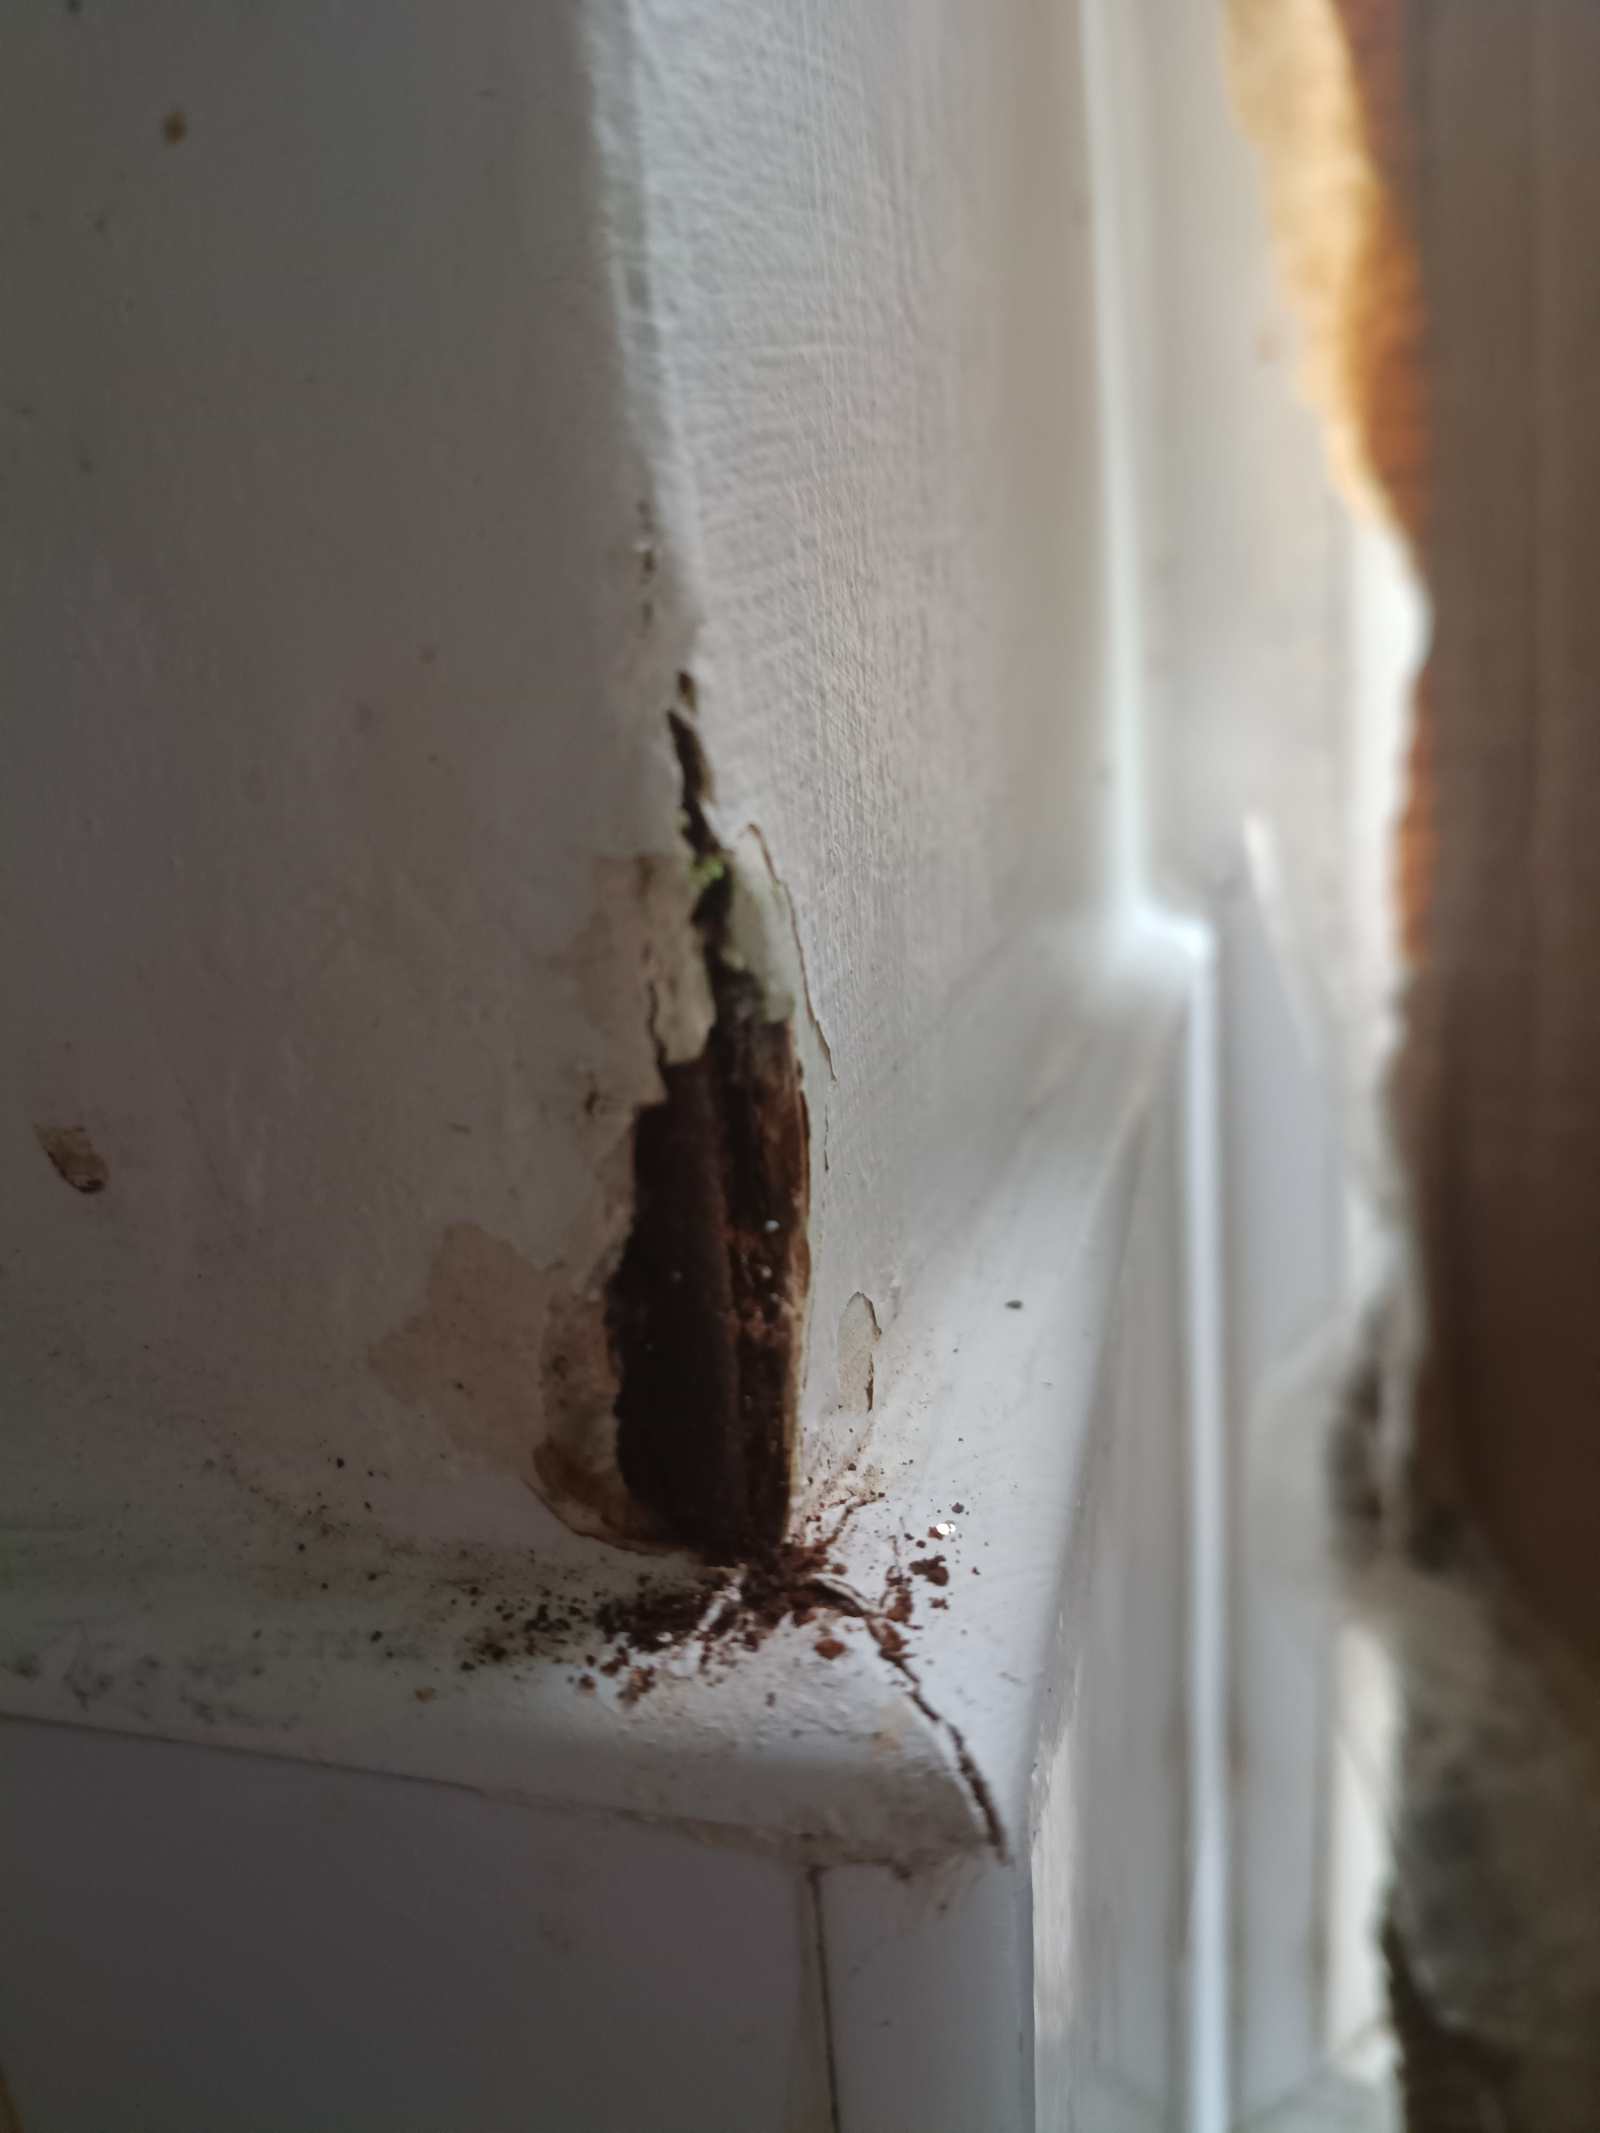 0
0


Confirm your email address to Create Threads and Reply

Categories
- All Categories
- 354K Banking & Borrowing
- 254.3K Reduce Debt & Boost Income
- 455.3K Spending & Discounts
- 247.1K Work, Benefits & Business
- 603.7K Mortgages, Homes & Bills
- 178.3K Life & Family
- 261.2K Travel & Transport
- 1.5M Hobbies & Leisure
- 16.1K Discuss & Feedback
- 37.7K Read-Only Boards