We’d like to remind Forumites to please avoid political debate on the Forum.
This is to keep it a safe and useful space for MoneySaving discussions. Threads that are – or become – political in nature may be removed in line with the Forum’s rules. Thank you for your understanding.
DIY Stable Renovation: Need Your Advice and Ideas!
Comments
-
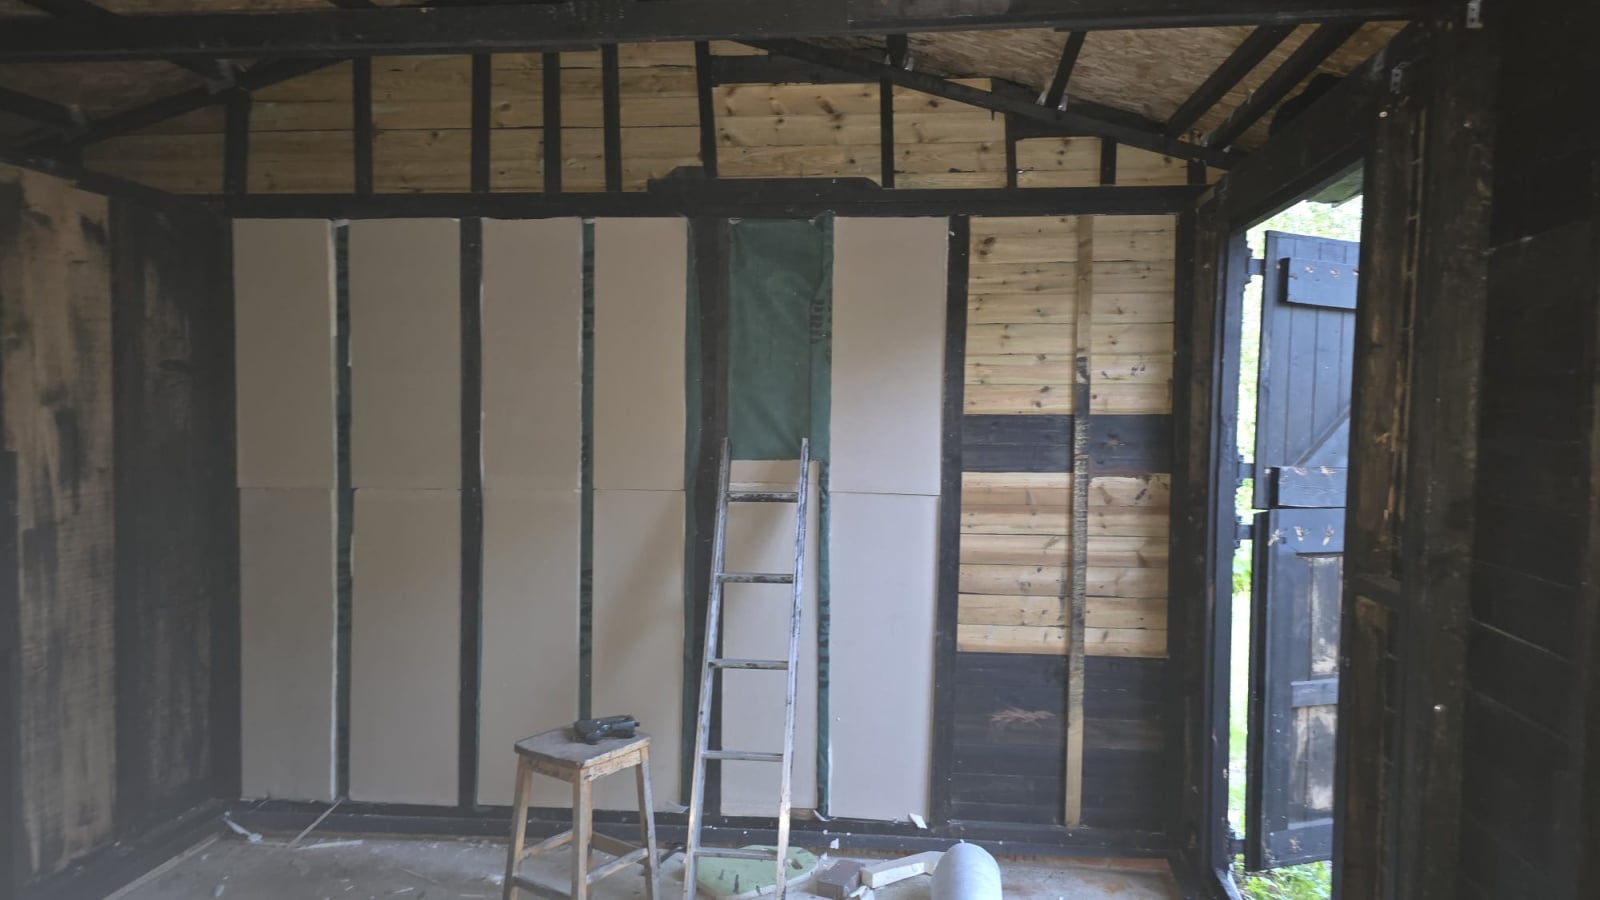
Made some more progress on the thermal insulation side work. I’ve got enough 50mm Celotex PIR insulation boards and have started cutting them to size to fit between the slats. Since the gaps between the slats are not uniform, it’s making the job a bit more time-consuming, but progress is being made.
I installed one layer of
Cromar Vent 3 Projust inside the timber before fitting the cut Celotex sheets. I’m also planning to add another layer before installing the plywood.My plan is to use foil tape around all the edges to improve the thermal seal and reduce any air gaps.
- Current Layer Build-Up (from outside to inside):
- (1) External timber cladding
- (2) Cromar Vent 3 Pro breathable membrane
- (3) 50 mm Celotex PIR insulation boards fitted between the framing/slats
- (4) Foil tape sealing around the insulation edges
- (5) Second layer of Cromar Vent 3 Pro (planned)
- (6) Plywood internal lining
- (7) Plywood ceiling and layer of loft insulation
Expanding form not used as I may have to readjust some of these boards for wiring.
Any other suggestions or recommendations before I close everything up? See photos attached.
 0
0 -
How deep are the vertical timber studs? And how thick the celotex? Ie, is there an air gap betwixt them?
I just don't know if there's an issue with not having a ventilated gap there.
And not sure if another layer of membrane is needed this side of the celotex - not sure what purpose it'll serve. But, tbh, I don't know the correct sequence one should follow here.
0 -
Current Layer Build-Up (from outside to inside):
(1) External timber cladding(2) Cromar Vent 3 Pro breathable membrane(3) 50 mm Celotex PIR insulation boards fitted between the framing/slats
(4) Foil tape sealing around the insulation edges(5) Second layer of Cromar Vent 3 Pro (planned)(4) Polythene sheet - https://www.toolstation.com/pinnacle-polythene-dust-sheet/p74553
(5) Duct tape (for the joins) - https://www.toolstation.com/heavy-duty-cloth-duct-tape/p44852
(6) WBP Plywood internal lining
Using one layer of Cromar Vent 3 Pro in this situation is a waste of money. Using two layers would be bonkers. It serves zero purpose.
If the studs are deeper than the celotex is thick then use some offcuts to space the celotex away from the external timber cladding, so the inside face of the celotex is flush with studs. Cover this with polythene (easiest way to fix is stick a small 1" piece of duct tape on the polythene over a stud, then staple gun through the tape and polythene. The staple will tear through the polythene if you don't strengthen it with tape first, a 1" square of thin card works just as well)
Use duct tape to seal up the joins in the polythene, and repair any holes/rips made during fitting. The polythene forms a vapour barrier on the warm side of the insulation. It will keep any residual cold draughts outside, and stop warm moist air coming into contact with the cold timber studs and cladding. A vapour barrier is what you need, a "breathable membrane" does the exact opposite.
If you'll have an air gap because the celotex is thinner than the depth of the studs then you want the air gap to be on the cold side - (a) to give the cold wood some ventilation and (b) you don't want a cold air flow just behind the plywood lining (it defeats the purpose of using insulation).
(7) Plywood ceiling and layer of loft insulation
Make sure you put in enough noggins or battens to support the ceiling plywood - particularly around the edges of the room and joins between sheets. Preferably before you put the plywood on the walls. There would be little worse than scuffing up your new plywood walls when you need to hammer/drill into the ceiling right next to the wall.
…and have started cutting them to size to fit between the slats. Since the gaps between the slats are not uniform, it’s making the job a bit more time-consuming, but progress is being made.
This is why you laid whole sheets of celotex for the roof on top of the OSB, rather than trying to cut it to fit between the rafters/purlins. And then try to keep it in place. 🙂
2 -
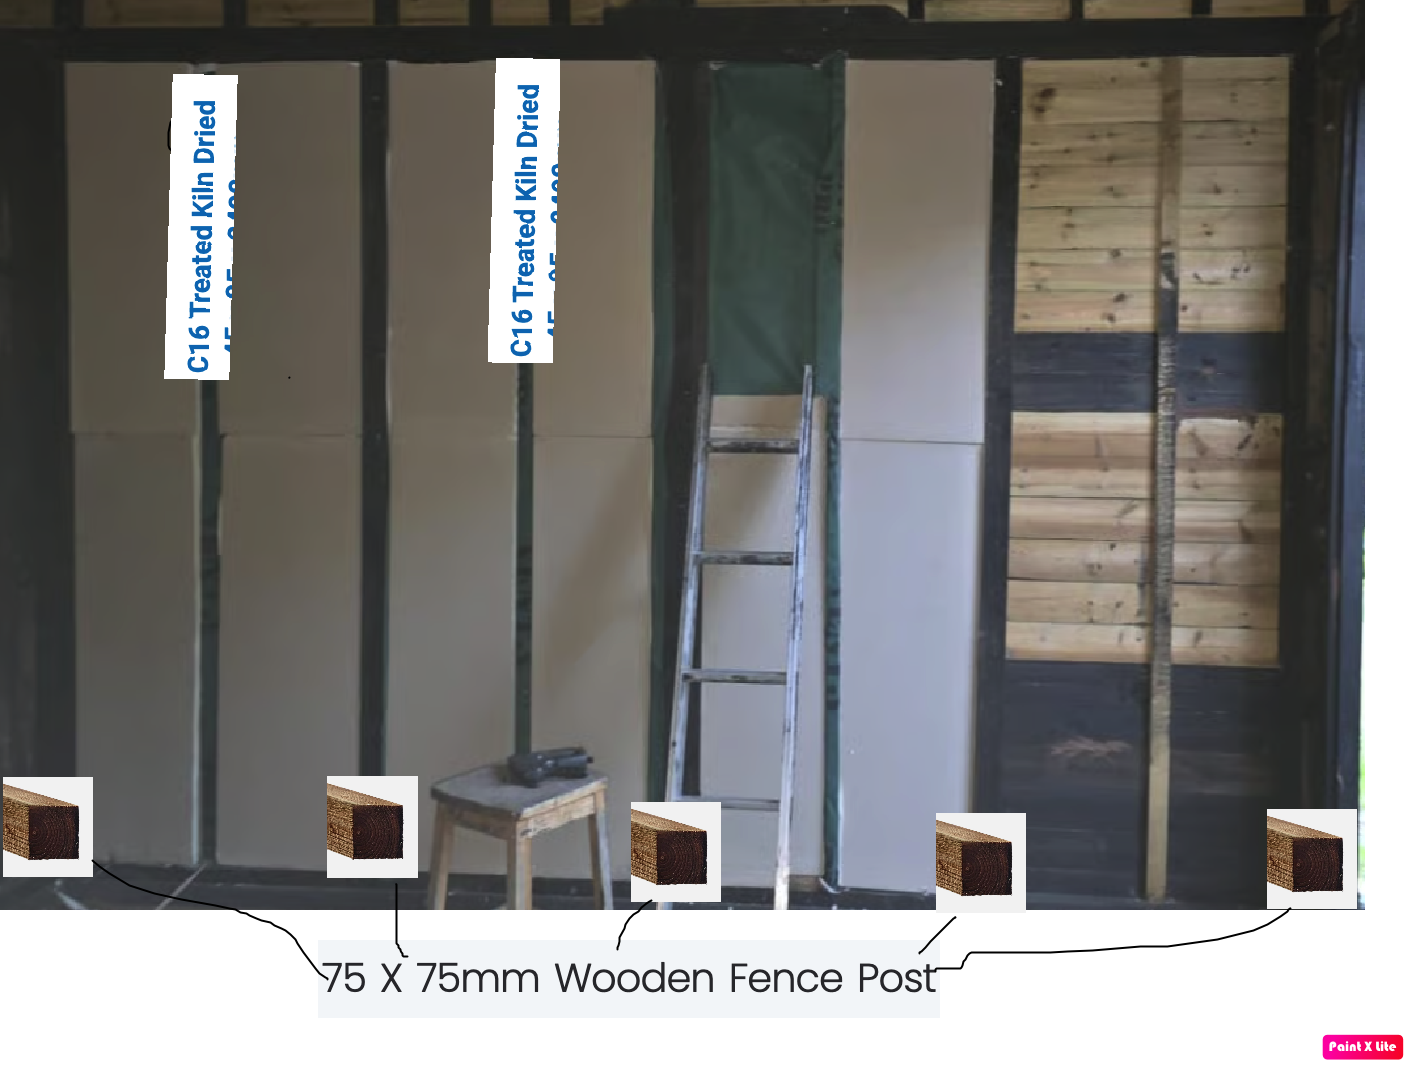
Mistake I did is for this side didn't had enough C16 , so tried use timber with half width in couple of places
50 mm Celotex PIR1 -
thanks for this…I will add these 2 layers and exclude Comar layer.
(4) Polythene sheet - https://www.toolstation.com/pinnacle-polythene-dust-sheet/p74553(5) Duct tape (for the joins) -appreciate all inputs.
1 -
So the story so far on this project started Oct 2024….
Roof (from external to internal): (all Done)
- Corrugated metal roofing sheets box shaped
- Polythene layer
- 30 mm Celotex insulation board (foil on both sides, with all joints taped)
- 11 mm OSB3 sheets
- Foam Eaves filler
Walls (from external to internal): (In Progress)
- Timber cladding
- 50 mm Celotex insulation board (non-foil)
- Polythene sheet
- Plywood lining
Floor (to be decided):
- Underfloor insulation layer (??)
- 11 mm OSB board (or plywood)
- Carpet or laminate flooring
With all of the above, I hope to create a garden office that will be comfortable to use for at least 8 months of the year, and ideally all year round (South East England)…?
The total cost of the project is now over £10,000, so I am feeling a bit anxious about it.
Any other suggestion to improve thermal efficiency appreciated.
Thanks
0 -
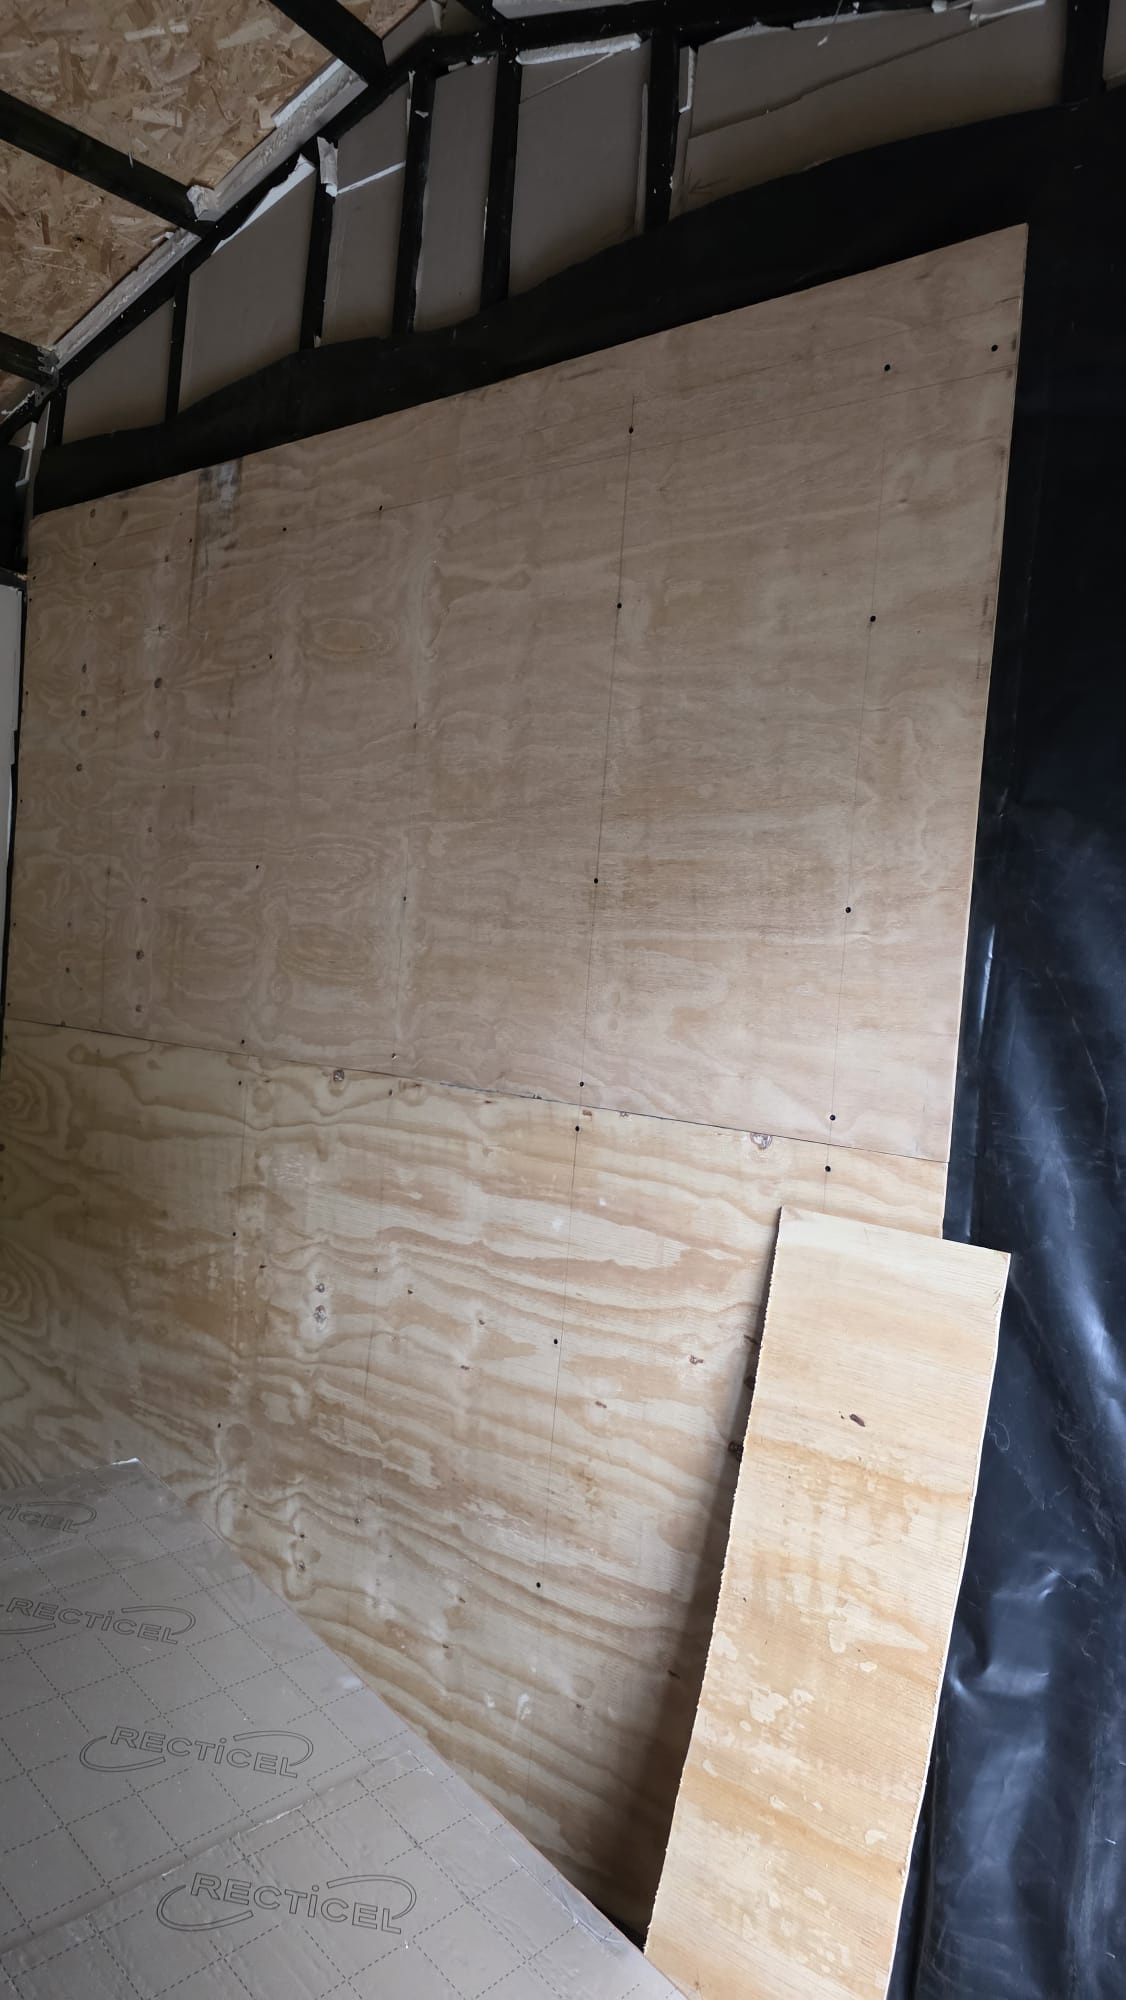
I am making slow progress on internal plywood lineing..
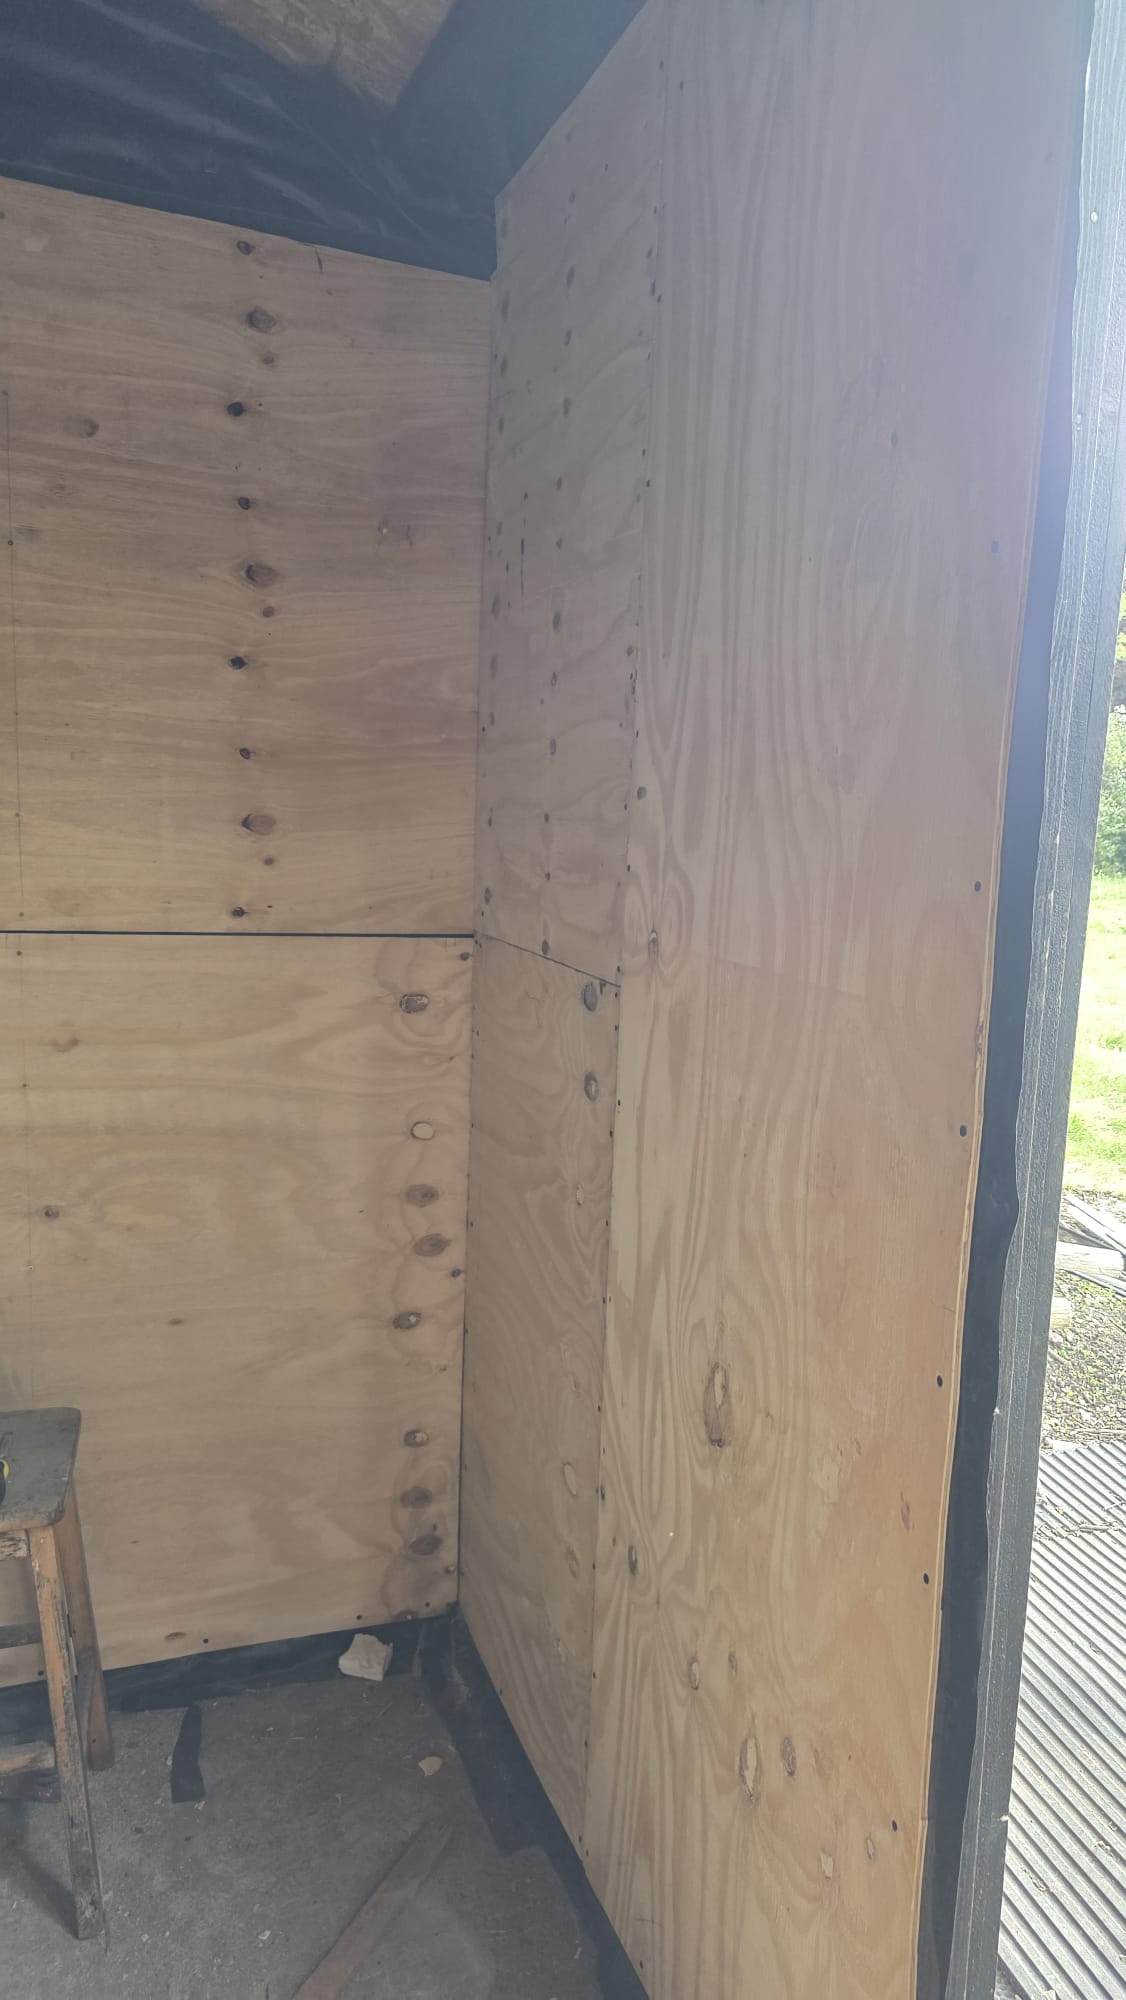
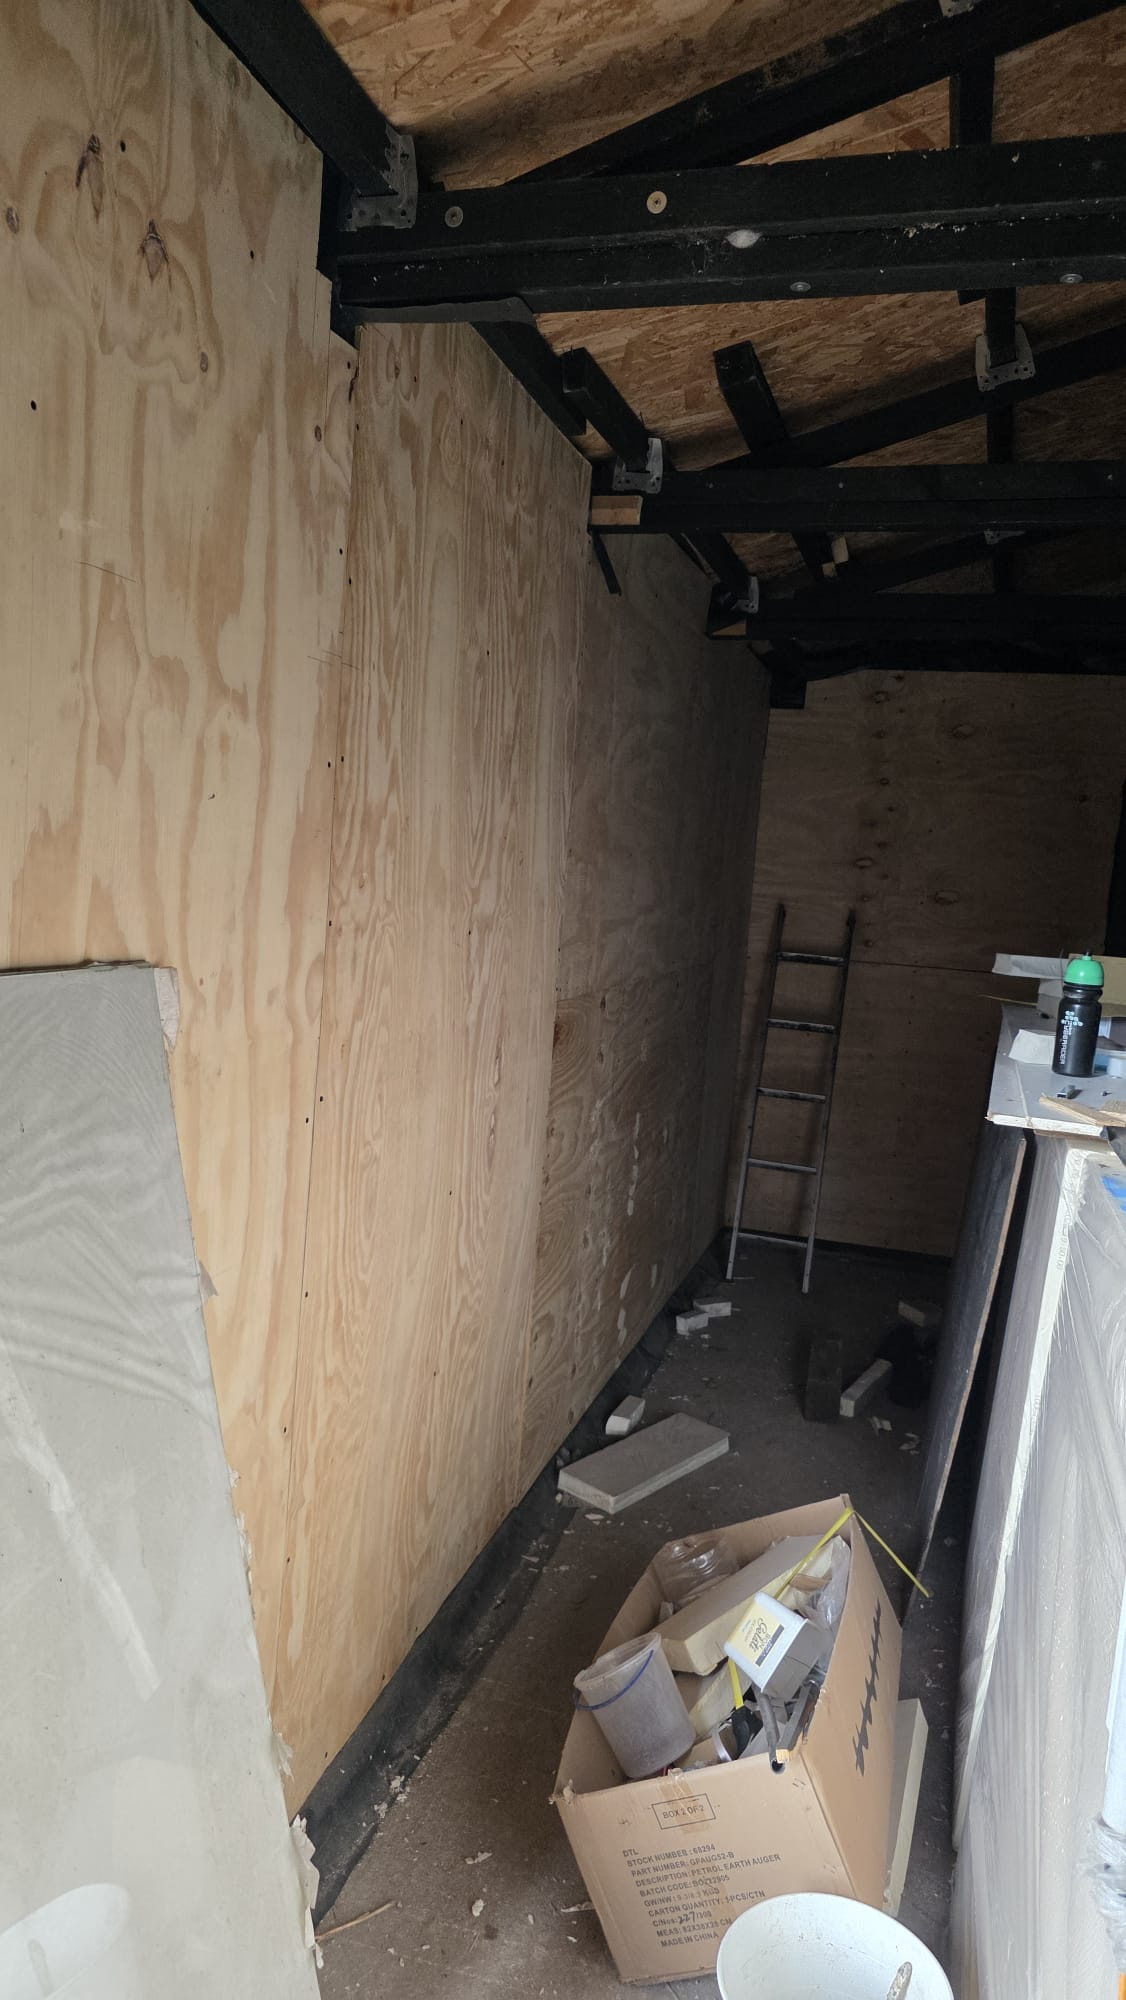
I’ve made some more progress with the internal thermal lining and plywood covering. Because I installed the timber studs without taking proper measurements, it has created a lot of extra work. In some places, the plywood joints don’t line up with the studs, leaving gaps and creating weak joints.
So far, I’ve only completed the lining in the areas where the internal wiring has not yet been installed. The ceiling is still to be done once the electrical work is finished.
Despite the uneven and unplanned stud placement, I managed to cut and adjust most of the plywood so that the joints are supported by the studs. However, in a couple of places, the top and bottom plywood sheets meet where there is no stud or horizontal timber behind the joint.
Is there a good way to strengthen these unsupported joints before applying putty and paint? I bought some self-adhesive scrim tape for the joints. Will this help provide any strength, or is it only to prevent cracks in the filler?
Any advice or suggestions would be much appreciated. Thank you.
 0
0 -
Cut strips of ply, a bit like in your last pic, say 200mm wide, and glue and screw it behind one sheet, half overlapping. Position the next sheet - glue and screw. It'll be very strong, like an unbroken sheet.
P'board screws should do, I think, with the heads going flush. Make sure the boards are nicely pushed flat against each other as you screw them so they pull tight.
1 -
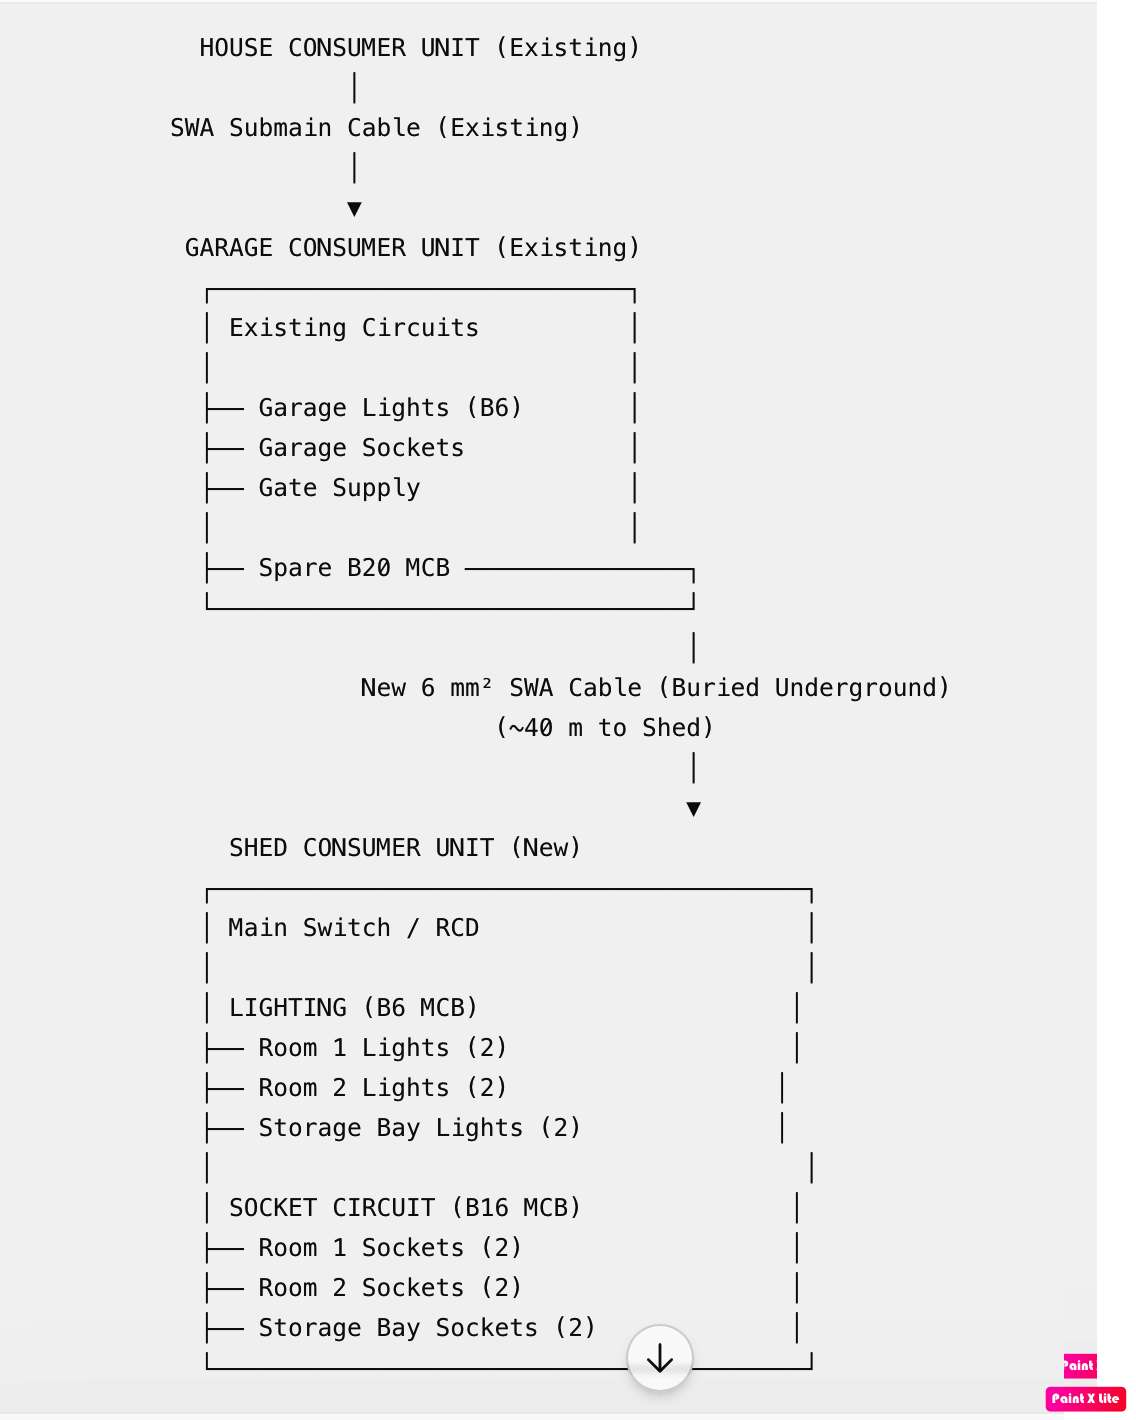
I managed to find a way forward for the electrical connections.. Any suggestions on this please…
 0
0 -
Thanks for this that is very practical and will be very effective. I will do that going forward.
I already have this issue in 3-4 places where I placed plywood boards is there any other way with out removing fixed sheets ..?
0








Confirm your email address to Create Threads and Reply

Categories
- All Categories
- 355.7K Banking & Borrowing
- 254.9K Reduce Debt & Boost Income
- 456.1K Spending & Discounts
- 248.3K Work, Benefits & Business
- 605.9K Mortgages, Homes & Bills
- 179K Life & Family
- 263.7K Travel & Transport
- 1.5M Hobbies & Leisure
- 16.2K Discuss & Feedback
- 37.7K Read-Only Boards