We’d like to remind Forumites to please avoid political debate on the Forum.
This is to keep it a safe and useful space for MoneySaving discussions. Threads that are – or become – political in nature may be removed in line with the Forum’s rules. Thank you for your understanding.
DIY Stable Renovation: Need Your Advice and Ideas!
Comments
-
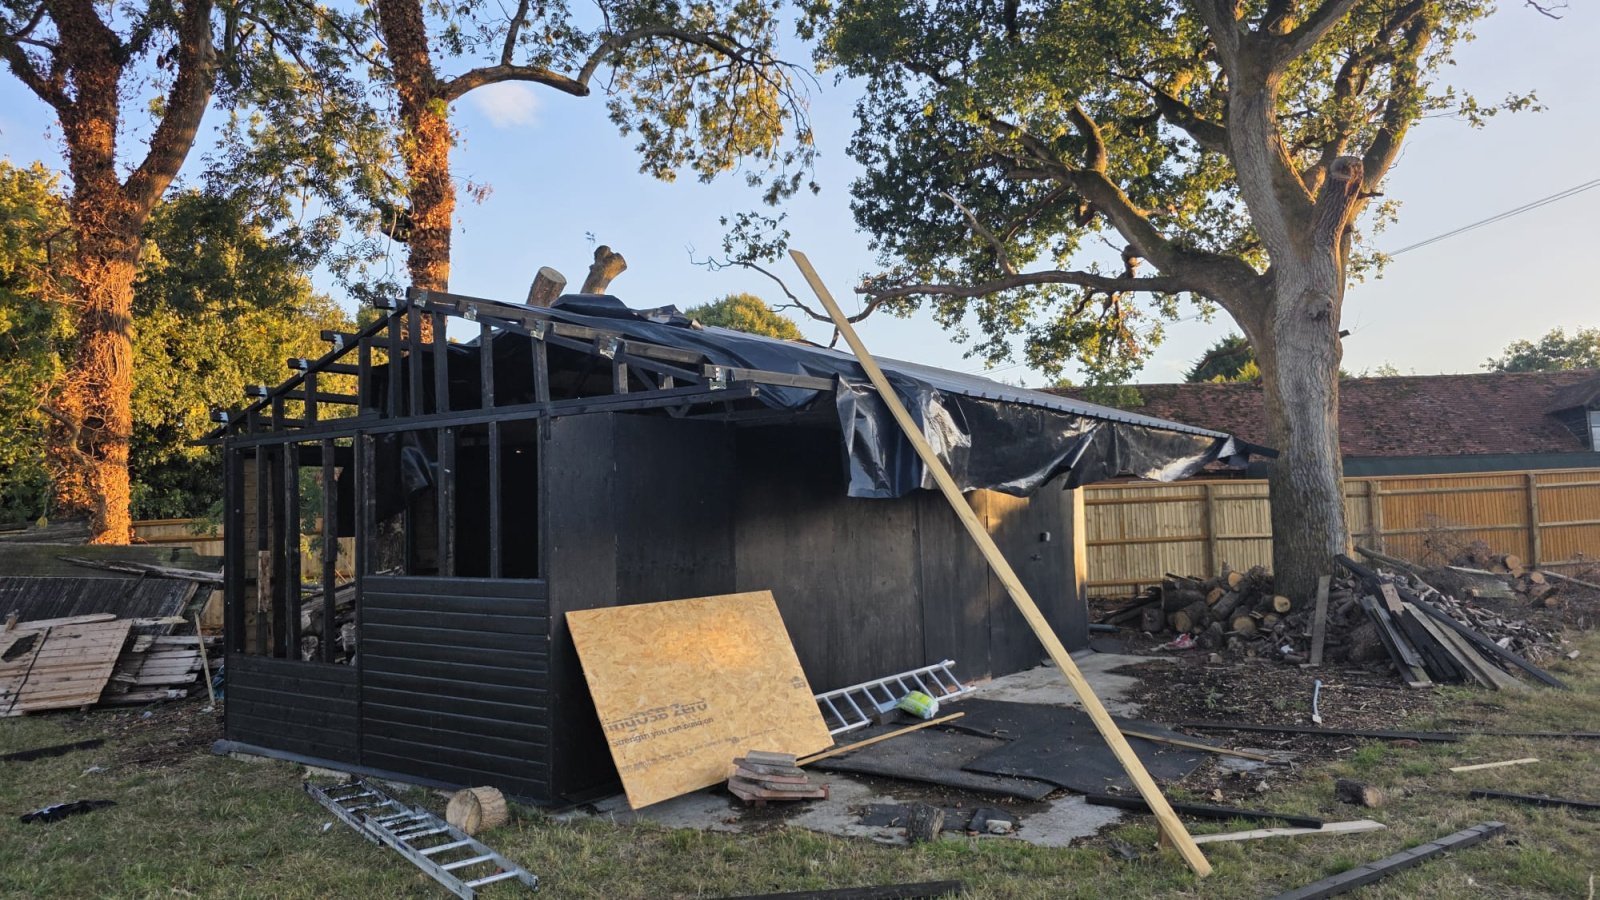
I’ve finished the front side of the stable, as shown in the picture above, and I’m now working on the back side. I’m hoping to complete the entire half by the end of next week, assuming the weather stays as good as it’s been this week.
The biggest challenge I’m facing is access to certain areas, as I don’t have any scaffolding for this job. It’s making things quite difficult. While working on the first side, the access issues were manageable because I could reach across from the opposite side. But now that the front is done and I’ve moved to the back, I’m really struggling with access. I’ve had to limit the placement of screws to areas I can reach safely.
I still have a few sections left to complete.
Does anyone have tips or suggestions for improving access without using full scaffolding? Are there any methods or tools others here have used successfully in similar situations? Any tips highly appreciated. thanks.
0 -
I totally replaced the roof on a wooden outbuilding a couple of years ago using a corrugated bituminous roofing (so not quite the same as you, but similar principle).
I used a small stand-alone scaffolding tower that I bought off of amazon, that I was able to fit inside of the building and was just tall enough for me to safely work on the ridge. I then did it one side at a time and worked from one end to the other strip by strip, putting down the osb and the roofing, strip by strip, before moving the scaffolding and doing the next strip. It meant a bit of messing around getting the corrugated bits fitted so that they overlapped correctly, but doing that way, I was just about able to reach to put all of the screws in. But if you've already fitted all of the OSB then it's a bit late for trying that.
I've not read through the whole topic, but how do you feel about climbing, layong on the roof? If you're physically able to and you trust the roof to hold your weight then that might be the easiest way and a scaffolding tower would make access a lot easier than trying to get up there from a ladder1 -
GardenBirdWatcher said: I used a small stand-alone scaffolding tower that I bought off of amazon, that I was able to fit inside of the building and was just tall enough for me to safely work on the ridge.Also invested in a scaffold tower myself a few years back. Well worth having, and it is in (almost) constant use.When shopping around, I paid a visit to a "showroom" and tested both the budget models, and the more upmarket versions. The cheapest was held together with wingnuts & bolts - Found it very wobbly and slow to assemble. Went for a slightly more expensive version that clipped together. Much more stable.Super DIY 5S - Claims to be a 5m tower, but platform height is just 3m. I might invest in an upgrade kit to take it to 7m (5m platform height) one day.
Any language construct that forces such insanity in this case should be abandoned without regrets. –
Erik Aronesty, 2014
Treasure the moments that you have. Savour them for as long as you can for they will never come back again.1 -
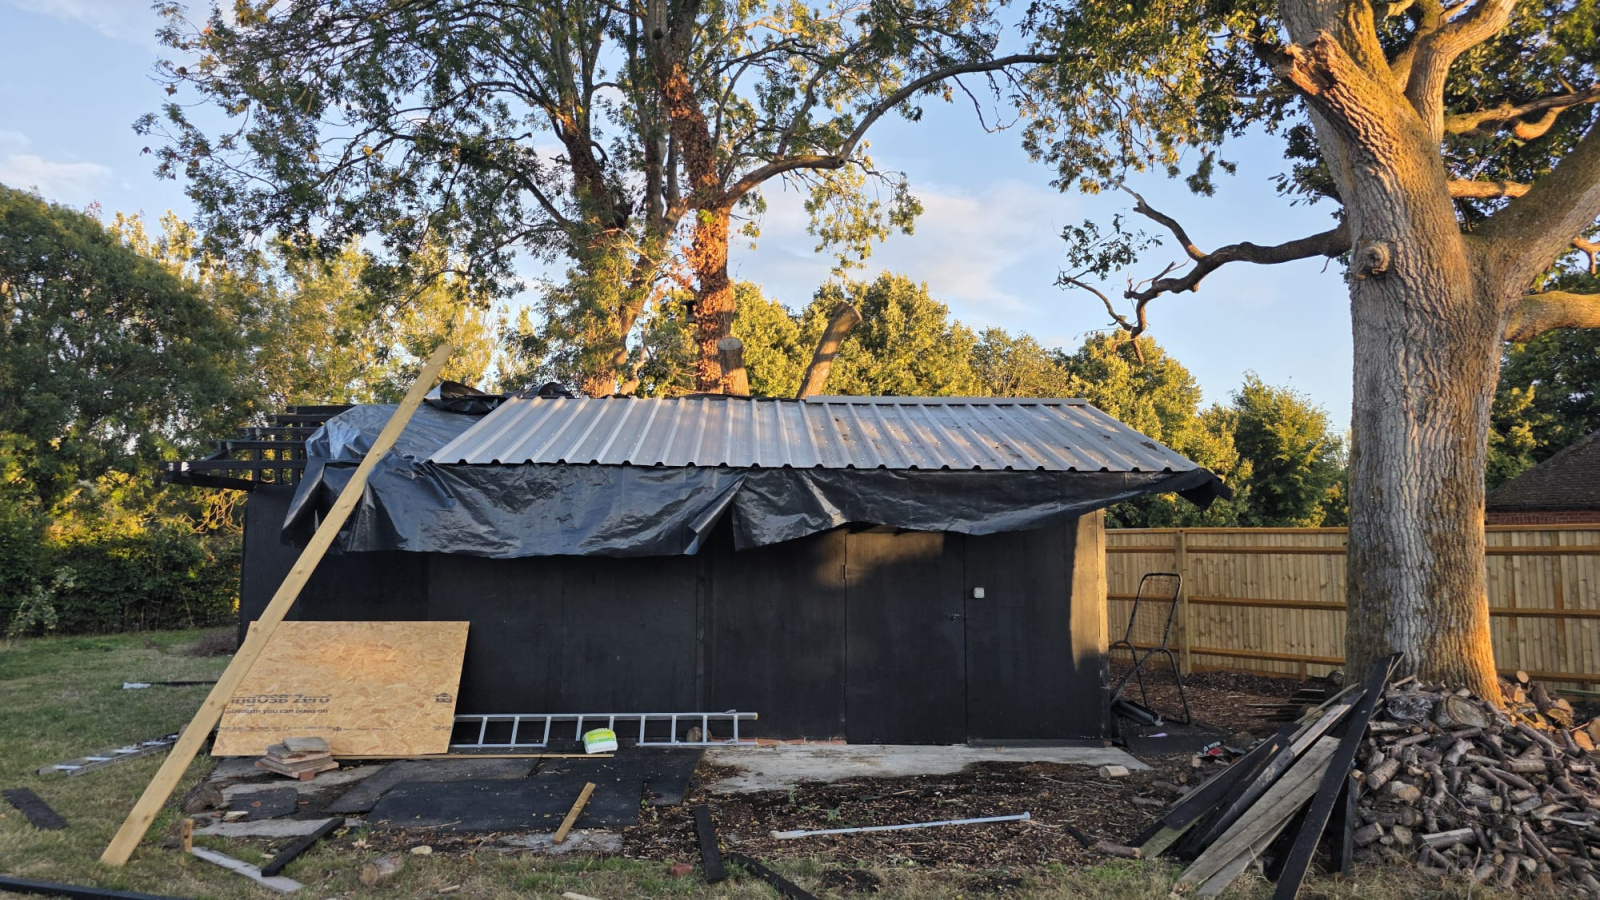
I managed to complete the first half of the stable, including the ridge. Thanks so much for the earlier input on how to improve access—it really helped! I ended up climbing over the roof, and I can confirm it's sturdy. My main concern was the slippery top, but I came up with a clever solution: I placed a wooden board across the top, supported by the structure. That prevented me from slipping down.
So far, so good. Now the real hard work begins with the second half. The good news is that I don’t have to learn anything new—I’ve already done everything once for the first half. If I apply what I learned, hopefully the second part will go more smoothly and be quicker to complete.
Fingers crossed! Thanks again for all the support—much appreciated! See some photos

 1
1 -
I was a bit distracted over the past few weeks, but progress is still steady and the roof work is now in its final stages. See the photos below. With just one more rain-free weekend, I should be able to complete Phase 1 – the basic structure and roof.
I’ve already started planning the next phases:
-
Phase 2 – Install electric connection and basic lighting (Sep/Oct)
-
Phase 3 – Extend and cover the front overhang area to use it as storage with shelving (Sep/Oct)
-
Phase 4 – Add thermal insulation and interior decoration (might be tricky during the winter months?)
Phase 5 - Add extension on one side with bitumen cover to store fire wood
-
Phase 6 – Convert the inside into a teenage pad with entertainment, games, and even a pool table
Still a long way to go before I can finally rest!
 2
2 -
-
I’d love to get your ideas and input for the upcoming phases. I have quite a few questions about electrification and interior work — especially around what materials would be best to use.
Previously, there was an electric supply to the stable. It was a fully functional stable with horses up until about 5 years ago, so I’m not sure whether it had a dedicated connection or if it was simply fed from the main house supply?. Can this be found from unit/fuse board of the house..?
When I moved in, I noticed the cable had been cut — most likely because the stable had fallen into a derelict state. I haven’t been able to trace exactly where the connection originated. I even tried using a metal detector to find the route of the old cable, but so far no luck.
The closest point to the stable is the conservatory, but I couldn’t find any connection leading from there. Another possible source is the garage, which sits at the opposite end of the stable, but again I’ve not found any evidence of a link.
I was also wondering whether I should reuse some of the old electrical fittings removed from the stable (e.g. tubes, trip switches, etc.) or whether it would be better to start fresh with new lights and fittings. I’ve attached photos of the existing connectors and lighting.
For Phase 2, my initial plan is as follows:
-
Trace the original outgoing connection from the house and re-establish it with new wiring.
-
Dig a trench about 1.5 feet deep, lay the cable in protective plastic piping, and run it to the stable.
-
Reuse as many of the old connectors and tubes as possible to complete the wiring.
-
Replace old filament bulbs with new LED lights and tubes.


 0
0 -
-
Phase 3 is to make use of the overhang area by closing it off completely with an external door and adding some internal shelving.

0 -
I finally completed the full roofing! 🎉
A massive thanks to everyone here — your advice and encouragement truly made this possible.It’s hard to believe my first post about this renovation project was exactly a year ago — October 8th last year. Looking back at those old photos, the stable was in terrible shape, and I could never have imagined reaching this point.
I’m adding some new interior and exterior photos below to show how far things have come. There’s still a lot more to do, but I’ve decided to shift priorities and move forward with Phase 3 ahead of the interior work planned for Phase 2. Work on Phase 3 has already started, and I’m gathering materials now.
Honestly, I can’t find the right words to express how grateful I am to everyone here. For someone who had never done any building work — and was even afraid of heights — completing this phase within a year feels like a huge milestone. The best part? I’m no longer worried about autumn rain! ☔
Thanks again to everyone who helped me reach this stage.
Here’s what’s next on the plan:Phase 2 – Install electric connection and basic lighting (Dec)
Phase 3 – Extend and cover the front overhang area to use it as storage with shelving (Started – Oct/Nov)
Phase 4 – Add thermal insulation and interior decoration (might be tricky during the winter months – Dec)
Phase 5 – Add an extension on one side with a bitumen cover to store firewood (Dec)
Phase 6 – Convert the inside into a teenage pad with entertainment, games, and even a pool table (2026)


 4
4 -
Looking good! Quite jealous, as this looks like quite a fun project.
1 -
I have a question about interior wall materials. Which is better for my use case: (1) Plywood, (2) Plasterboard, or (3) OSB?
I'm leaning towards using OSB, but I'm concerned about the rough surface and whether it can provide a smooth finish. Since this is for an outbuilding, I feel OSB might be the best option overall. I've already installed thermal insulation in the roof and plan to use thicker insulation in the walls as well. OSB seems more moisture-resistant, which could be an advantage in this setting.
However, I’m not sure if I can achieve a smooth, clean finish with OSB due to its rough surface and edges. In terms of cost, OSB seems the most affordable, which is another reason I'm considering it.
Plywood is likely more expensive than OSB, but I assume it gives a better finish and is easier to paint. I’m not sure, though, how well it performs with moisture.
As for plasterboard, I’m unsure how durable it would be in an outbuilding, especially with potential humidity or temperature changes. I also thought about applying decorative wallpaper, but I’m not sure if that’s possible directly on OSB. I am completely ruling out plaster board.
Given the construction details and insulation I’ve already added, could you please help me decide the best, most cost-effective option that still provides a decent finish?
keen to hear from someone did similar outhouse project which may not be completely insulated like house but better to manage except extreme winter I think. thanks
1


Confirm your email address to Create Threads and Reply

Categories
- All Categories
- 355K Banking & Borrowing
- 254.6K Reduce Debt & Boost Income
- 455.7K Spending & Discounts
- 247.8K Work, Benefits & Business
- 604.9K Mortgages, Homes & Bills
- 178.7K Life & Family
- 262.5K Travel & Transport
- 1.5M Hobbies & Leisure
- 16.1K Discuss & Feedback
- 37.7K Read-Only Boards