We’d like to remind Forumites to please avoid political debate on the Forum.
This is to keep it a safe and useful space for MoneySaving discussions. Threads that are – or become – political in nature may be removed in line with the Forum’s rules. Thank you for your understanding.
DIY Stable Renovation: Need Your Advice and Ideas!
Comments
-
I finally managed to source 22 PIR (Celotex) boards to help prevent condensation. I found the cheapest option on a site called Materials Market (https://materialsmarket.com/). Prices for Celotex or similar boards vary wildly online for the same thickness, but these guys offered the best deal including delivery, which is expected within 3–4 days.
I’ve also picked up some foil tape to join the boards together. Next, I need to source self-drilling screws (lenth TBC) suitable for fixing into metal sheets, to securely hold all three layers together (metal sheets – Celotex – OSB).
I also need to get eaves fillers. I'm considering buying large sheets of closed-cell polyethylene foam and cutting the fillers myself to make it suit well with metal sheet's pitch. Also that might work better and be more cost-effective than buying pre-made ones.
0 -
sujsuj said:
I finally managed to source 22 PIR (Celotex) boards to help prevent condensation. I found the cheapest option on a site called Materials Market (https://materialsmarket.com/). Prices for Celotex or similar boards vary wildly online for the same thickness, but these guys offered the best deal including delivery, which is expected within 3–4 days.
I’ve also picked up some foil tape to join the boards together.
 sujsuj said:Next, I need to source self-drilling screws (lenth TBC) suitable for fixing into metal sheets, to securely hold all three layers together (metal sheets – Celotex – OSB).The screws need to go into the timber purlins (the wood which goes lengthwise along the roof) not the OSB. So the length has to be enough to go through the insulation + OSB, and then a good 40mm into the purlins.They need to be suitable for fixing into wood - the type for fixing into metal won't work properly wood. They don't have to be self-drilling (you can drill holes for them) but you do need to make sure they have washers with a bonded flexible seal - EPDM or Neoprene for example.You'll also need some stitching screws which are 'metal to metal' and much shorter - you'll use those to fix the ridge and cappings.
Just buy the pre-made ones suitable for the profile you've got. You'll never be able to do a better job than the machine that cuts them by the mile. Usually the cut is made so you have a length of eaves filler and a length of ridge filler in one piece - the ridge filler is as important, if not more so, than the eaves one. At the ridge you can get snow or rain blown up the gaps between the sheet and the ridge piece.sujsuj said:I also need to get eaves fillers. I'm considering buying large sheets of closed-cell polyethylene foam and cutting the fillers myself to make it suit well with metal sheet's pitch. Also that might work better and be more cost-effective than buying pre-made ones.
1 -
Section62 said:sujsuj said:
I finally managed to source 22 PIR (Celotex) boards to help prevent condensation. I found the cheapest option on a site called Materials Market (https://materialsmarket.com/). Prices for Celotex or similar boards vary wildly online for the same thickness, but these guys offered the best deal including delivery, which is expected within 3–4 days.
I’ve also picked up some foil tape to join the boards together.
 sujsuj said:Next, I need to source self-drilling screws (lenth TBC) suitable for fixing into metal sheets, to securely hold all three layers together (metal sheets – Celotex – OSB).The screws need to go into the timber purlins (the wood which goes lengthwise along the roof) not the OSB. So the length has to be enough to go through the insulation + OSB, and then a good 40mm into the purlins.They need to be suitable for fixing into wood - the type for fixing into metal won't work properly wood. They don't have to be self-drilling (you can drill holes for them) but you do need to make sure they have washers with a bonded flexible seal - EPDM or Neoprene for example.You'll also need some stitching screws which are 'metal to metal' and much shorter - you'll use those to fix the ridge and cappings.
Just buy the pre-made ones suitable for the profile you've got. You'll never be able to do a better job than the machine that cuts them by the mile. Usually the cut is made so you have a length of eaves filler and a length of ridge filler in one piece - the ridge filler is as important, if not more so, than the eaves one. At the ridge you can get snow or rain blown up the gaps between the sheet and the ridge piece.sujsuj said:I also need to get eaves fillers. I'm considering buying large sheets of closed-cell polyethylene foam and cutting the fillers myself to make it suit well with metal sheet's pitch. Also that might work better and be more cost-effective than buying pre-made ones.Thanks very much for your detailed reply — it's much appreciated.
I’m using 11mm OSB and 25mm Celotex, so would 70–75mm screws be sufficient to fix through all the layers?
Regarding the eaves fillers, I’m a bit confused... Do we need three sets of fillers per corrugated metal sheet — one at the top, one at the bottom, and one for the ridge? My sheet is long enough to cover one side of the roof. Or do we only need two sets — one for the bottom and one for the ridge? Could you please clarify?
I'm struggling to visualise how ridge and eaves fillers differ in shape from the regular fillers. I’ll try to figure it out. Also, I’m a little confused about the smaller “stitching screws” used for fixing the ridge. Are you saying that the ridge cover is simply screwed into the raised part of the box-profile metal sheet, without touching the OSB or layers underneath?
Now that I think about it, that makes sense — you can’t always rely on having a rafter directly beneath the ridge area. So does that mean I’ll need to install more screws into the high points of the metal sheet underneath the ridge, to later attach the ridge cap securely? That’s new information for me, as I haven’t reached that stage yet.
I'll need to source both types of screws and the eaves fillers, so I’ll do some more research on that. I assume I’ll also need shorter screws for securing the edge trims, as these won’t need to go through as many layers. so may be 3 types of screws needed?
One other area I’m still a bit confused about is the layering — sorry to bring this up again. A previous suggestion on the forum outlined the following:
-
Outermost box-profile corrugated metal sheets (Yes, sourced)
-
Polythene membrane (damp-proof sheet) - Not sourced yet
-
25mm Celotex (Yes, sourced)
-
OSB3 board (Yes, sourced)
However, I’ve seen mixed advice online about using a polythene damp-proof membrane versus a breathable membrane like Cromar (already have). Which would be more appropriate in this case?Please note that I don't plan to leave any air gaps between layers (no battens), and the eaves fillers will likely block air circulation as well.
Thanks again for all the help — it’s really valuable!
0 -
-
As above, depends on the thickness of the purlin - but if you use 50mm then 70 or 75mm screws would be Ok.sujsuj said:
I’m using 11mm OSB and 25mm Celotex, so would 70–75mm screws be sufficient to fix through all the layers?
Two. At the bottom the filler closes the holes you'd otherwise get where the 'ridges' (the raised part) are on each sheet. At the top you don't use filler under the steel sheets as the holes allow ventillation into the (roof) ridge space. Here the filler goes on top of the steel sheet but underneath the ridge piece. This stops snow and leaves etc being blown into the holes.sujsuj said:
Regarding the eaves fillers, I’m a bit confused... Do we need three sets of fillers per corrugated metal sheet — one at the top, one at the bottom, and one for the ridge? My sheet is long enough to cover one side of the roof. Or do we only need two sets — one for the bottom and one for the ridge? Could you please clarify?sujsuj said:I'm struggling to visualise how ridge and eaves fillers differ in shape from the regular fillers. I’ll try to figure it out.The fillers have to match the sheet profile you've chosen. They are a mirror image because one part goes below the sheet, the other will go above the sheet. From memory I think yours is something like the middle one of these three - sujsuj said:Also, I’m a little confused about the smaller “stitching screws” used for fixing the ridge. Are you saying that the ridge cover is simply screwed into the raised part of the box-profile metal sheet, without touching the OSB or layers underneath?
Now that I think about it, that makes sense — you can’t always rely on having a rafter directly beneath the ridge area. So does that mean I’ll need to install more screws into the high points of the metal sheet underneath the ridge, to later attach the ridge cap securely? That’s new information for me, as I haven’t reached that stage yet.
Stitching screws (the short ones) are used to fix metal sheeting to metal sheeting - so for both the ridge and the end capping. So yes, 'the ridge cover is simply screwed into the raised part of the box-profile metal sheet, without touching the OSB or layers underneath'.The reason for this is that you fix these sheets to the purlins using screws through the 'valley' of the sheet, if you put fixing in the ridges (the raised part) then they won't tighten enough to form a seal without the steel deforming (and probably leaking). So you don't screw through the ridge piece into the OSB/purlins because that would deform the steel.You need to fix the top end of the steel sheet as close to the top as possible - so you'll have a purlin at the top on both sides of the shed. In fact you want to do this top fixing first (in the middle of the sheet width wise) - and only this one fixing per sheet - because once you've put all the sheets on one side of the shed (using only one fixing at the top of each sheet) you then move on to fixing the bottoms, starting at each end. Because you only have one fixing in the middle at the top it allows you to rotate each sheet around that 'pivot' so the ridges of adjacent sheets will take up their natural position without being deformed.sujsuj said:I'll need to source both types of screws and the eaves fillers, so I’ll do some more research on that. I assume I’ll also need shorter screws for securing the edge trims, as these won’t need to go through as many layers. so may be 3 types of screws needed?Two types.1) The main fixings (going through all the layers into the purlins)2) Stitching screws to fit metal sheet to metal sheet. (You may need to use some of these to fix adjacent sheets together if they won't sit flat)sujsuj said:One other area I’m still a bit confused about is the layering — sorry to bring this up again. A previous suggestion on the forum outlined the following:-
Outermost box-profile corrugated metal sheets (Yes, sourced)
-
Polythene membrane (damp-proof sheet) - Not sourced yet
-
25mm Celotex (Yes, sourced)
-
OSB3 board (Yes, sourced)
However, I’ve seen mixed advice online about using a polythene damp-proof membrane versus a breathable membrane like Cromar (already have). Which would be more appropriate in this case?Please note that I don't plan to leave any air gaps between layers (no battens), and the eaves fillers will likely block air circulation as well.
I think we've gone over this a few times already. The 'mixed advice' is wrong advice. The foil of the celotex (when you've taped the joints) will act as a vapour barrier, so there is zero point in laying an (expensive) breathable membrane over the top of it. There won't be anything for the membrane to allow to breathe as the taped foil is impermeable.Strictly the polythene isn't necessary if you've taped the joints - but as polythene is cheap it is worth doing because it (a) keeps the celotex foil and tape dry and (b) stops leaks if the taping isn't perfect.1 -
-
For clarity -
 The red line is where the steel sheeting sits. The orange line is where the ridge piece will be. Top/Bottom refers to which end of the steel sheet each goes.1
 -
Thanks very much @Section62 + All
I realised I still need to source quite a bit of items. Some item I am still not clear. any help much appreciated.
1. Eva fillers (pairs) - need to see measurements of sheet to which box profile it is..?
2. 3 types of roofing screws
A. 80mm screws from sheet to purins (https://www.screwfix.com/p/easydrive-flange-self-drilling-roofing-screws-6-3mm-x-80mm-100-pack/5672p)
B. 25mm Stiching screws for ridge to sheet (https://www.screwfix.com/p/easydrive-flange-self-drilling-stitching-screws-with-washers-6-3mm-x-25mm-100-pack/4259h)
C. 25mm Screws for side flashing (https://www.screwfix.com/p/easydrive-flange-self-drilling-roofing-screws-6-3mm-x-25mm-100-pack/9353p )
these are the right items..?
3. PIR panels pins - seen 30mm pins that need to be glued to OSB, but worried this will protude through the corrugated metal sheet. What other options we have?
4. Damp proof membrane - sourced from AMZ0 -
managed to get PIR boards — they’re not Celotex branded, but Recticel. From what I can see, they seem just as good as the other brands. Nearly everything is ready now for the long weekend. Just need the weather to play along too — fingers crossed! Thanks.
0 -
sujsuj said:managed to get PIR boards — they’re not Celotex branded, but Recticel. From what I can see, they seem just as good as the other brands. Nearly everything is ready now for the long weekend. Just need the weather to play along too — fingers crossed! Thanks.You'll find several different brands of PUR/PIR boards. Apart from the printing, they are all the same, so just pick the one that suits your budget.Easter weekend - It is going to rain. It always does.
Any language construct that forces such insanity in this case should be abandoned without regrets. –
Erik Aronesty, 2014
Treasure the moments that you have. Savour them for as long as you can for they will never come back again.1 -
Hoping for the best this weekend as I plan to put up the first set of corrugated metal sheets, weather permitting! I’ve watched plenty of videos on this process, but I have a few questions. Any input would be highly appreciated.
-
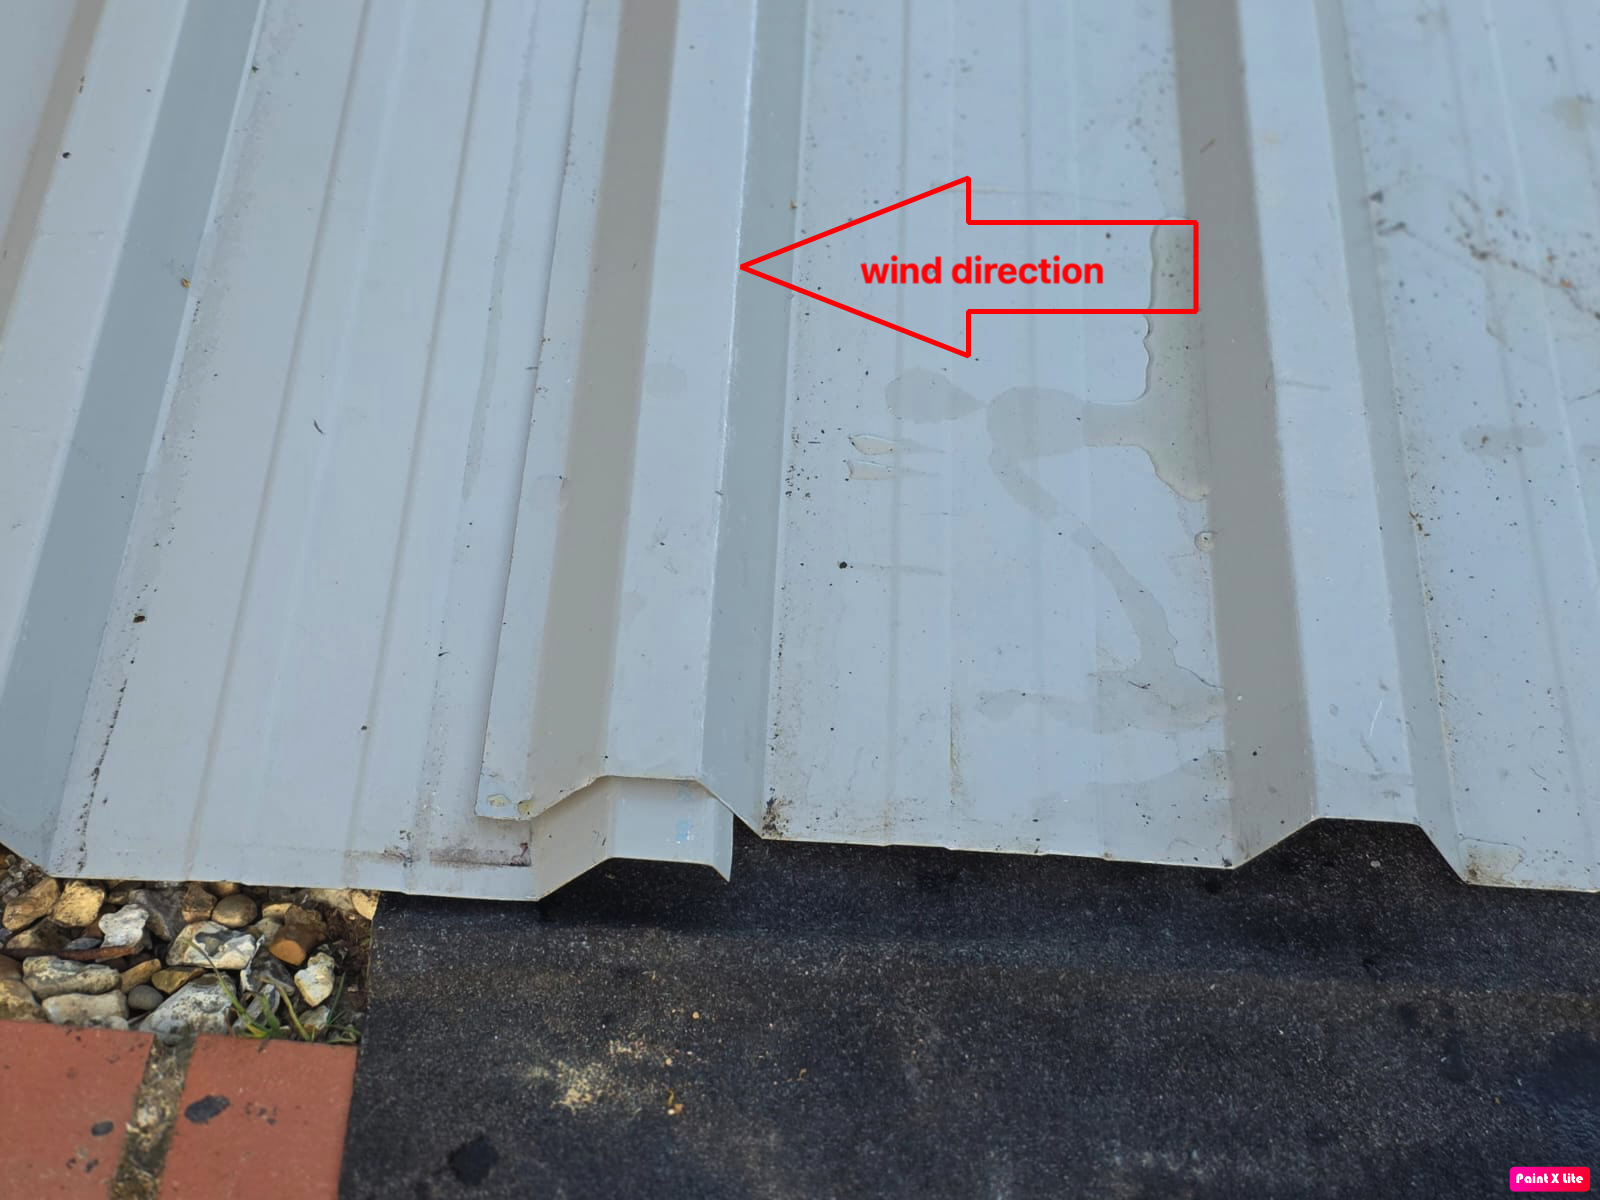
Wind direction & sheet overlapping: Based on the wind direction, should adjacent sheets be placed one over the other as shown in the image? (Wind direction is indicated in the photo.)
-
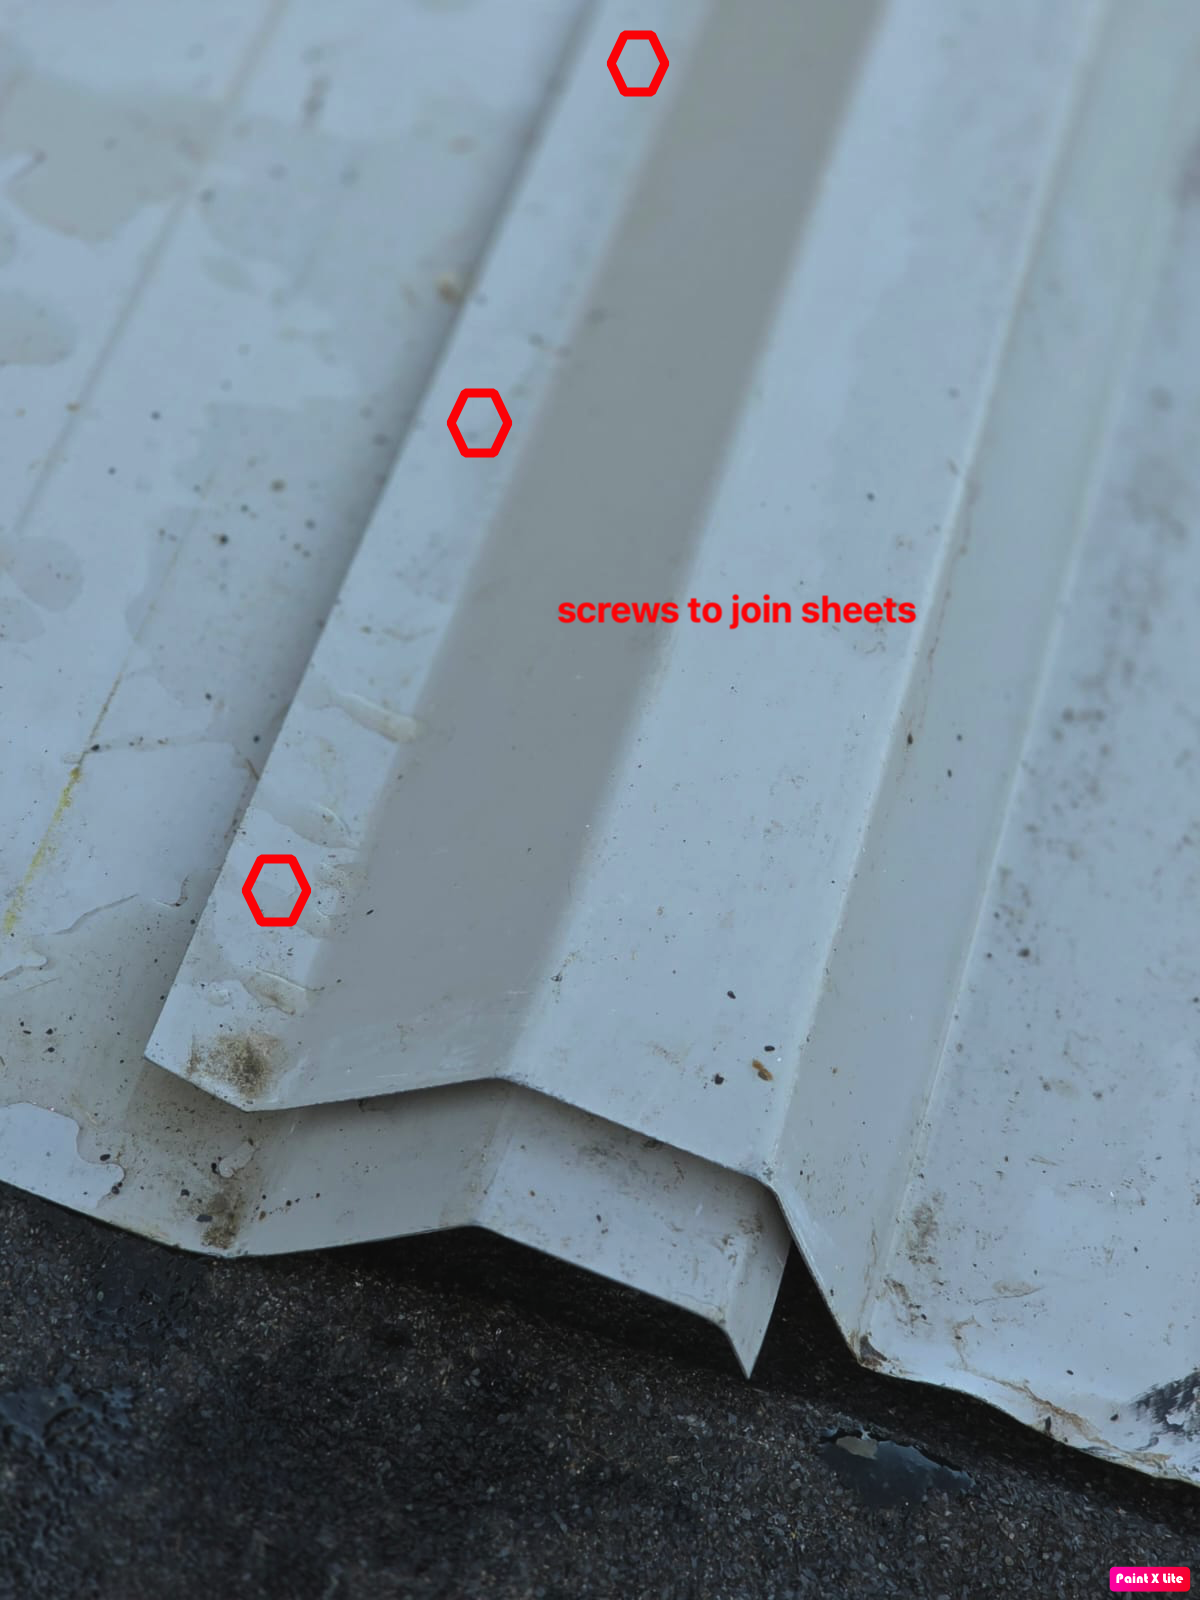
Screws on overlapping sheets: I understand that screws are used at regular intervals to join two sheets. What’s the ideal interval for placing these screws? Should I place them at every purlin or every alternate purlin?
-
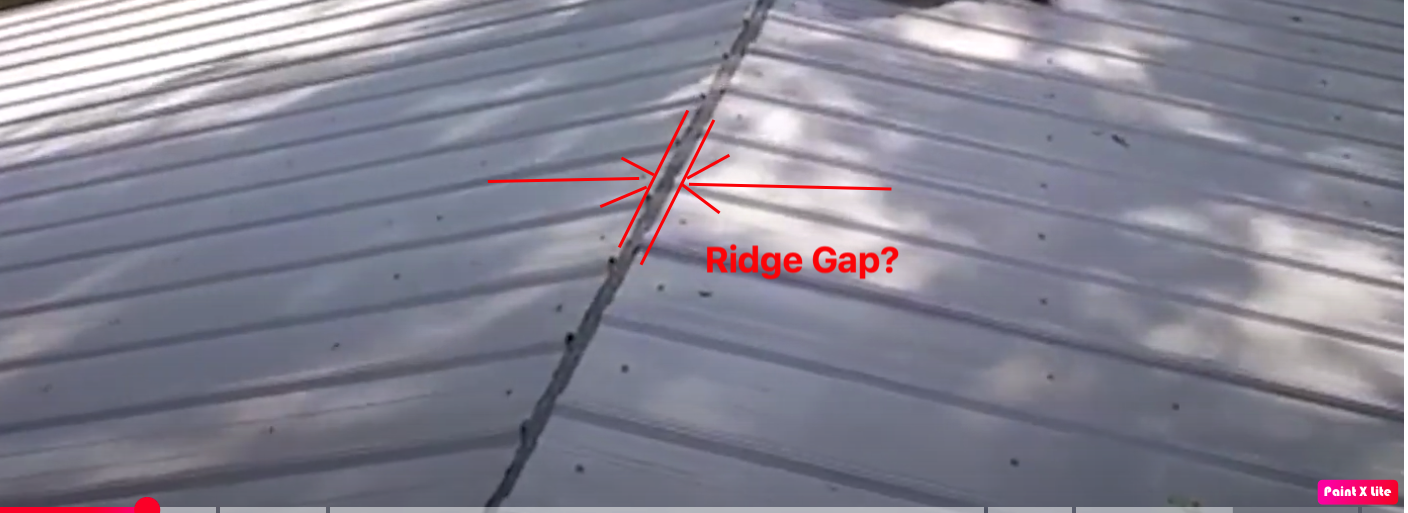
Ridge gap: Is a ridge gap necessary between two sheets? I’m considering keeping it minimal to avoid leakage after installing the ridge flashing. Does this sound like a good approach?
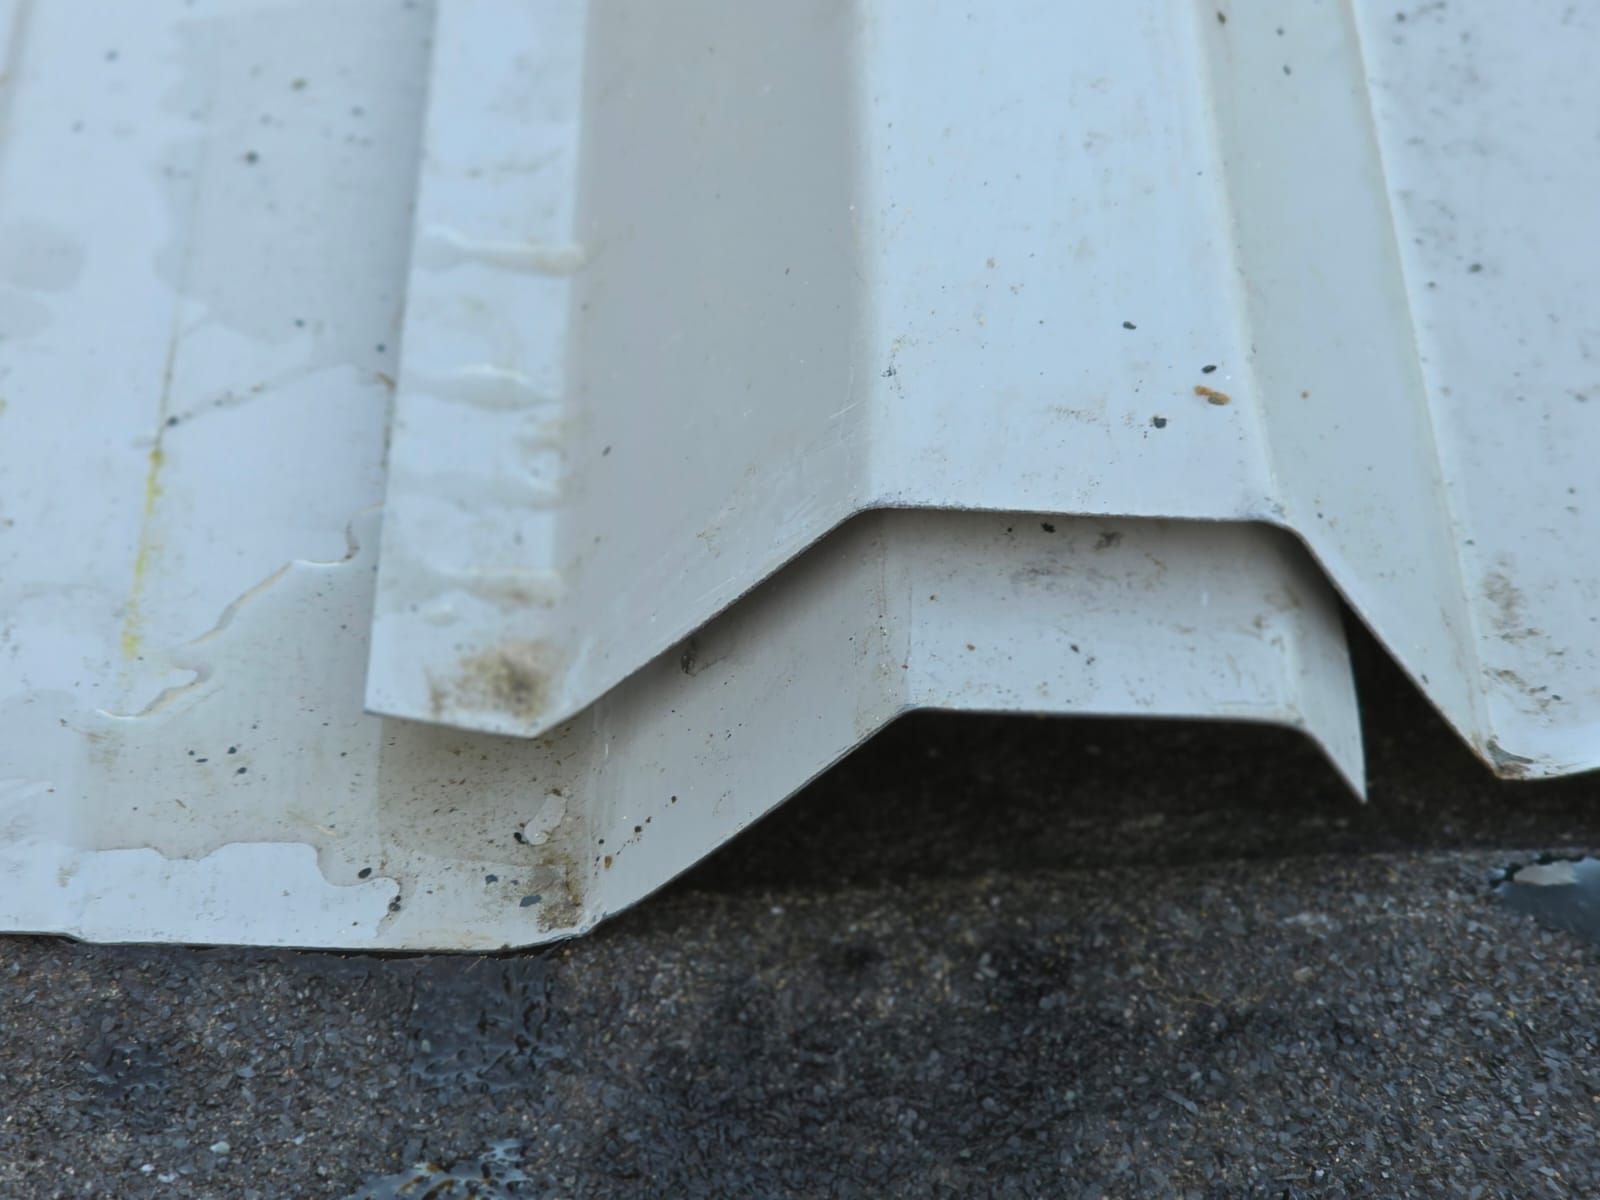
See the attached photos for reference. Thanks so much!


 0
0 -
-
1 Unless you live in a very exposed area (and from previous pictures you don't appear to) then the direction of overlap doesn't matter in terms of wind. If the sheet edges fit snugly** then you shouldn't have a problem with either wind or rain.sujsuj said:Hoping for the best this weekend as I plan to put up the first set of corrugated metal sheets, weather permitting! I’ve watched plenty of videos on this process, but I have a few questions. Any input would be highly appreciated.
-
Wind direction & sheet overlapping: Based on the wind direction, should adjacent sheets be placed one over the other as shown in the image? (Wind direction is indicated in the photo.)
-
Screws on overlapping sheets: I understand that screws are used at regular intervals to join two sheets. What’s the ideal interval for placing these screws? Should I place them at every purlin or every alternate purlin?
-
Ridge gap: Is a ridge gap necessary between two sheets? I’m considering keeping it minimal to avoid leakage after installing the ridge flashing. Does this sound like a good approach?
See the attached photos for reference. Thanks so much!
The sheets should overlap the opposite way to what is shown in your pictures - so the exposed sheet edge is high up rather than sitting in the trough where it can get wet and start rusting.It also means that stitching screws (if needed) will be in a ridge rather than a trough. Remember what I said in a previous post about fixings being in troughs, stitchings being in ridges. The suggested stitching screw positions in your photo are the opposite of that.2 You won't need to screw (stitch) overlapping sheets unless you are doing it wrong. If you get the sheet edges to fit snugly** then you won't need to stitch them as you have a small roof with closely spaced purlins. Edge stitching is only really necessary on larger buildings where the purlins are spaced much wider - were're talking warehouses where the purlin spacings could be wider than your shed is wide.You might think that putting edge stitching in would be a good idea anyway, just for luck. It isn't. Each hole you make in the sheets is a potential site for leaks and corrosion. Keep the number of screw holes to the minimum compatible with holding the sheets on the roof.If you've done it wrong and the sheet edges don't fit snugly** then edge stitching screws can be used to force the overlap to fit, but this is bad practice.3 Yes, keep the gap to the minimum you can.However - the ridge is where you can hide (and protect from rain) any problems with sheet ends - for example if one end of the sheet is bent or the plastic is already delaminating then put this end at the ridge where the ridge piece will cover it. The ridge can also be used to hide any differences in sheet lengths.So the first job is to go through all the sheets one by one to inspect for damaged ends. Usually one end of the sheet will be a 'cut' edge where the sheet was cut to length, treat those as damaged ends and have them at the ridge end if possible. Lay the sheets out on flat ground (ideally held off the ground with some lengths of wood) arranged as they will go on the roof so you won't forget which end is which. You may have too many damaged ends for all of them to be used at the ridge end, so decide now which ends are the least damaged to go at the bottom. It is much easier to do this on the ground than when you've got the sheet up on the roof.Make sure the underside of the sheet is dry before you fix it on the roof. This is why laying them on lengths of wood on the ground is preferable as the air gap helps with drying.**Remember, there is a technique to getting the sheet edges to naturally fit snugly without needing to force them together with stitching screws. I described it fully in a previous post, but it involves initially fixing the sheets with only one screw at the top centre until one side of the roof is done, and then rotating each individual sheet around that point to even out any misalignment between sheets. As soon as you have two screws in one sheet it is impossible to rotate them, and you'll have no option but to use force if they are misaligned.1 -
Confirm your email address to Create Threads and Reply

Categories
- All Categories
- 352.9K Banking & Borrowing
- 253.9K Reduce Debt & Boost Income
- 454.7K Spending & Discounts
- 246K Work, Benefits & Business
- 602.1K Mortgages, Homes & Bills
- 177.8K Life & Family
- 259.9K Travel & Transport
- 1.5M Hobbies & Leisure
- 16K Discuss & Feedback
- 37.7K Read-Only Boards


