We’d like to remind Forumites to please avoid political debate on the Forum.
This is to keep it a safe and useful space for MoneySaving discussions. Threads that are – or become – political in nature may be removed in line with the Forum’s rules. Thank you for your understanding.
DIY Stable Renovation: Need Your Advice and Ideas!
Comments
-
Section62 said:
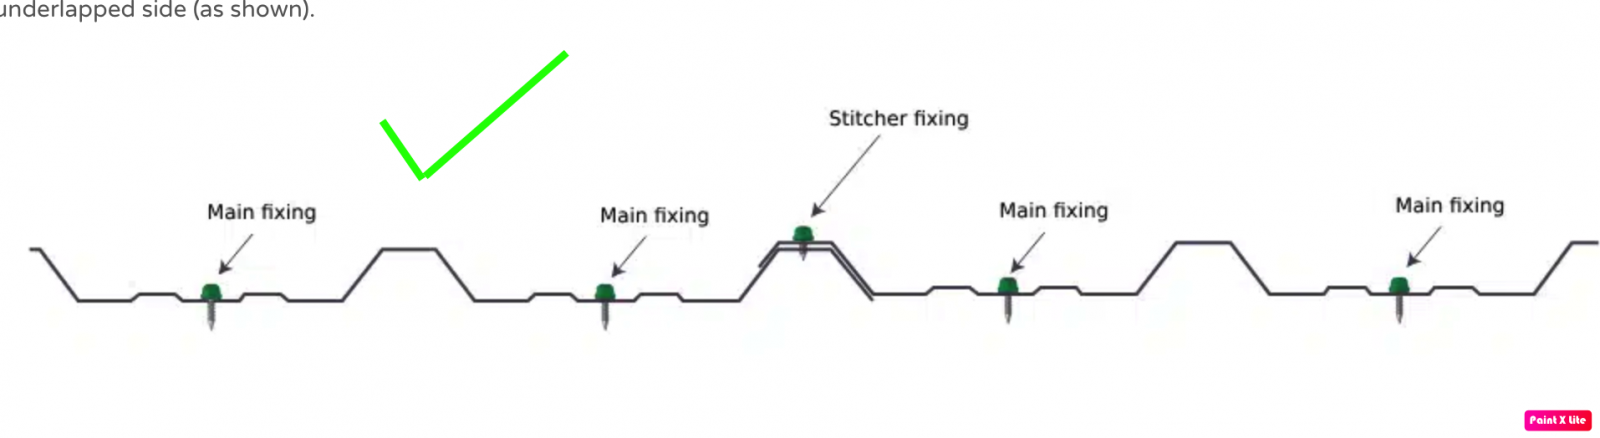
1 Unless you live in a very exposed area (and from previous pictures you don't appear to) then the direction of overlap doesn't matter in terms of wind. If the sheet edges fit snugly** then you shouldn't have a problem with either wind or rain.sujsuj said:Hoping for the best this weekend as I plan to put up the first set of corrugated metal sheets, weather permitting! I’ve watched plenty of videos on this process, but I have a few questions. Any input would be highly appreciated.
-
Wind direction & sheet overlapping: Based on the wind direction, should adjacent sheets be placed one over the other as shown in the image? (Wind direction is indicated in the photo.)
-
Screws on overlapping sheets: I understand that screws are used at regular intervals to join two sheets. What’s the ideal interval for placing these screws? Should I place them at every purlin or every alternate purlin?
-
Ridge gap: Is a ridge gap necessary between two sheets? I’m considering keeping it minimal to avoid leakage after installing the ridge flashing. Does this sound like a good approach?
See the attached photos for reference. Thanks so much!
OK. thanks for this input.The sheets should overlap the opposite way to what is shown in your pictures - so the exposed sheet edge is high up rather than sitting in the trough where it can get wet and start rusting.
It also means that stitching screws (if needed) will be in a ridge rather than a trough. Remember what I said in a previous post about fixings being in troughs, stitchings being in ridges. The suggested stitching screw positions in your photo are the opposite of that.
This is surprising to me. I know it's basic, but somehow I thought that by using a full-length screw, you could achieve a 2-in-1—i.e., one screw would do both jobs: fixing the sheets to the purlins and stitching the sheets together. It looks like my understanding was completely wrong. Thanks for clarifying this!2 You won't need to screw (stitch) overlapping sheets unless you are doing it wrong. If you get the sheet edges to fit snugly** then you won't need to stitch them as you have a small roof with closely spaced purlins. Edge stitching is only really necessary on larger buildings where the purlins are spaced much wider - were're talking warehouses where the purlin spacings could be wider than your shed is wide.
Ok, I probably saw some videos that suggested that method, and I mistakenly thought it was the right way. I was aware of stitching screws for fixing the ridge cap, but the idea of overlapping stitching screws is new to me. Thanks for clarifying this—looks like I just avoided a potential blunder!You might think that putting edge stitching in would be a good idea anyway, just for luck. It isn't. Each hole you make in the sheets is a potential site for leaks and corrosion. Keep the number of screw holes to the minimum compatible with holding the sheets on the roof.
Ok. that makes more sense. thanksIf you've done it wrong and the sheet edges don't fit snugly** then edge stitching screws can be used to force the overlap to fit, but this is bad practice.3 Yes, keep the gap to the minimum you can.However - the ridge is where you can hide (and protect from rain) any problems with sheet ends - for example if one end of the sheet is bent or the plastic is already delaminating then put this end at the ridge where the ridge piece will cover it. The ridge can also be used to hide any differences in sheet lengths.
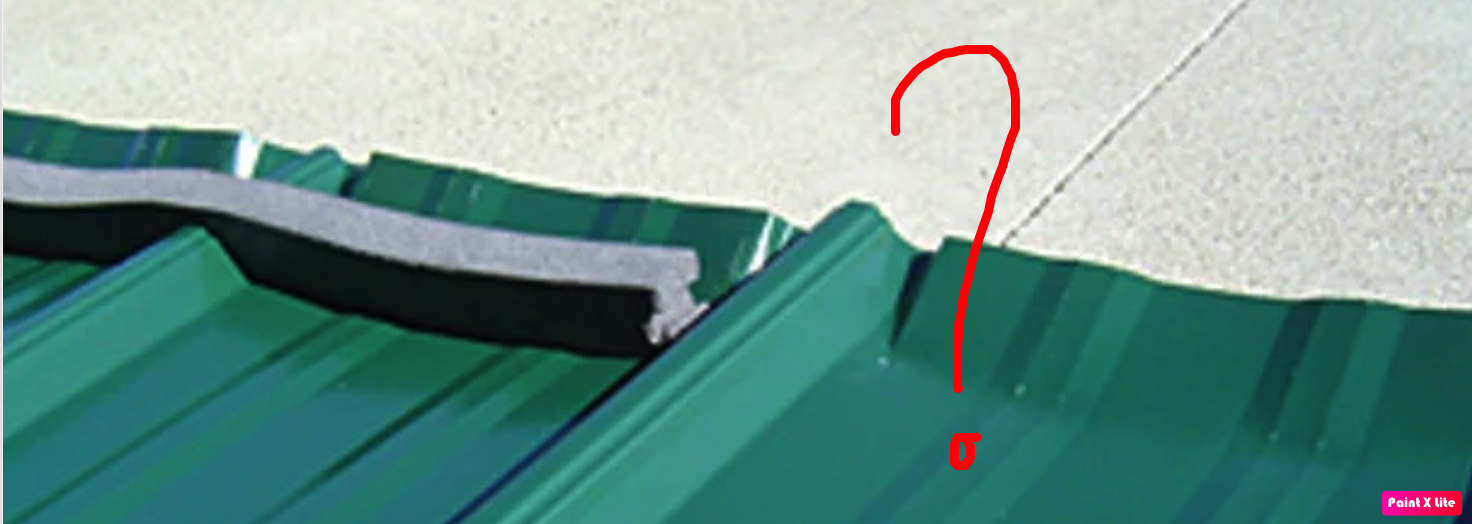
Thanks! I've seen people bending the top edge of box profile sheets (valleys) upwards to prevent water leakage. may be an extra precaution! Is this necessary? (last photo with Green sheet)So the first job is to go through all the sheets one by one to inspect for damaged ends. Usually one end of the sheet will be a 'cut' edge where the sheet was cut to length, treat those as damaged ends and have them at the ridge end if possible. Lay the sheets out on flat ground (ideally held off the ground with some lengths of wood) arranged as they will go on the roof so you won't forget which end is which. You may have too many damaged ends for all of them to be used at the ridge end, so decide now which ends are the least damaged to go at the bottom. It is much easier to do this on the ground than when you've got the sheet up on the roof.
OK. Thanks.Make sure the underside of the sheet is dry before you fix it on the roof. This is why laying them on lengths of wood on the ground is preferable as the air gap helps with drying.
OK. Thanks.**Remember, there is a technique to getting the sheet edges to naturally fit snugly without needing to force them together with stitching screws. I described it fully in a previous post, but it involves initially fixing the sheets with only one screw at the top centre until one side of the roof is done, and then rotating each individual sheet around that point to even out any misalignment between sheets. As soon as you have two screws in one sheet it is impossible to rotate them, and you'll have no option but to use force if they are misaligned.
I will re-read those to ensure I am doing it correctly. Thanks again for this. Much appreciated.I added some photos which confirm what you clarified.

0 -
-
sujsuj said:This is surprising to me. I know it's basic, but somehow I thought that by using a full-length screw, you could achieve a 2-in-1—i.e., one screw would do both jobs: fixing the sheets to the purlins and stitching the sheets together. It looks like my understanding was completely wrong. Thanks for clarifying this!There are two different jobs that require two different fixings.1) Fixing to the purlin - these fixings go through the 'sandwich' of wood and insulation which is partially compressible. When you do these screws up you need to have enough pressure so the EPDM forms a seal, but not so tight the metal sheeting is distorted. There's no need to 'clamp' the steel tightly to the purlins, it is enough that they are secured.2) Stitching - this is 'clamping' one metal sheet to another metal sheet these screws need to be done up enough to hold the two sheets closely together, without overdoing it so the thread gets stripped. The screws are designed to bring the two sheets into close contact.If you try stitching two sheets by screwing into a purlin you won't get a good result. The lower metal sheet will be compressed into the insulation, but there's nothing to draw the two metal sheets close to each other. It is the same thing as trying to screw two bits of wood together without drilling them first - if you run the screw through the first piece of wood with 15mm sticking out on the point side, and then screw the point into the second piece of wood then you'll probably end up with a ~15mm gap between the pieces of wood - and when the screw head embeds itself in the first piece of wood and the screw won't turn any more that ~15mm gap will still be there.sujsuj said:
Thanks! I've seen people bending the top edge of box profile sheets (valleys) upwards to prevent water leakage. may be an extra precaution! Is this necessary? (last photo with Green sheet)Not necessary, and another bad idea.Water shouldn't get to the top end of the sheets because the ridge filler seals the gap. Even if some water gets past the filler, there's still ~3" or so before the sheet end.I think what is shown in that picture has probably involved cutting slots in the troughs of the sheets to allow them to be bent - if so, what they've done is effectively moved the end of the sheet downwards by ~2" as the hole created by the slot is that much closer to the ridge filler. So any water passing the filler has less distance to travel before it can 'leak' through the holes.Remember I suggested using polythene sheeting under the steel? That means even if some water did manage to get to the top end of the sheet somehow then it won't be leaking through the roof because the polythene will catch it. Cutting and bending the steel sheets like that is hard work for a worse outcome than just leaving them flat.The bending also makes it difficult to measure the distance from the top purlin to the top edge if the steel sheet - which you need to be able to do if you want the bottom edges of adjacent sheets to line up with each other.2 -
Today was a major breakthrough on my ride-on mower project — but interestingly, that success only came after hitting a big milestone in my stable project! So 2 wins in a day!!
I’ve managed to get the first set of OSB boards, PIR insulation, and even the polyethylene barrier up on the stable. Check out the photos! I'm feeling much more confident now and think I can make solid progress before the May Bank Holiday. Thanks again for all the support!
There are a few challenges though. I extended the frame to avoid cutting the metal sheets, which gave me more space — but now the OSB and PIR boards aren’t quite the right size. So I’ll need to cut some panels, and I’ll also need to add another purlin to support the partial boards.
Also i found getting these OSB boards to roof is very difficult. Managed to get one up today, but its was lots of hard work! Need to find an easier way to do this, as i need to repeat this for another 20+ times!


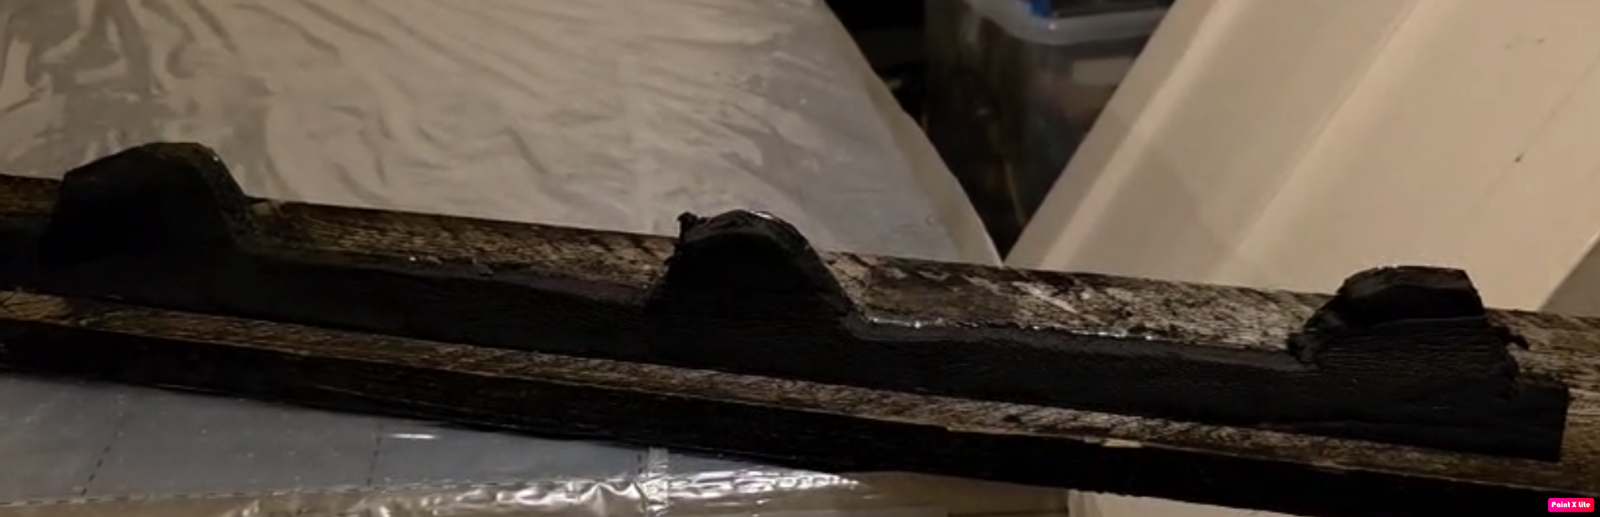
I ran into some issues with my eave filler today. As I mentioned earlier, I sourced closed-cell foam van insulation off-cuts from Campervan Insulation UK.. The challenge has been cutting them cleanly to fit the box profile shape.
I made a sample eave filler using a Stanley knife, but the cuts didn’t come out as clean as I’d like — I’m not fully satisfied with the result. For testing, I used double-sided ultra tape to stick them under the sheet, and they actually seem to be holding up well.
If anyone has any ideas or tips for getting a cleaner cut on this type of foam, I’d really appreciate the help!
Photos attached — thanks again!

 0
0 -
sujsuj said: I made a sample eave filler using a Stanley knife, but the cuts didn’t come out as clean as I’d like — I’m not fully satisfied with the result.
If anyone has any ideas or tips for getting a cleaner cut on this type of foam, I’d really appreciate the help!
I've used a Kitchen Devil knife* (very sharp and with a serrated edge) before now. Gives a clean cut with minimal wander. Have tried a regular wood saw, but that leaves a very rough edge. A circular saw, whilst quick, also leaves a rough edge as well as a lot of airbourne dust.Any language construct that forces such insanity in this case should be abandoned without regrets. –
Erik Aronesty, 2014
Treasure the moments that you have. Savour them for as long as you can for they will never come back again.1 -
sujsuj said:
....If anyone has any ideas or tips for getting a cleaner cut on this type of foam, I’d really appreciate the help!
Yes, you buy pre-cut eaves/ridge filler which comes accurately cut and ready to use. The cost is nothing compared to the total cost of the roof.The foam you've got is also too thin - you need it to be at least 25mm thick so it will stand on its edge and be self-supporting. Otherwise it will just fall over, or be too flimsy to stop the birds pecking it out.1 -
Section62 said:sujsuj said:
....If anyone has any ideas or tips for getting a cleaner cut on this type of foam, I’d really appreciate the help!
Yes, you buy pre-cut eaves/ridge filler which comes accurately cut and ready to use. The cost is nothing compared to the total cost of the roof.The foam you've got is also too thin - you need it to be at least 25mm thick so it will stand on its edge and be self-supporting. Otherwise it will just fall over, or be too flimsy to stop the birds pecking it out.I opted for DIY eaves/ridge fillers because the box profile sheets I had (from a company called Tata Steel) weren’t the standard type I expected. The fillers available came in two standard sizes, but unfortunately, mine didn’t match either of them.
So, I made my own fillers by stacking off-cuts together to achieve the required thickness—about 22mm. I know "the more, the merrier," but when I tested the sample I created, it seemed to work just fine.
The only issue I had was getting a clean cut with a Stanley knife. I’ll try out some of the suggestions I received to see if they help me get a cleaner finish.
By the way, I also managed to place another OSB + PIR sheet on top today. I'm hopeful that if I get a clear weekend, I can finish one side and get the metal sheets installed as well.
Thanks very much for all the feedback!
0 -
Another good day at the office! The first set of corrugated sheets is up. Hopefully, tomorrow will be just as good. Thanks!
 0
0 -
sujsuj said:Another good day at the office! The first set of corrugated sheets is up. Hopefully, tomorrow will be just as good. Thanks!It isn't clear from the picture whether it is or isn't, but you want to make sure the bottom edge of the polythene sheet overhangs the end of the insulation/OSB by enough so that any water running down the roof will go into the gutter rather than onto the insulation/OSB. I'd normally overhand by a good 4" or 6" and then trim back a bit (if necessary) once the gutter is up.The insulation/OSB is visible in your picture which suggests it might not overlap enough.If so, you don't need to take the sheet off again, just cut a strip of polythene (say) 18" wide and feed that up underneath the large sheet you've already laid, and just use a few bits of duct tape to keep it in place until you start screwing the bottom end of the steel sheets down. (you haven't started screwing the bottom ends yet, have you?)2
-
Yes, I placed it there temporarily only. After that, I added more length to the polythene sheet, patched it up with duct tape, and placed two sheets now. The bottom edge is completely covered. I’ll get some new photos tomorrow. Thanks for highlighting it.
The biggest challenge I'm facing is using these long hex screws. While rotating them with machine, the entire sheet lifts temporarily, making it quite tricky. I suppose that’s expected to some extent.?
I'm also finding it difficult to reach the middle area of the sheet for screwing.
Do you have any tips for better access?
Both the polythene and metal sheets are slippery, and I couldn’t find an easy solution.
Any practical suggestions to get better access to the long sheet would be much appreciated.
At the moment, I’m managing with three ladders of different sizes. still one row of screws I ma finding difficult to fix. Going forward I will put one sheet at a time.Getting right tightness for washer also seems to be tricky. I am improving as I progress but access issues and all making it bit difficult.
I have already finished about 80% of the screws for the two sheets after placing the fillers.
The first one wasn’t done very well, but the second one came out better — I’m confident the third will be close to what I want. Thanks!Also, I finally found a way to cut the eaves/ridge fillers — thanks to @FreeBear tip to use a kitchen knife!
At first, I didn’t believe it would work after both the razor and Stanley knife failed.
But once I tried it, it worked perfectly! I also got a knife sharpener to keep it cutting smoothly when it starts struggling. Thanks very much for that @FreeBear0 -
here is the photo after polyethylene to cover entire boards.. Need to find more time to finish remaining sheets of this side then to start next side!

0


 I added some photos which confirm what you clarified.


Confirm your email address to Create Threads and Reply

Categories
- All Categories
- 355K Banking & Borrowing
- 254.6K Reduce Debt & Boost Income
- 455.7K Spending & Discounts
- 247.8K Work, Benefits & Business
- 604.9K Mortgages, Homes & Bills
- 178.7K Life & Family
- 262.5K Travel & Transport
- 1.5M Hobbies & Leisure
- 16.1K Discuss & Feedback
- 37.7K Read-Only Boards