We’d like to remind Forumites to please avoid political debate on the Forum.
This is to keep it a safe and useful space for MoneySaving discussions. Threads that are – or become – political in nature may be removed in line with the Forum’s rules. Thank you for your understanding.
📨 Have you signed up to the Forum's new Email Digest yet? Get a selection of trending threads sent straight to your inbox daily, weekly or monthly!
The Forum now has a brand new text editor, adding a bunch of handy features to use when creating posts. Read more in our how-to guide
Interior of outbuilding - options?

ChilliBob
Posts: 2,429 Forumite


Hey guys,
We've moved into a house with an established outbuilding (shed, summerhouse, whatever you want to call it!)
We aren't 100% sure how we will use it fully - it may stay a glorified shed/workshop/storage thingy, it may evolve into a gym/play area etc.
In the meantime I'm keen to, let's not suagr coat, Tart up the inside a bit. Basically is very dark.
See attached pictures, and tell me what you would do? The limitations being:
Something I can do myself - I'm fine painting, drilling, some woodwork, but not electric stuff really.
Something that doesn't take too long - I have one child and one due in two and a half weeks :0.(yes it may have to wait till she's born and stuff.
Ideally something that doesn't cost a bomb, as we don't know how long it'll be for, and not too hard to change (I. E. I'm not grip filling something to the floor that I may have to chip up a year of few later!
On to the pic: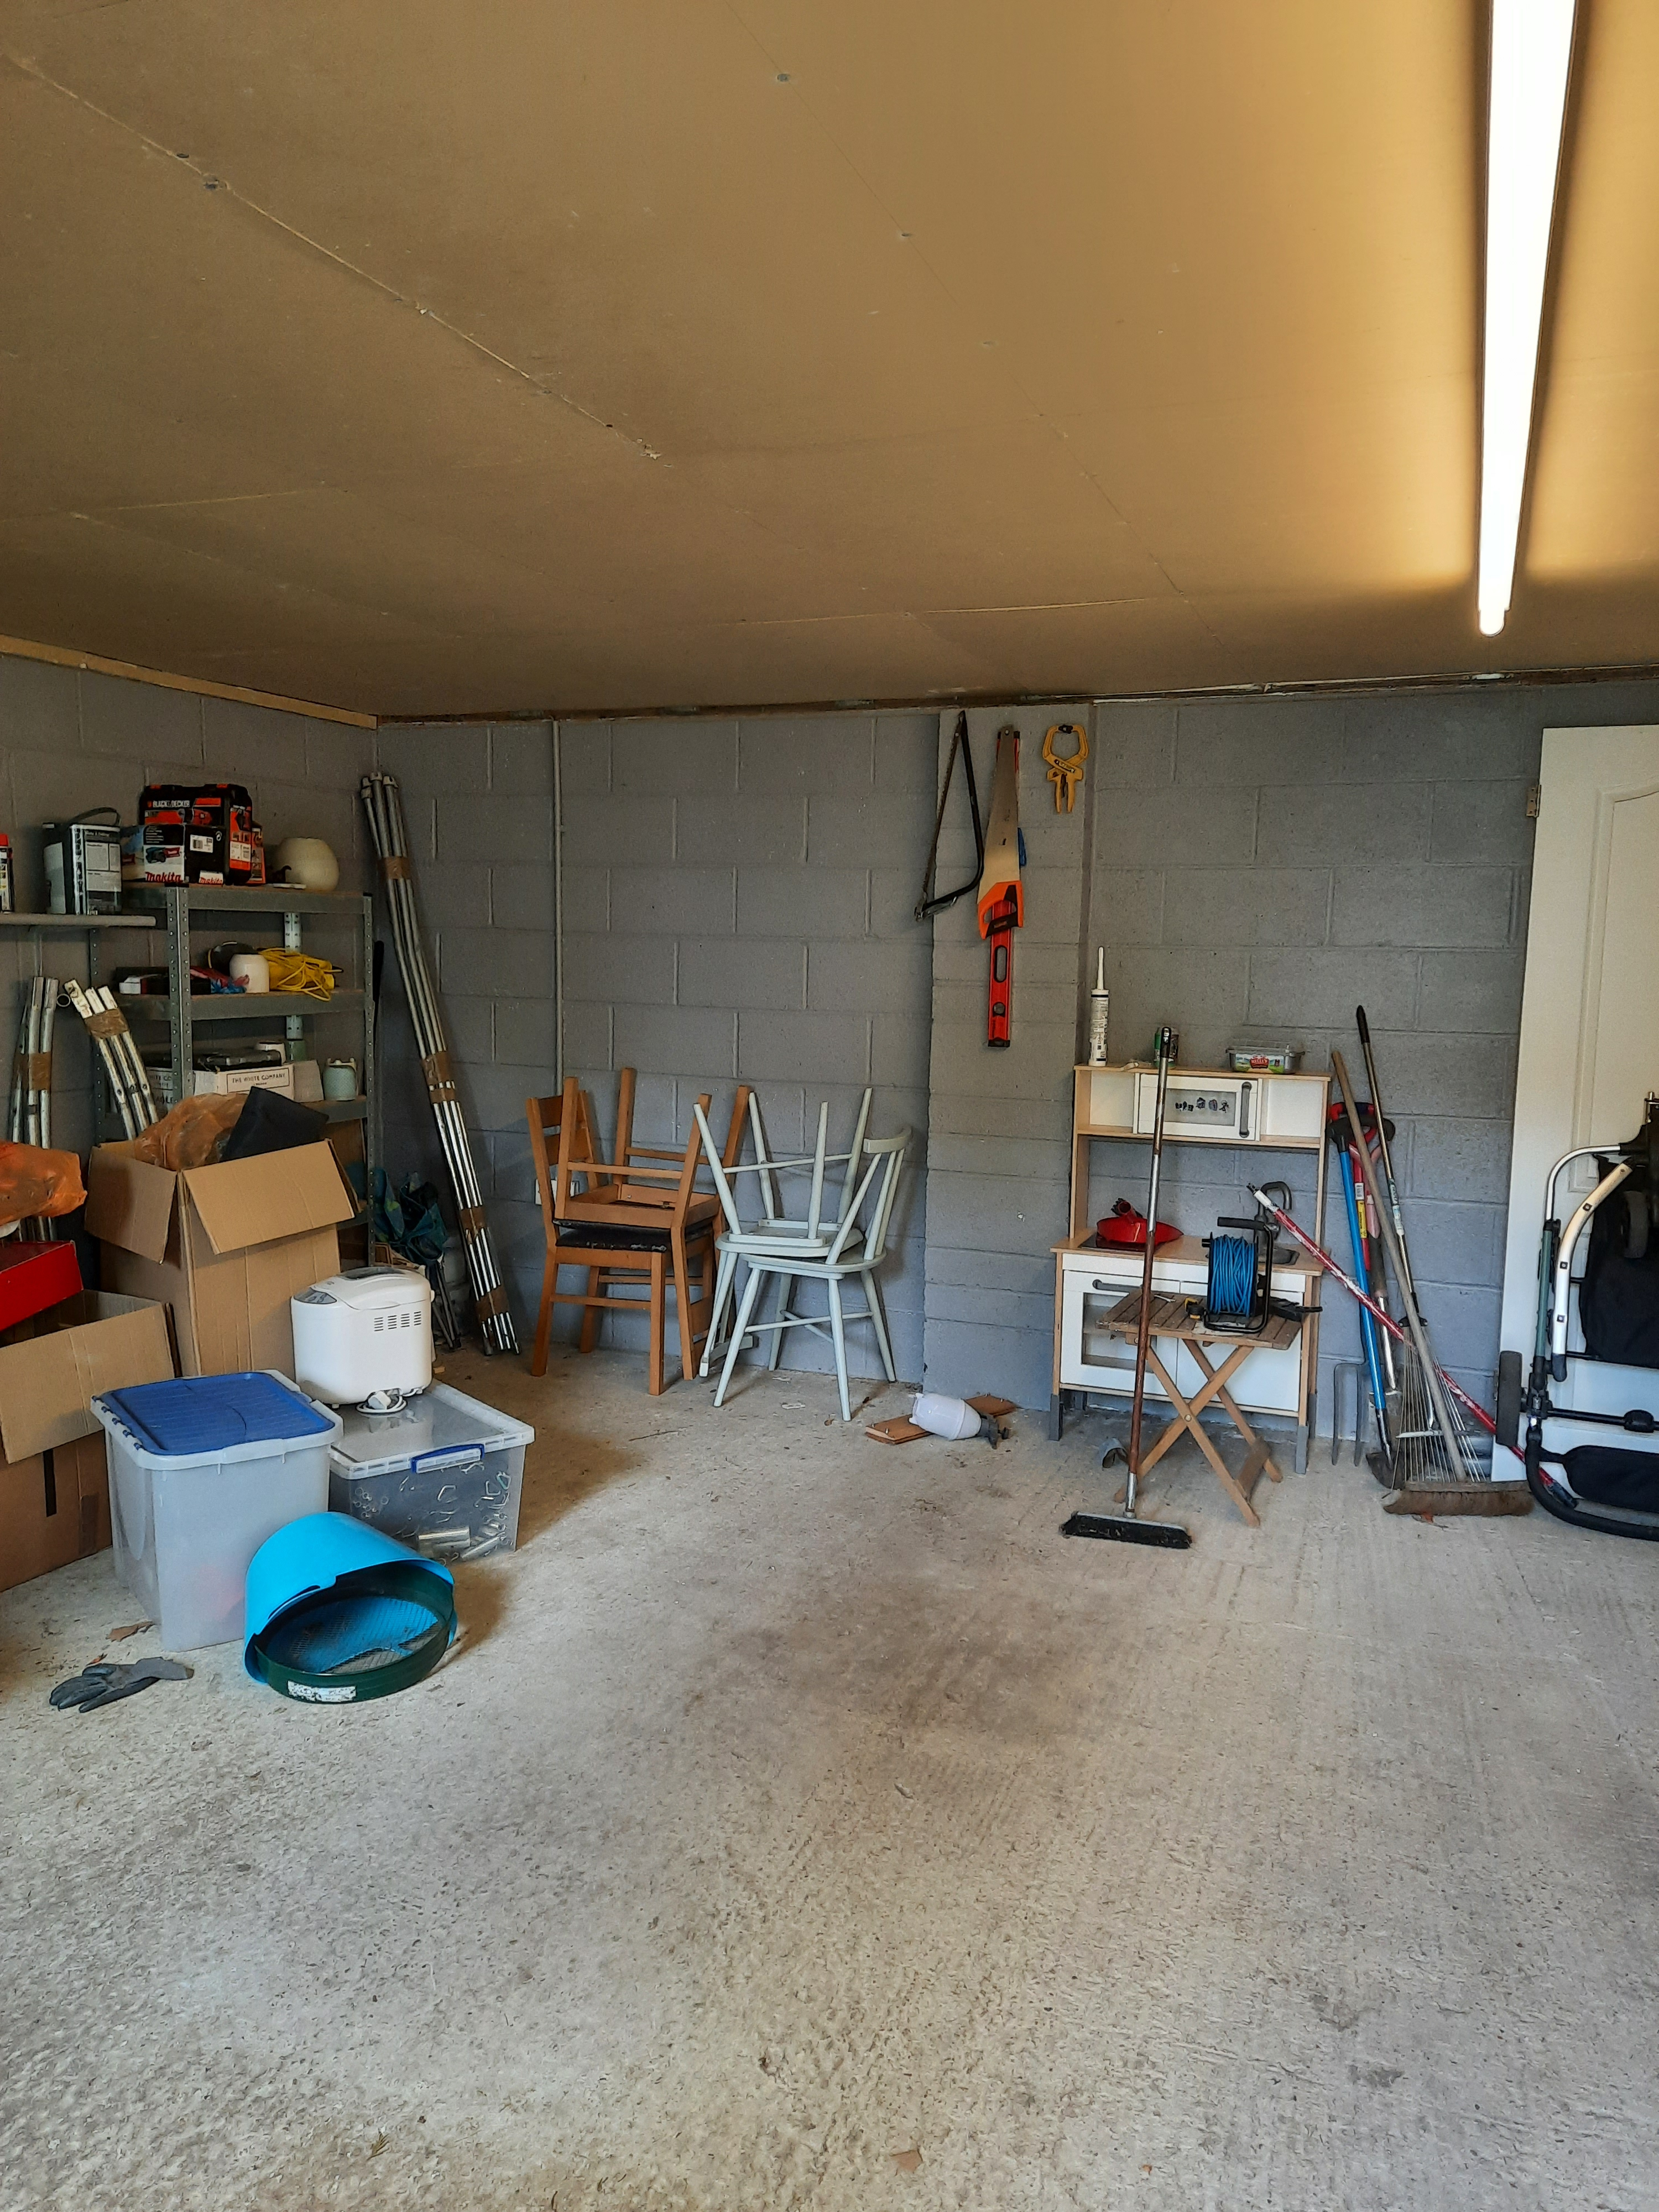
My thoughts:
1. Smooth masonry paint on the walls in a lighter colour
2. Paint the floor - masonry?
3. The plasterboard ceiling is just raw plasterboard, and obviously quite dark.. Not sure what to do here as plasterboard isn't my speciality - I'm no plasterer!.. Not sure I could skim it any decent way with sat Knuaff filler or something?! It feels like it'd not take paint - it feels too absorbant.
So yeah, answers on a post card!
Thanks in advance")
We've moved into a house with an established outbuilding (shed, summerhouse, whatever you want to call it!)
We aren't 100% sure how we will use it fully - it may stay a glorified shed/workshop/storage thingy, it may evolve into a gym/play area etc.
In the meantime I'm keen to, let's not suagr coat, Tart up the inside a bit. Basically is very dark.
See attached pictures, and tell me what you would do? The limitations being:
Something I can do myself - I'm fine painting, drilling, some woodwork, but not electric stuff really.
Something that doesn't take too long - I have one child and one due in two and a half weeks :0.(yes it may have to wait till she's born and stuff.
Ideally something that doesn't cost a bomb, as we don't know how long it'll be for, and not too hard to change (I. E. I'm not grip filling something to the floor that I may have to chip up a year of few later!
On to the pic:
My thoughts:
1. Smooth masonry paint on the walls in a lighter colour
2. Paint the floor - masonry?
3. The plasterboard ceiling is just raw plasterboard, and obviously quite dark.. Not sure what to do here as plasterboard isn't my speciality - I'm no plasterer!.. Not sure I could skim it any decent way with sat Knuaff filler or something?! It feels like it'd not take paint - it feels too absorbant.
So yeah, answers on a post card!
Thanks in advance
0
Comments
-
Masonry paint on the walls, a proper floor paint (two pack) for the concrete slab.The ceiling, tape the joints with a plasterboard mesh, adding extra screws where needed (not nails). Slap some Febond Bluegrit on, and then put a thin coat of ready mix drywall mud on (Knauf Fill & Finish). If you don't get it smooth, go over it with a damp sponge float - The moisture in the sponge will soften the "mud" and drag the humps in to the hollows. Do a search for "wet sponge sanding" to get an idea of how it is done.When dry, paint with a white emulsion.Depending on how tall you are, some milk crates and scaffold boards will get you a bit closer to the ceiling - I prefer a scaffold tower, but not everyone has one to hand (and they are not that cheap).Any language construct that forces such insanity in this case should be abandoned without regrets. –
Erik Aronesty, 2014
Treasure the moments that you have. Savour them for as long as you can for they will never come back again.0 -
That ceiling looks a bit short of screws.0
-
And, I suspect, noggins
0 -
Chilli, as FreeBear says re the walls and floor.That ceiling looks well saggy. I suspect it doesn't have battens/noggins catching the sheet ends. Can you get up there for a look - is there a hatch?The simplest DIY method to secure the boards and also make the ceiling look ok - ie a bodge, but it should work - would be to screw battens over the boards, along each joint, and some in between, too, if needed to prevent further saggage.Fill the existing nail hollows with filler, sand and then just emulsion paint the whole caboodle - p'board is designed to take this.Turn your room into...
 1
1 -
You made a nice job of that ceiling Bendy, but your pictures look a mm out of plumb.1
-
stuart45 said:You made a nice job of that ceiling Bendy, but your pictures look a mm out of plumb.

Lol, and double-lol!0 -
Many thanks for the reply.FreeBear said:Masonry paint on the walls, a proper floor paint (two pack) for the concrete slab.The ceiling, tape the joints with a plasterboard mesh, adding extra screws where needed (not nails). Slap some Febond Bluegrit on, and then put a thin coat of ready mix drywall mud on (Knauf Fill & Finish). If you don't get it smooth, go over it with a damp sponge float - The moisture in the sponge will soften the "mud" and drag the humps in to the hollows. Do a search for "wet sponge sanding" to get an idea of how it is done.When dry, paint with a white emulsion.Depending on how tall you are, some milk crates and scaffold boards will get you a bit closer to the ceiling - I prefer a scaffold tower, but not everyone has one to hand (and they are not that cheap).
When you say two pack for the floor, what do you mean? I can see say Layland floor paint etc?
Any point in putting anything filler wise over the breeze block walls? Or just masonry paint?
As regards the ceiling, so that orange mesh sfuff? Does it just stick on like normal tape? They've just used it in our bathroom after taking out coving as it goes.
Height wise, I'll be fine, I'm not that tall but I have shed loads of stuff to stand on
0 -
It is saggy in places yes, and there's no hatch. There must be cables above it to allow for the lighting and power. Most runs around the perimiter though as I can see it.Bendy_House said:Chilli, as FreeBear says re the walls and floor.That ceiling looks well saggy. I suspect it doesn't have battens/noggins catching the sheet ends. Can you get up there for a look - is there a hatch?The simplest DIY method to secure the boards and also make the ceiling look ok - ie a bodge, but it should work - would be to screw battens over the boards, along each joint, and some in between, too, if needed to prevent further saggage.Fill the existing nail hollows with filler, sand and then just emulsion paint the whole caboodle - p'board is designed to take this.Turn your room into...
It's a good plan you have but quite 'full term' solution.
I'll take other pics but the tiled roof is rather nice, my bro had the idea of opening it up but I wasn't sure what I'd find!0 -
There's a good chance there's trussed rafters under the boards.0


Confirm your email address to Create Threads and Reply

Categories
- All Categories
- 354K Banking & Borrowing
- 254.3K Reduce Debt & Boost Income
- 455.2K Spending & Discounts
- 247K Work, Benefits & Business
- 603.6K Mortgages, Homes & Bills
- 178.3K Life & Family
- 261.1K Travel & Transport
- 1.5M Hobbies & Leisure
- 16.1K Discuss & Feedback
- 37.7K Read-Only Boards