We’d like to remind Forumites to please avoid political debate on the Forum.
This is to keep it a safe and useful space for MoneySaving discussions. Threads that are – or become – political in nature may be removed in line with the Forum’s rules. Thank you for your understanding.
📨 Have you signed up to the Forum's new Email Digest yet? Get a selection of trending threads sent straight to your inbox daily, weekly or monthly!
The Forum now has a brand new text editor, adding a bunch of handy features to use when creating posts. Read more in our how-to guide
How should I tackle this please
Comments
-
billiepiper14 said:Oh thanks that’s made my day 😊
I was wondering about that, there’s definitely gaps under the tiles. I got out as much silicone as I could but it’s possible a tiny bit got pushed back into the voids. So I would pack the gaps with silicone first and when I can see they are loaded, start with the bead ?I don’t understand what you mean by choose your tool shape and bevel (utter novice sorry 😂) ive got the little square gadget someone recommended. Do you mean how much end i cut off the silicone tube ? Thanks in advanceDon't worry about bits of old sili sitting under that gap. The only old bits you need to worry about are any that might get pulled out during the job and mess it up!By 'tool' I mean the rubber 'Fugi'. Please do get one - it'll transform the job, both the ease and success.Ok, since there are wee gaps that I'd want to ensure are filled, I would do this job in two passes, but right away so they blend.First, I'd cut only the smallest amount off the nozzle, and at a 45o angle. This will give you a small bead. Start at one end, press the nozzle at - ooh - around 60+ degrees, almost right angles, so the sili is ejected firmly out into the corner. Press and push away from you, not pulling towards you like that guy has done. Squeeze slowly and in control, and judge the size of bead being issued - your aim here is to get a small bead, and it being pressed firmly into any gap.Then cut an inch off the nozzle to give a larger bead. Go over the original bead, and add this extra layer. After you've done a foot or so, test your Fugi and see that there's enough sili there. If there isn't, go back and add a tiny bit more, and then stick with that amount as you do the rest. The more upright you hold the gun, the larger the bead.Just get this bit done - don't hang around. Just do it! It'll take around a minute to apply that bead, that's all.Then Fugi it.Fugiing: Do some dry test runs to get used to how to hold it. Make sure you can get into a comfy position to run it all the way around. Get used to corners - don't worry about that vertical sili bead - you'll be going over it. For the corners, approach until you reach the corner, and then you'll need to angle the edge forward a wee bit as your knuckle contacts the wall to allow the tool to fully reach the corner. When you are a bead's-thickness away, angle the tool into the corner so it sits at 45o to it until you are fully in, and then start pulling it away along the next wall immediately getting it back to right angles. Practice this to see what it feels like.Hold the tool firmly but gently. Check how much pressure you need to apply so it makes full contact with both surfaces, but don't press hard. Just 'firm'.If you find the sili is building up too much on the blade so you need to wipe it, or if you find you haven't added enough sili so it's leaving holidays, this is how to stop and start; Keep moving forward, whilst you release the pressing-down from the tool, and then lift it away. Clean the blade/add extra sili.Then go back a good 6+" of your good beading. Gently position the tool there, but don't press so it makes contact. Now start moving it along towards the new bit, and as you move it steadily, press down to the usual level so it lands imperceptibly on the good beading, and continues on its way as tho' it never left. You should find the restart will be unnoticeable.Deep breath. This will work. It will look amazing - far better than the old beading. You'll be better than that 'pro'.It needs confidence. Don't dilly-dally. Do as many dry runs as you need, until you understand what the method is.Then apply the sili, have your wiping cloths ready, and go for it.I hate having sili build up in a messy and wasteful way that needs the tool removing a number of times, so tend to apply too little sili if anything. I then just complete the job, and go back and add an extra bit over the holidays, and then run the Fugi over these parts again - they should blend in perfectly.Remember, to remove the tool, release the pressure as it still moves forward.To restart, go back a good few inches to the good beading, position the tool but don't press, get it moving, and then steadily add the required pressure until it gently makes moving contact.`If you have deep grout lines, you may wish to use the extra part that keeps the tool level - the guy has it in that video. I usually don't bother; the tool does follow the grout lines, and this leaves matching lines in the sili bead, but it's neat and looks ok. And, it ensures the sili is pressed firmly onto the grout, so makes a better seal.Ok, and show us your results - we need a good laugh on here...
1 -
Don’t overthink it. Watch a video on applying silicone with a Fugi. Just do it.1
-
Wow thanks so much , not sure I will sleep tonight because of the pressure 😊
seriously though just remembering I caulked all my skirtings with a fugi. They weren’t perfect but it’s given me a good idea of what’s to be done. Will defo post results, it’s a team effort 😂On a mission to be mortgage free asap
Sept 2023 65,000, June 2024 61,9921 -
You e used a Fugi before?! You're an expert.
One more wee tip - another way to deal with grout lines, if you don't want them 'transferred' to the beading, is to slightly angle the tool from the usual vertical. That way it shouldn't drop in to the grout hollows.
However, that's a bodge, and I prefer to have these grout marks, as it means the silicone has been pressed firmly into them. I'd say the weak point in any tiled wall will be the grout lines, so make sure they are completely clean before applying the silicone.1 -
Disaster !!!
Thought I had allowed plenty of time before my Grandkids arrived like an hour and a half lol.
Basically had it near perfect (in my standards 😂)
Went to put a little more in one area and just couldn’t for the life of me get the line back. I guess I was panicking thinking there was going to be a knock on door whilst I’m up to my armpits in silicone. Anyway I cleaned up then realised you can’t go back to silicone later so went back and tried to finish but it became sticky so I’ve cleaned it all off. Question is do I need to also clean off the successful remaining side also please ?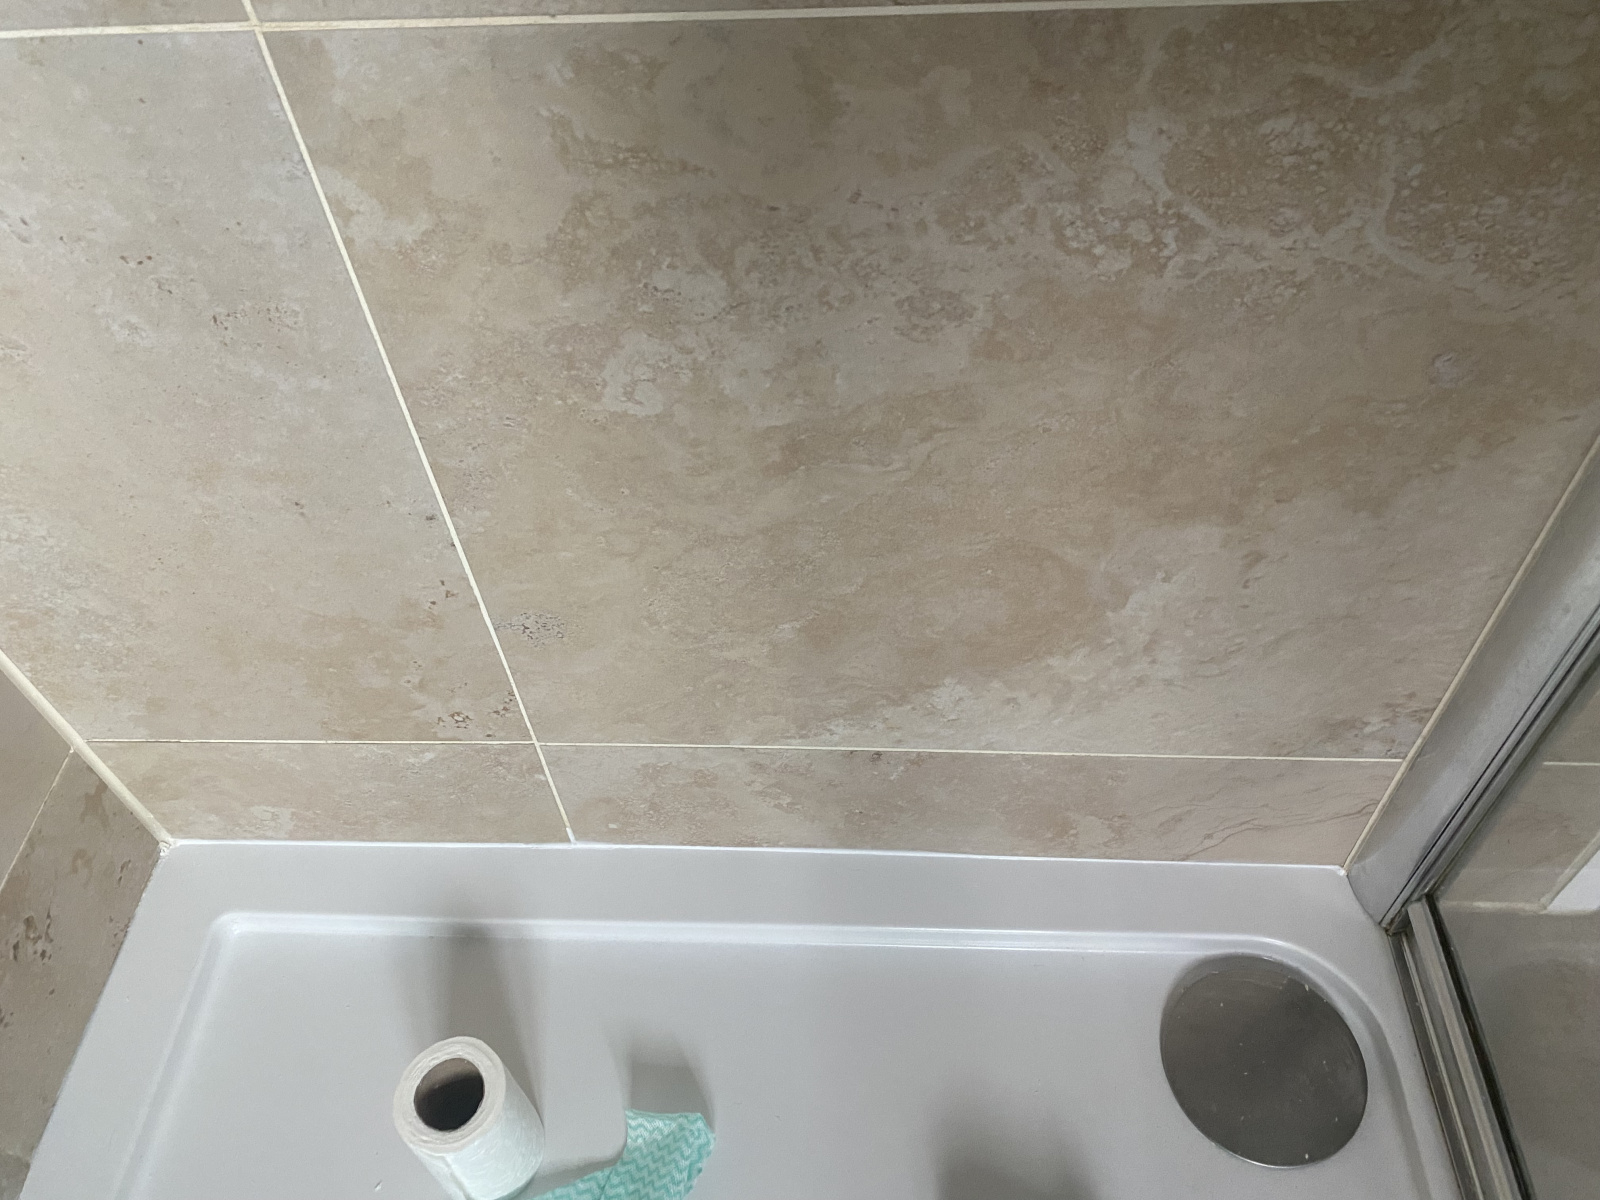
On a mission to be mortgage free asap
Sept 2023 65,000, June 2024 61,9921 -
No it'll be fine, but I would wait until tomorrow to continue.
I prefer to do this over 2 days, do the the 2 opposite sides on the first day, let it go off, then the next day do the remaining side. That way you don't mess up the corners.1 -
If one side is successful, it's fine to leave.1
-
billiepiper14 said:Disaster !!!
Thought I had allowed plenty of time before my Grandkids arrived like an hour and a half lol.
Basically had it near perfect (in my standards 😂)
Went to put a little more in one area and just couldn’t for the life of me get the line back. I guess I was panicking thinking there was going to be a knock on door whilst I’m up to my armpits in silicone. Anyway I cleaned up then realised you can’t go back to silicone later so went back and tried to finish but it became sticky so I’ve cleaned it all off. Question is do I need to also clean off the successful remaining side also please ?Oh boy! (fetches popcorn).Absolutely not an issue. No, I'd leave that bead in place, as it's doing a good job. However, personally, I'd increase the bead size significantly, and include an extra layer over that one.No, you aren't 'meant' to apply sili over old stuff, but I am confident there will be no issues with you doing it here - the lower bead is clean, and fresh. The new coating will adhere nicely, and also seal itself to both surfaces, beyond that wee bead.The only concern would be if you've left a thin smear of sili beyond the beading, and this could be roughed off by the Fugi passing over it and mess up your new bead. So I'd wait a few hours for that bead to be nigh-on cured, and then repeatedly run the Fugi - using the original profile - over it, to ensure there's no 'smear' left.Then, tomorrow, do it all - but with a significantly larger bead. Honestly, it'll look better, and be more secure.1 -
Thankyou so much. I’m on 10 hour shifts at weekends so I will A/ leave until Monday so I don’t feel rushed again or B/ talk nicely to son in law when he picks Grandkids up as he is self employed plumber and could sort me this in minutes I bet. Never does me any favors though so I won’t hold my breath lol
Also for a bigger bead do I just use the biggest corner of the fugi ? Thankyou enjoy your popcorn 😂On a mission to be mortgage free asap
Sept 2023 65,000, June 2024 61,9920 -
Burp. Thanks.billiepiper14 said:Thankyou so much. I’m on 10 hour shifts at weekends so I will A/ leave until Monday so I don’t feel rushed again or B/ talk nicely to son in law when he picks Grandkids up as he is self employed plumber and could sort me this in minutes I bet. Never does me any favors though so I won’t hold my breath lol
Also for a bigger bead do I just use the biggest corner of the fugi ? Thankyou enjoy your popcorn 😂
Yes, I'd hold the different shapes over the existing bead, and look for a good 2mm or so gap. No idea if that is the 'biggest'!
And, yes, sil should be able to do this in 2 minutes.
But, what's the fun in that?
For us watching, I mean.
1


Confirm your email address to Create Threads and Reply

Categories
- All Categories
- 353.7K Banking & Borrowing
- 254.2K Reduce Debt & Boost Income
- 455.1K Spending & Discounts
- 246.8K Work, Benefits & Business
- 603.3K Mortgages, Homes & Bills
- 178.2K Life & Family
- 260.9K Travel & Transport
- 1.5M Hobbies & Leisure
- 16K Discuss & Feedback
- 37.7K Read-Only Boards