We’d like to remind Forumites to please avoid political debate on the Forum.
This is to keep it a safe and useful space for MoneySaving discussions. Threads that are – or become – political in nature may be removed in line with the Forum’s rules. Thank you for your understanding.
Alcove Units – Best Solution?
Comments
-
paperclap said:So, a little insight / new discoveries.
Left alcove is 156cm wide. Right alcove is 164cm wide. Both are 35cm deep (not 30cm!).
I’ve created a scaled sketch. This visual representation is what will be for the left side… however, using the right side width. Stupid me! But, the principles are the same, and the proportions are largely the same too.
In between the doors, I think it actually may make sense to show the partition. Good stuff, PC - you can tell the proportions are good. Also worth sketching a two-door option just to compare. Obviously a lot less work - as long as it looks good too.That's a lower top than I'd expected, but is similar to what T-P has done with theirs, so I certainly ain't going to argue. It really comes down to what you want.At 'only' 560mm height, two doors would be wide, slender styles, and you need to judge - ideally with a sketch - whether that works for you. Just as we can judge that your sketch above certainly 'works', we can hopefully do ditto with other variations you wish to post. As I think I mentioned, you can always add an extra stick-on vertical stile to a 'wide' door if it helps.Worth spending time on this stage as you have a bit of work coming up... :-)0
 -
But, not too much work - this really doesn't have to be hard, or as complex as TP's very pro job. You stick with me, pal, and my Mickey-Mouse ways
 Oookkaaaay, ONCE you have decided on your sizes and format - how many doors, how the unit fronts will 'align' with the chimney breast, what the top will do - overlap a bit - etc - you should have a good idea (and a sketch) of what this layout is going to be, along with actual dimensions - height and depth (width is kinda fixed!).So, next step, I'd suggest, is to transfer these dims to your alcove with accurate pencil lines. You will need to draw on the walls:1) Where the unit front edges will land, perfectly vertically. (Will this be 'flush' with the chim breast, stepped back slightly, stepped forward ditto, it really doesn't matter - it's your call.2) The exact height of the unit's top (less worktop).These should be accurately drawn on the walls with the aid of a sprint level, 'cos you are going to use them.0
 -
I’ve seen your units before and it outstanding work that I would be proud of!ThisIsWeird said:But, not too much work - this really doesn't have to be hard, or as complex as TP's very pro job. You stick with me, pal, and my Mickey-Mouse waysOookkaaaay, ONCE you have decided on your sizes and format - how many doors, how the unit fronts will 'align' with the chimney breast, what the top will do - overlap a bit - etc - you should have a good idea (and a sketch) of what this layout is going to be, along with actual dimensions - height and depth (width is kinda fixed!).So, next step, I'd suggest, is to transfer these dims to your alcove with pencil lines. You will need to draw on the walls:1) Where the unit front edges will land. (Will this be flush with the chim breast, stepped back slightly, or stepped forward ditto - it really doesn't matter.2) The exact height of the unit top (less worktop).These should be accurately drawn on the walls with the aid of a sprint level, 'cos you are going to use them.
paperclip I admit having the tools make building these easy but you can take your time, keep us posted on the build and I’ll post when I can and ThisIsWeird will keep it real!Maybe, just once, someone will call me 'Sir' without adding, 'You're making a scene.'1 -
Next, you'll be doing two things - one is to construct a front frame from (I'd suggest) MDF, and the other is to screw timber battens to the wall sides and along the alcove's back on which to secure this frame, and to take the worktop:
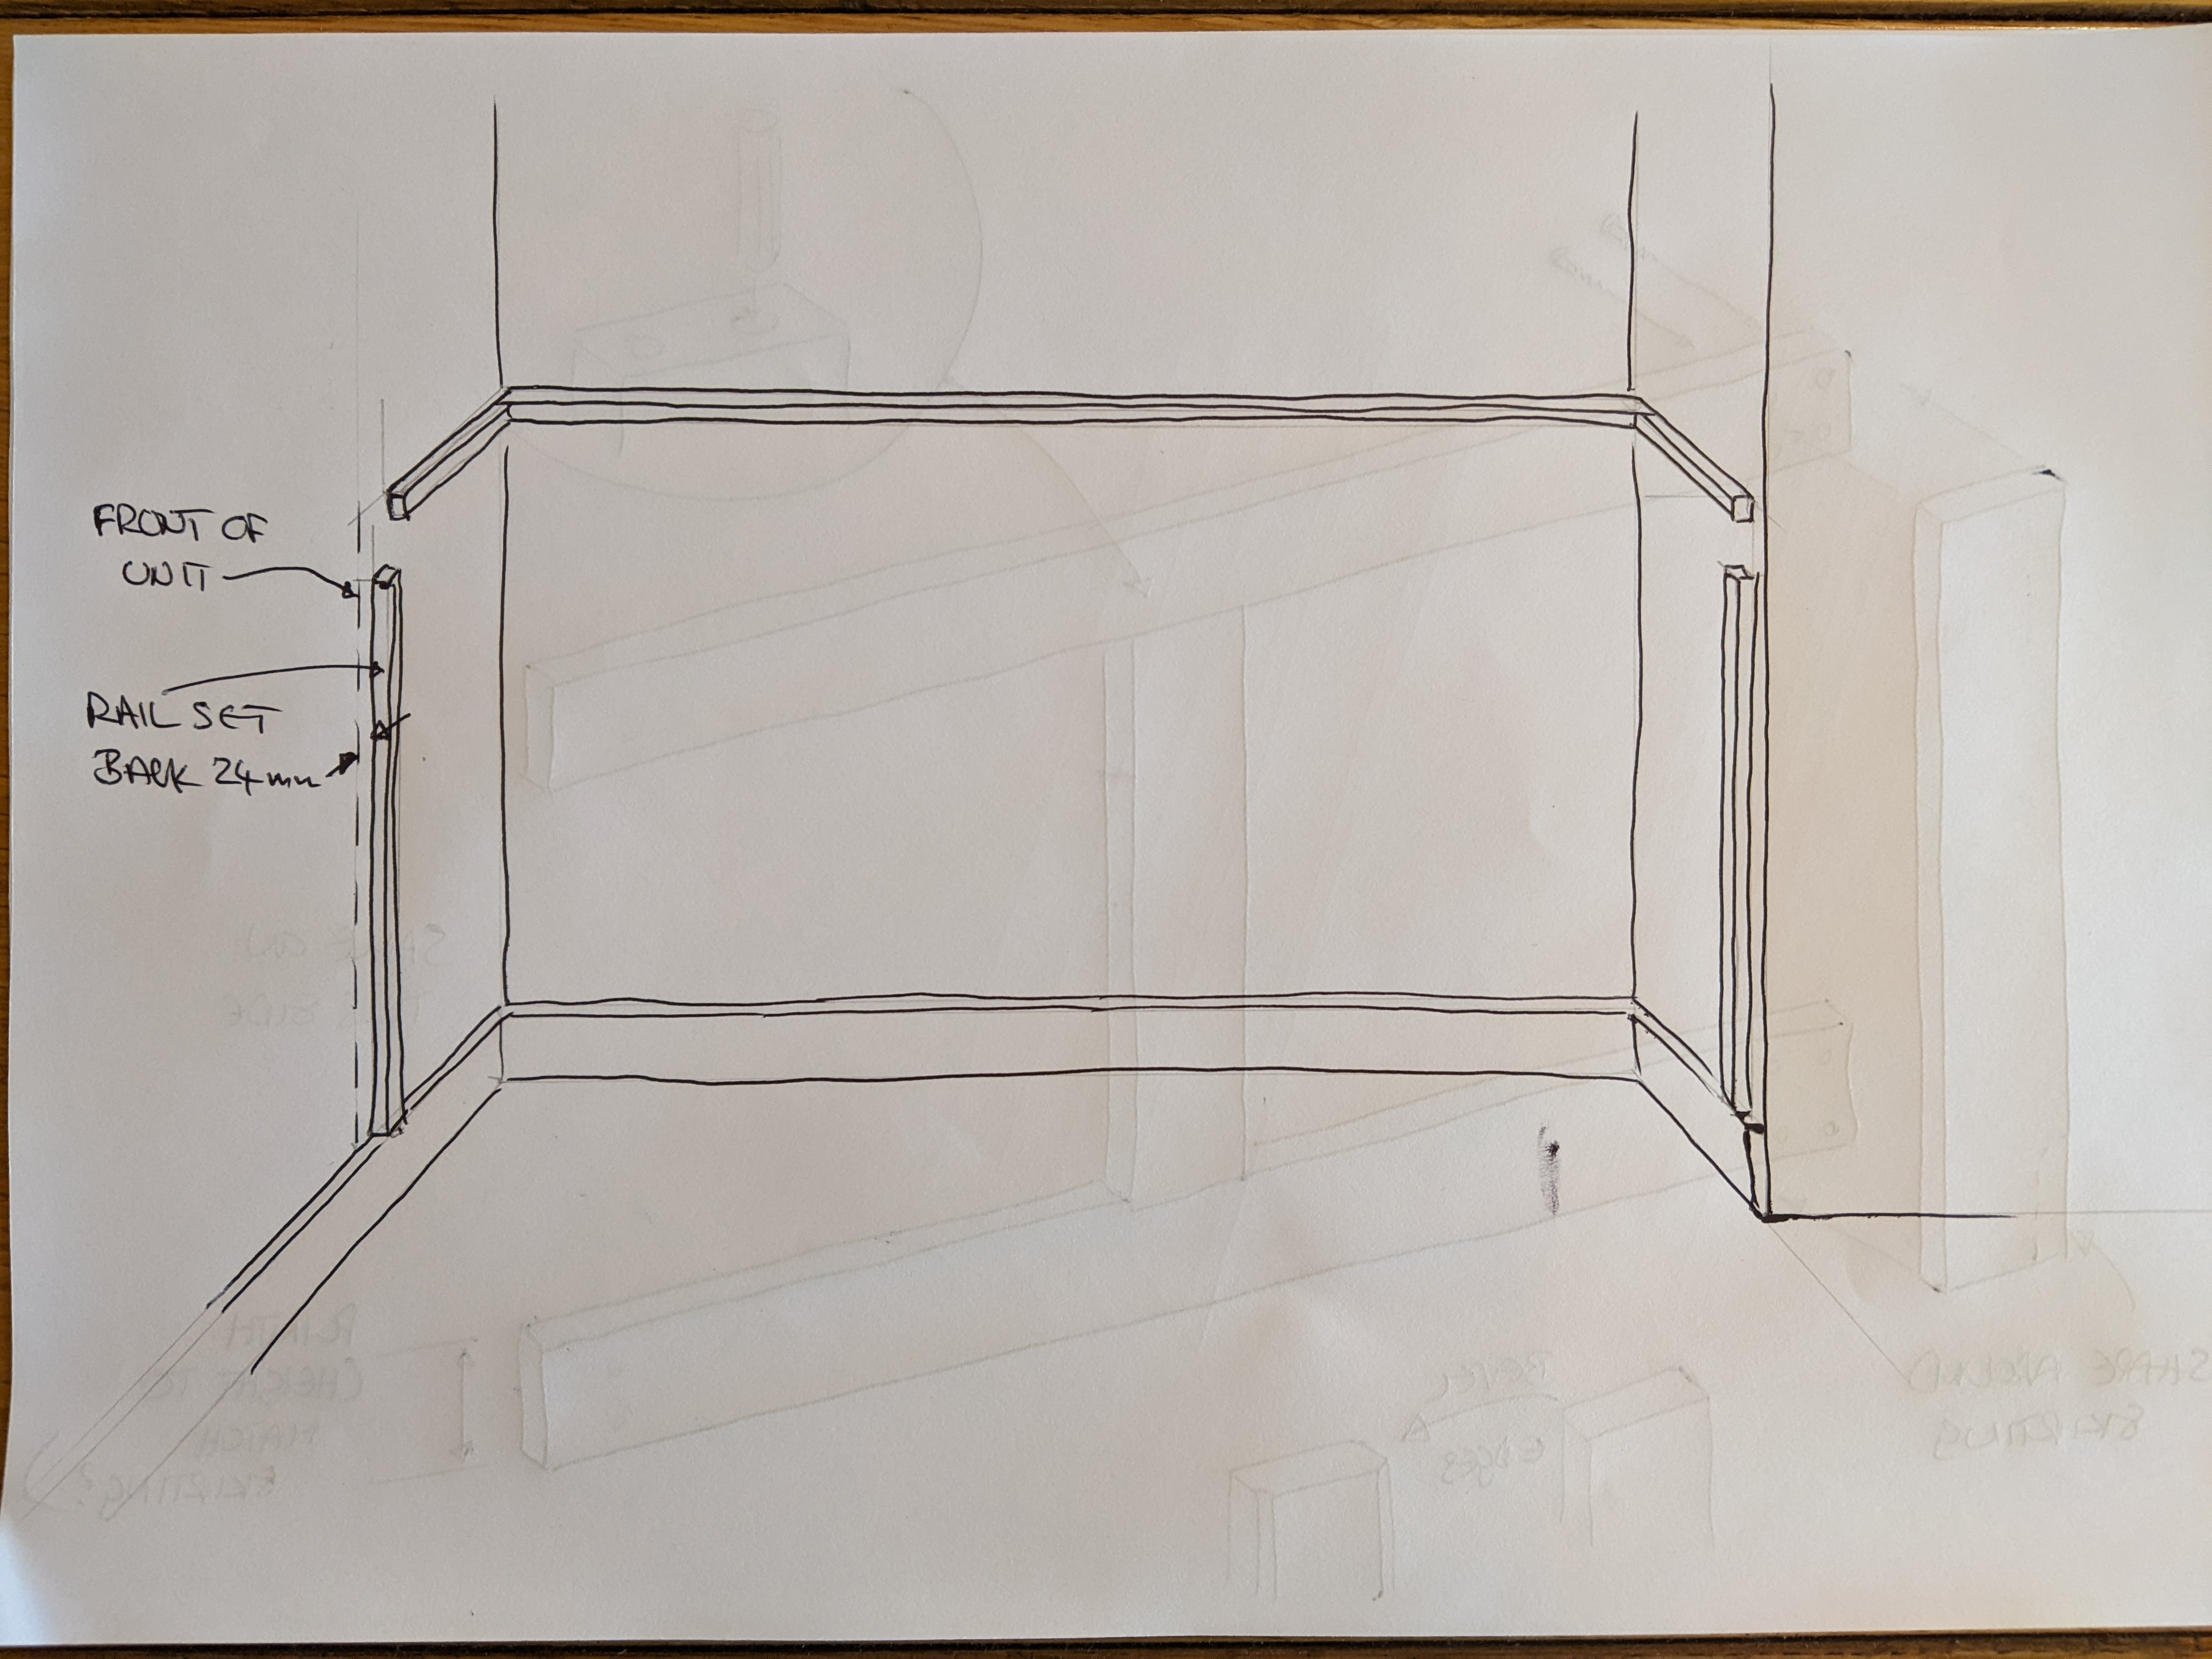 Not exactly mind-blowing, is it?If you use 24mm MDF (ie a double-up layer of 12mm) for the front frame, then the vertical side battens need to be set back by 24mm from the finished line.The top battens will be at the exact ehight of the front frame - in your case 560mm less the worktop thickness.Accurate pencil lines, drill and screw (and a smear of PVA glue) the battens to the wall. These will be plenty strong. (Don't do it yet, tho', as you haven't made the frame...)0
 -
Then there's the frame.I'd use 24mm thick MDF for this (doubled-up 12mm), and you can cut all the stile widths to the same width as long as it suits. If it doesn't, then make the plinth the height (rail width) you want, and the front's side rails a different width. BUT, sketch it out - see if it all can be the same, as this will be a lot less work.You'll be making this front frame from a top rail, a bottom rail (plinth height), two side rails, and one centre rail (unless you go for three doors, in which case two 'centre' rails). All but the two sides and the plinth will be hidden behind the doors. Note how the side rails are stepped forward by 24mm (the door thickness) from the rest.I've suggested 24mm MDF as this will be strong, easyish to work with, and can be made up from 12mm MDF glued together with PVA. If you can get by with only having to buy 12mm MDF, it should make life a lot easier.The frame could be constructed like this:
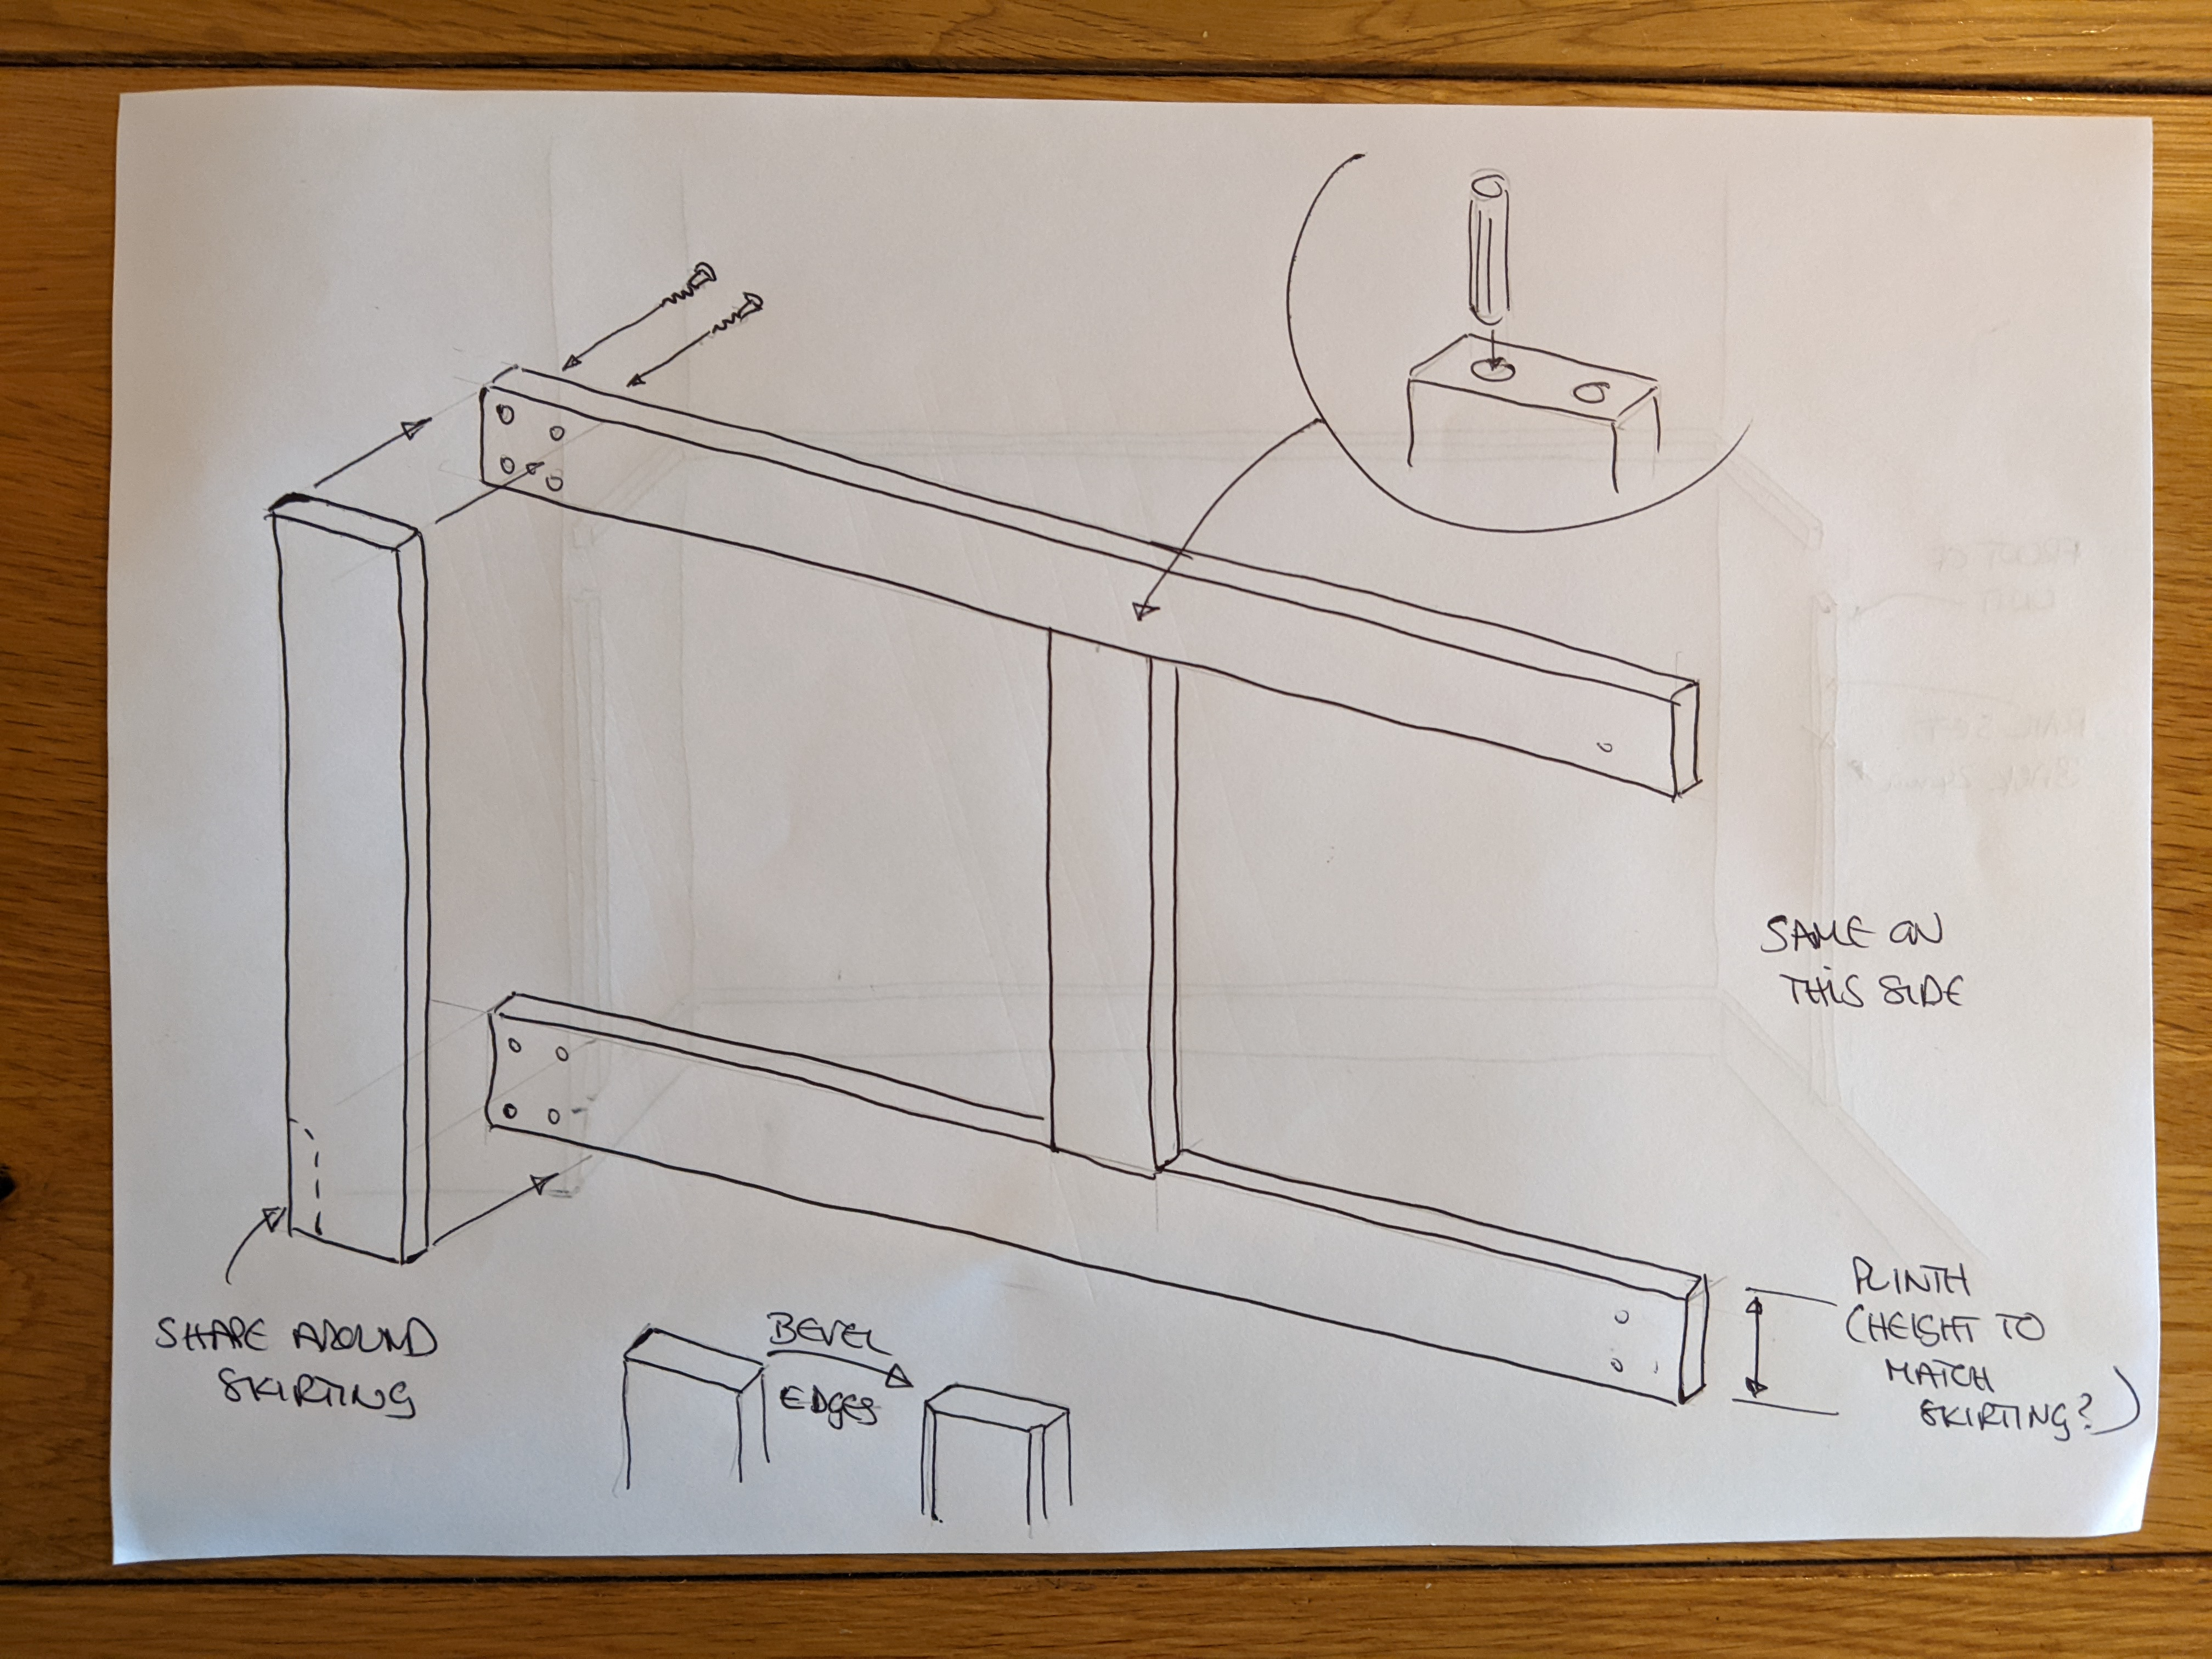 lAgain, it's not scary! And a lot less work than you'd initially anticipated, I think?And, that's it!1) Ok, IF the plinth height can be made the same as the skirting, then the skirting can be employed to support the edges of the unit's base. Along the front, a small timber batten will need fixing to the inside of the plinth at the same height as the skirting, and that will support the front of the base. Ok, yes, a couple more supports will be needed underneath, running back to front, to support the base too, but that will be easy to add, and not a tricky point.2) Note how the vertical battens in the first sketch are not only set back the required 24mm, but also stop short height-wise to allow the frame's top rail to sit 'over' it. The two side battens will fit in between the top and bottom horizontal rails, and screws driven through from the backs of these battens, into the front frame's vertical side rails. Drill pilot-holes for the screws in the MDF! I hope that makes sense.3) The chosen worktop will now just sit on the front top rail, and on the same-level battens you fitted (or will now fit) to the two side walls and along the back alcove wall. That will be plenty to support the thick, solid worktop - it won't even need fixing down - it can just sit there!4) Jobbie jobbed.5) The doors can be 12mm MDF, with ~100mm-wide 12mm stiles glued on top. These proportions will work, but I have to say that the 18+6 that you've been discussing would make for a more solid (and heavier...) door, perhaps less likely to warp too. But that would mean having to buy another (two) thicknesses of MDF, a real chore. I'd suggest that, as long as you paint BOTH sides of the doors with the SAME material, you should be fine, and I have had no significant problems with mine.6) Yes, bevel the MDF edges a few mm using a plane, and then remove a little of the sharpness using 120/180-grit. This works particularly well with the doors, and the resulting V-grooves where the stiles meet will add a lot of interest to the frame, imo. Also important, I think, on the side rails.7) Adding a shelf? Replicate the battening along the wall and back, tho' not coming right to the very front - just to whatever the shelf depth will be. The front of the shelf, tho', will need a central support up from the base. This could be a partition panel, or just a round pole.3
 -
Sorry it's taken me so long to reply! Been so incredibly busy with other bits and pieces. Just finished off the architrave recently – small victory!
Anyway, back to the units.
Regarding the skirting board, I had actually thought of running skirting along the face, and marrying it up with the surrounding wall... but thought it may look a bit odd (too high?). Our new skirting will be 120mm height. I'd planned to use this 38mm by 63mm studwork upright for the base. So in turn, the plinth height would be 63mm. Then, just run some standard MDF along the face of it.
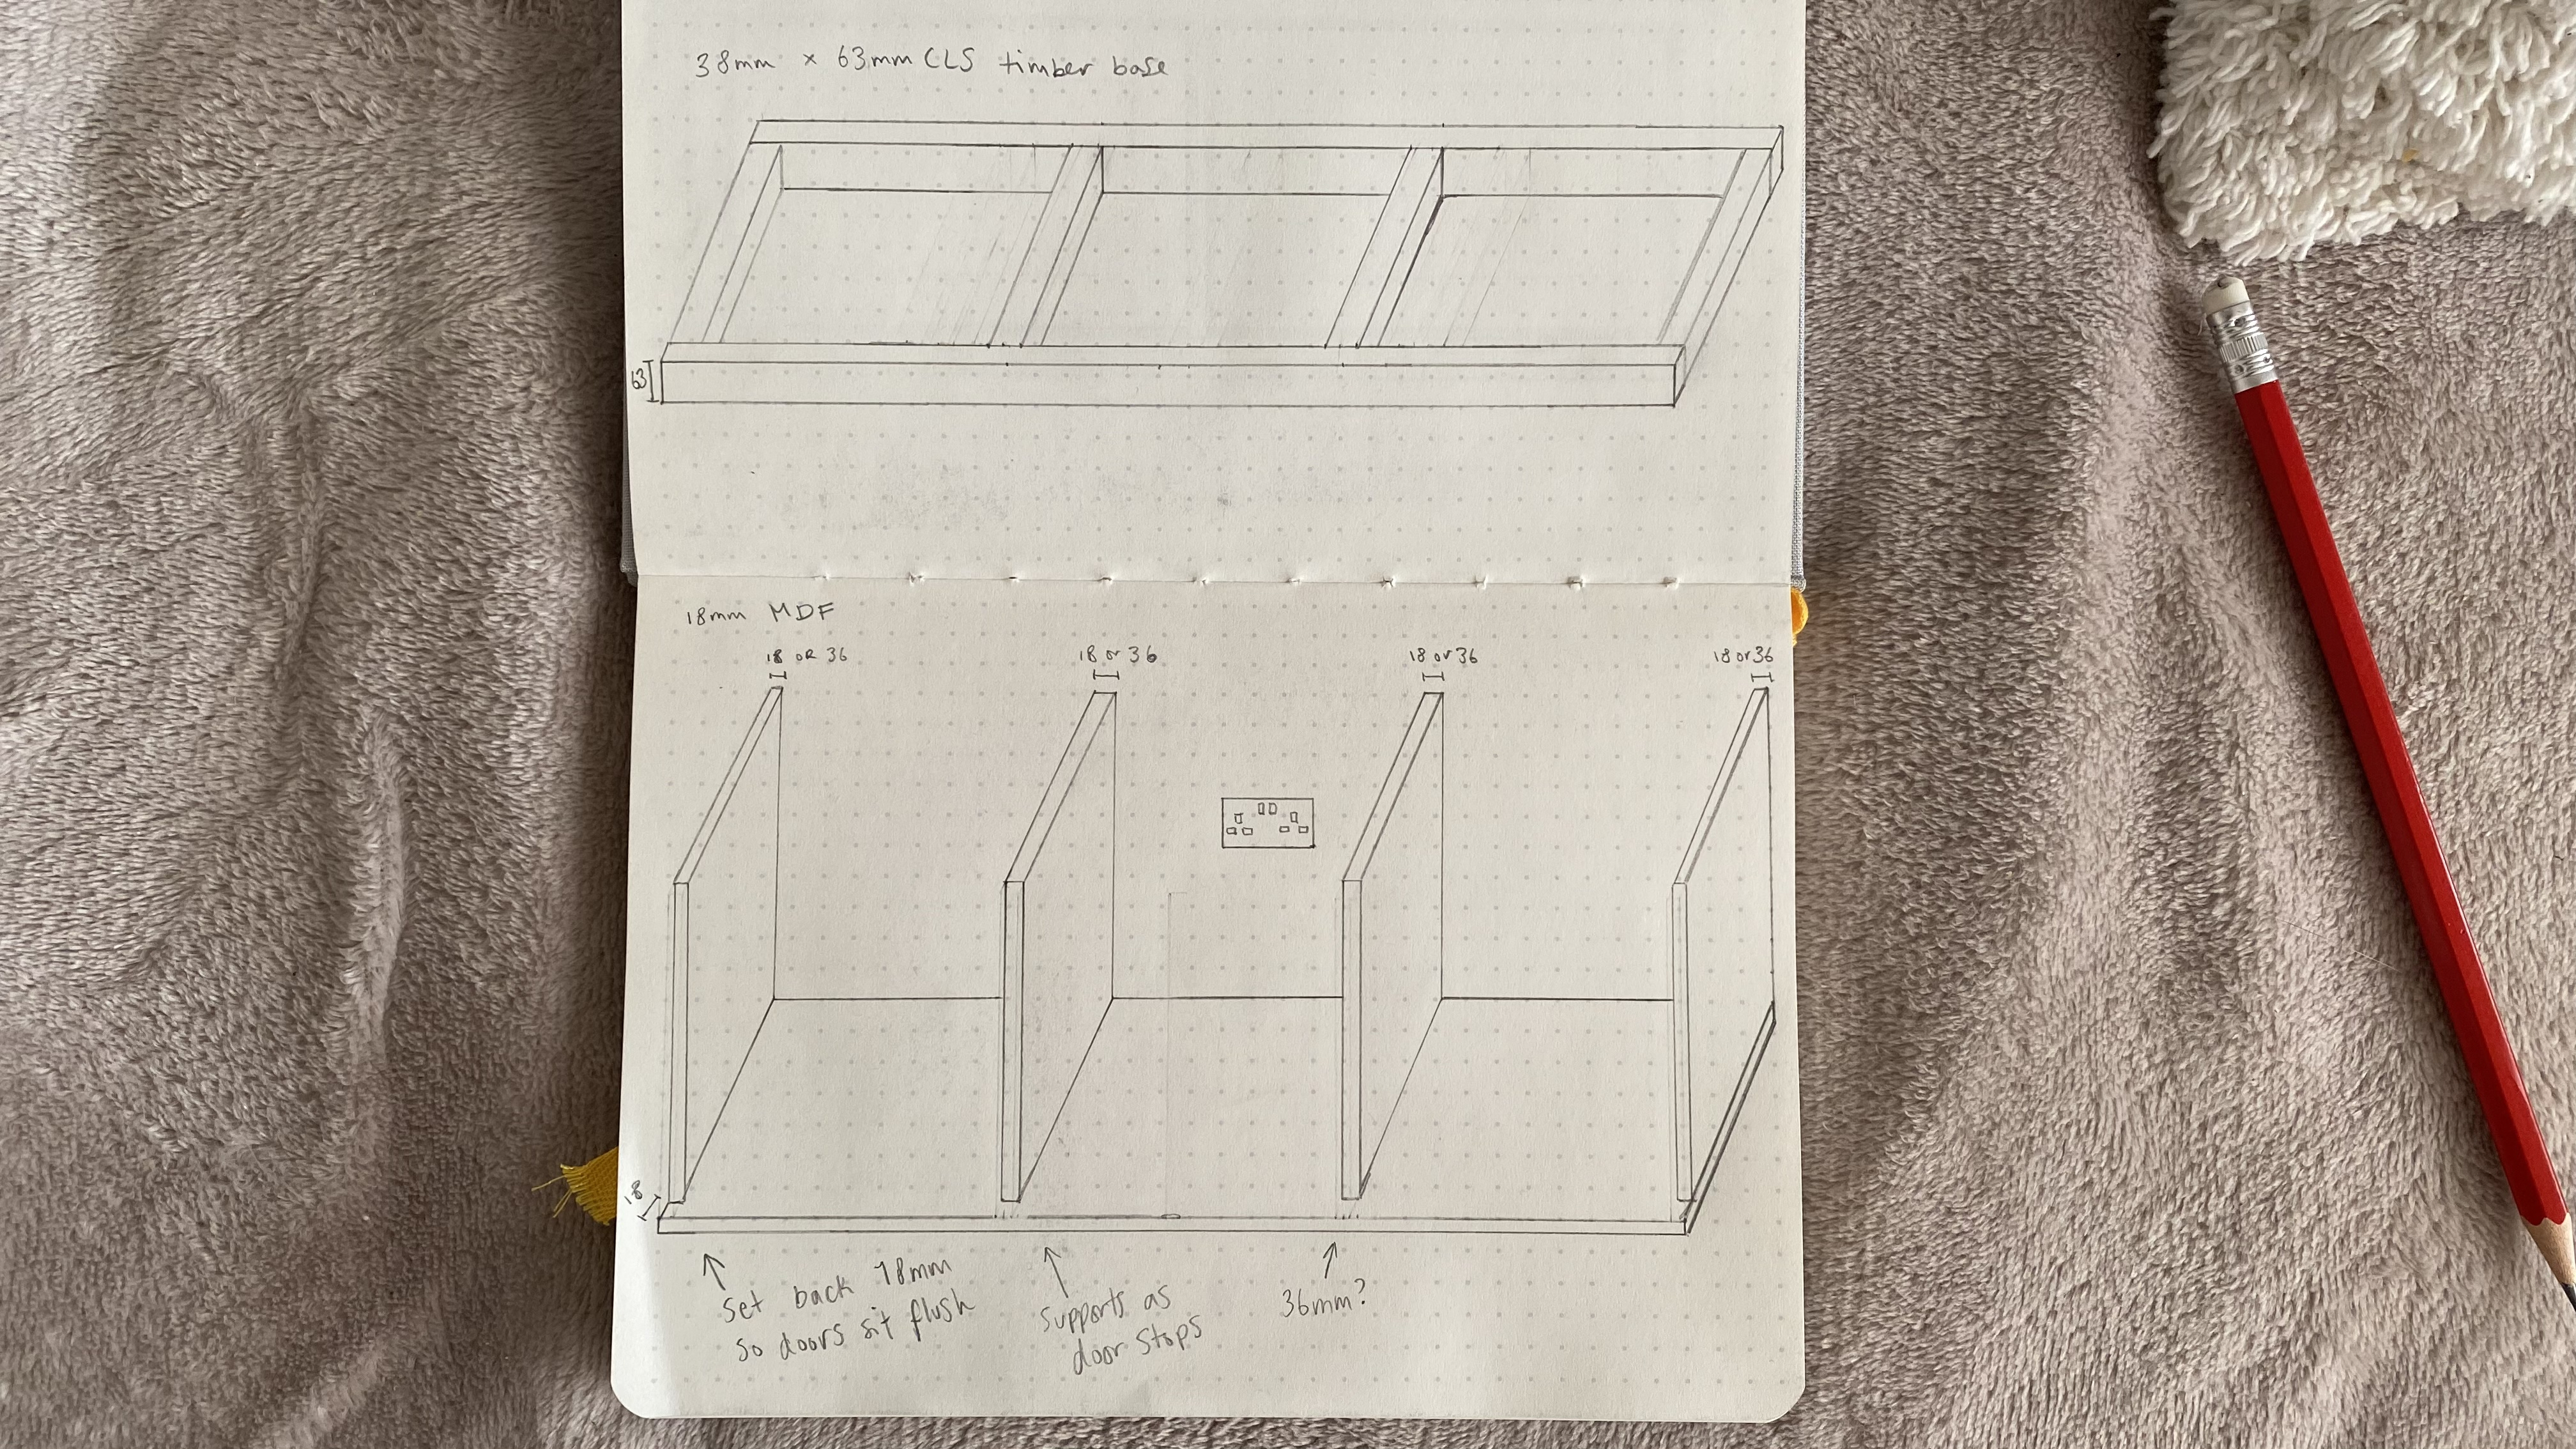
Massive apologies if this has already been commented on, but what is the problem with making up a base / plinth (with the above), and then a carcass, and plonking it on top? See my sketch.
Then on top of the open ended carcass, either another sheet of MDF with another sheet of finishing timber on top… or just the finishing timber directly on top.
 0
0 -
Hi PC. Good to see you back on this :-)
Nothing at all wrong with your construction plan. It'll be very solid.
When it comes to details such as plinth height and style, I think the best thing is as before - check out more Google images or the likes of Pinterest. You'll almost certainly be able to decide what it is you prefer.
It's what I do all the time. I find if very hard to come up with a design, so I just search for one and copy it.1 -
Thanks! Good to be back on it
I have a couple questions, about my approach in particular.
Is there any benefit to creating three separate carcasses, and ultimately screwing them together?
On the left side of the left unit, it is arguably an external wall, sort of. It’s joined to a conservatory. My concern is damp building up. Is it a concern at all? If it is, what is the best way to prevent it?0 -
I personally would break the units into three, as your alcove is quite wide it makes them easier to manoeuvre into place.If you have a cavity wall it is unlikely you would have damp problems and adding ventilation would be unsightly IMO.
Agree with you on no skirting, I’ve done both but think it’s looks better without.Maybe, just once, someone will call me 'Sir' without adding, 'You're making a scene.'2 -
paperclap said:
Regarding the skirting board, I had actually thought of running skirting along the face, and marrying it up with the surrounding wall... but thought it may look a bit odd (too high?). Our new skirting will be 120mm height. I'd planned to use this 38mm by 63mm studwork upright for the base. So in turn, the plinth height would be 63mm. Then, just run some standard MDF along the face of it.
Ooookkkaaayyy!A couple of tweaks required here Look closely at the pic on page 2 of the units you hope to emulate:
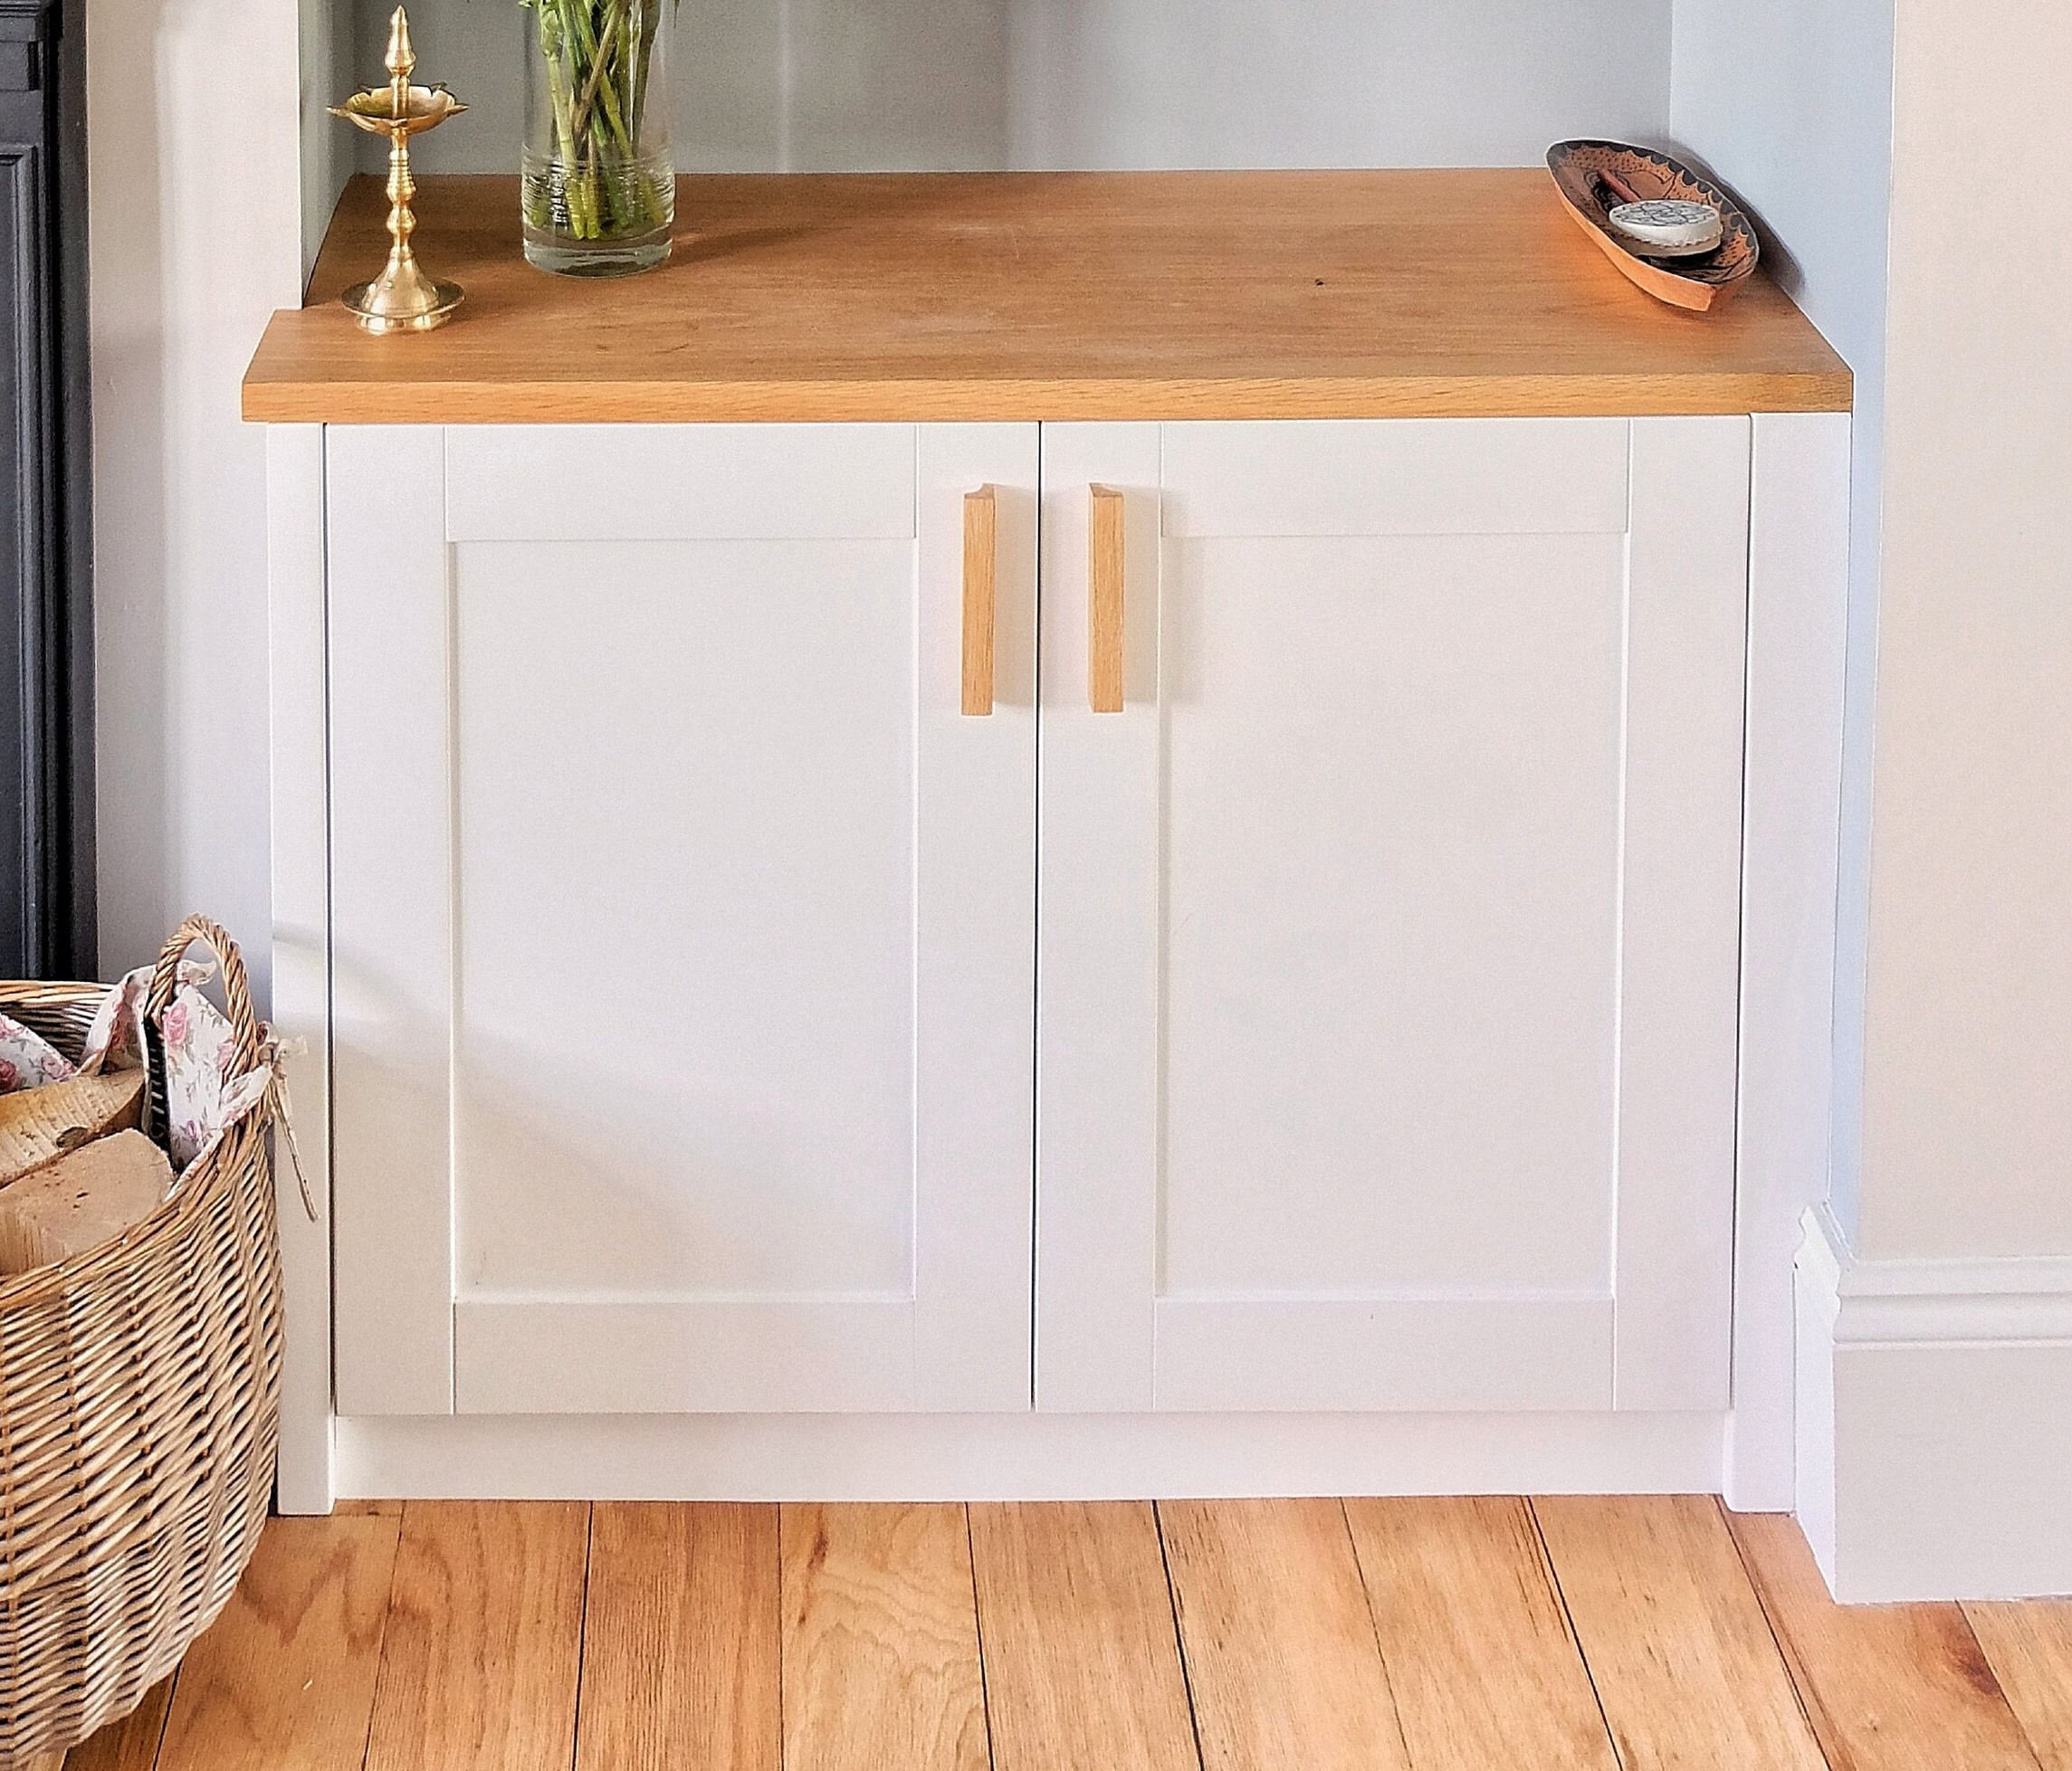 Things to note:1) The unit above has nice thick outer sides to it, that come out flush with, or even a few mm past, the door faces. I think that looks good, but also means that the skirting can go up to it and end up neatly butted as shown. A suitable thickness for the sides would be, say, 32mm, ie a couple of 18mm MDF thicknesses. You are planning to use 18mm MDF for the unit sides anyway? Cool. You just need to add another strip - it only has to be 70mm-ish deep - to the side, flush with the front, and sand it all down to make the double-thickness.2) The doors cover - hide - the unit's bottom. That means that the bottom panel does not come out 18mm beyond the partition panels as in your sketch, but actually will be flush with them. Only the two outer sides of the unit, as mentioned in (1), will come out beyond the unit carcase, by around 22mm (the wee extra will allow for the door hinges and also a slight aesthetic). Does that make sense?3) The two outer unit sides will then need a further fillet strip added to their insides of this double thickness, set flush with the unit bottom and other partitions. This will act as the units front 'lip' that the doors close against, and will also take the hinges. Check out your kitchen cupboards, and look how the door sits in relation to the unit sides and front panel edges - the doors go over them, yes?4) That means that the centre partition panels will also need a double thickness at the front, but you seem to have twigged this already in your sketch. This will be the lip the doors close against, and on which the hinges will be mounted.So, a bit like:
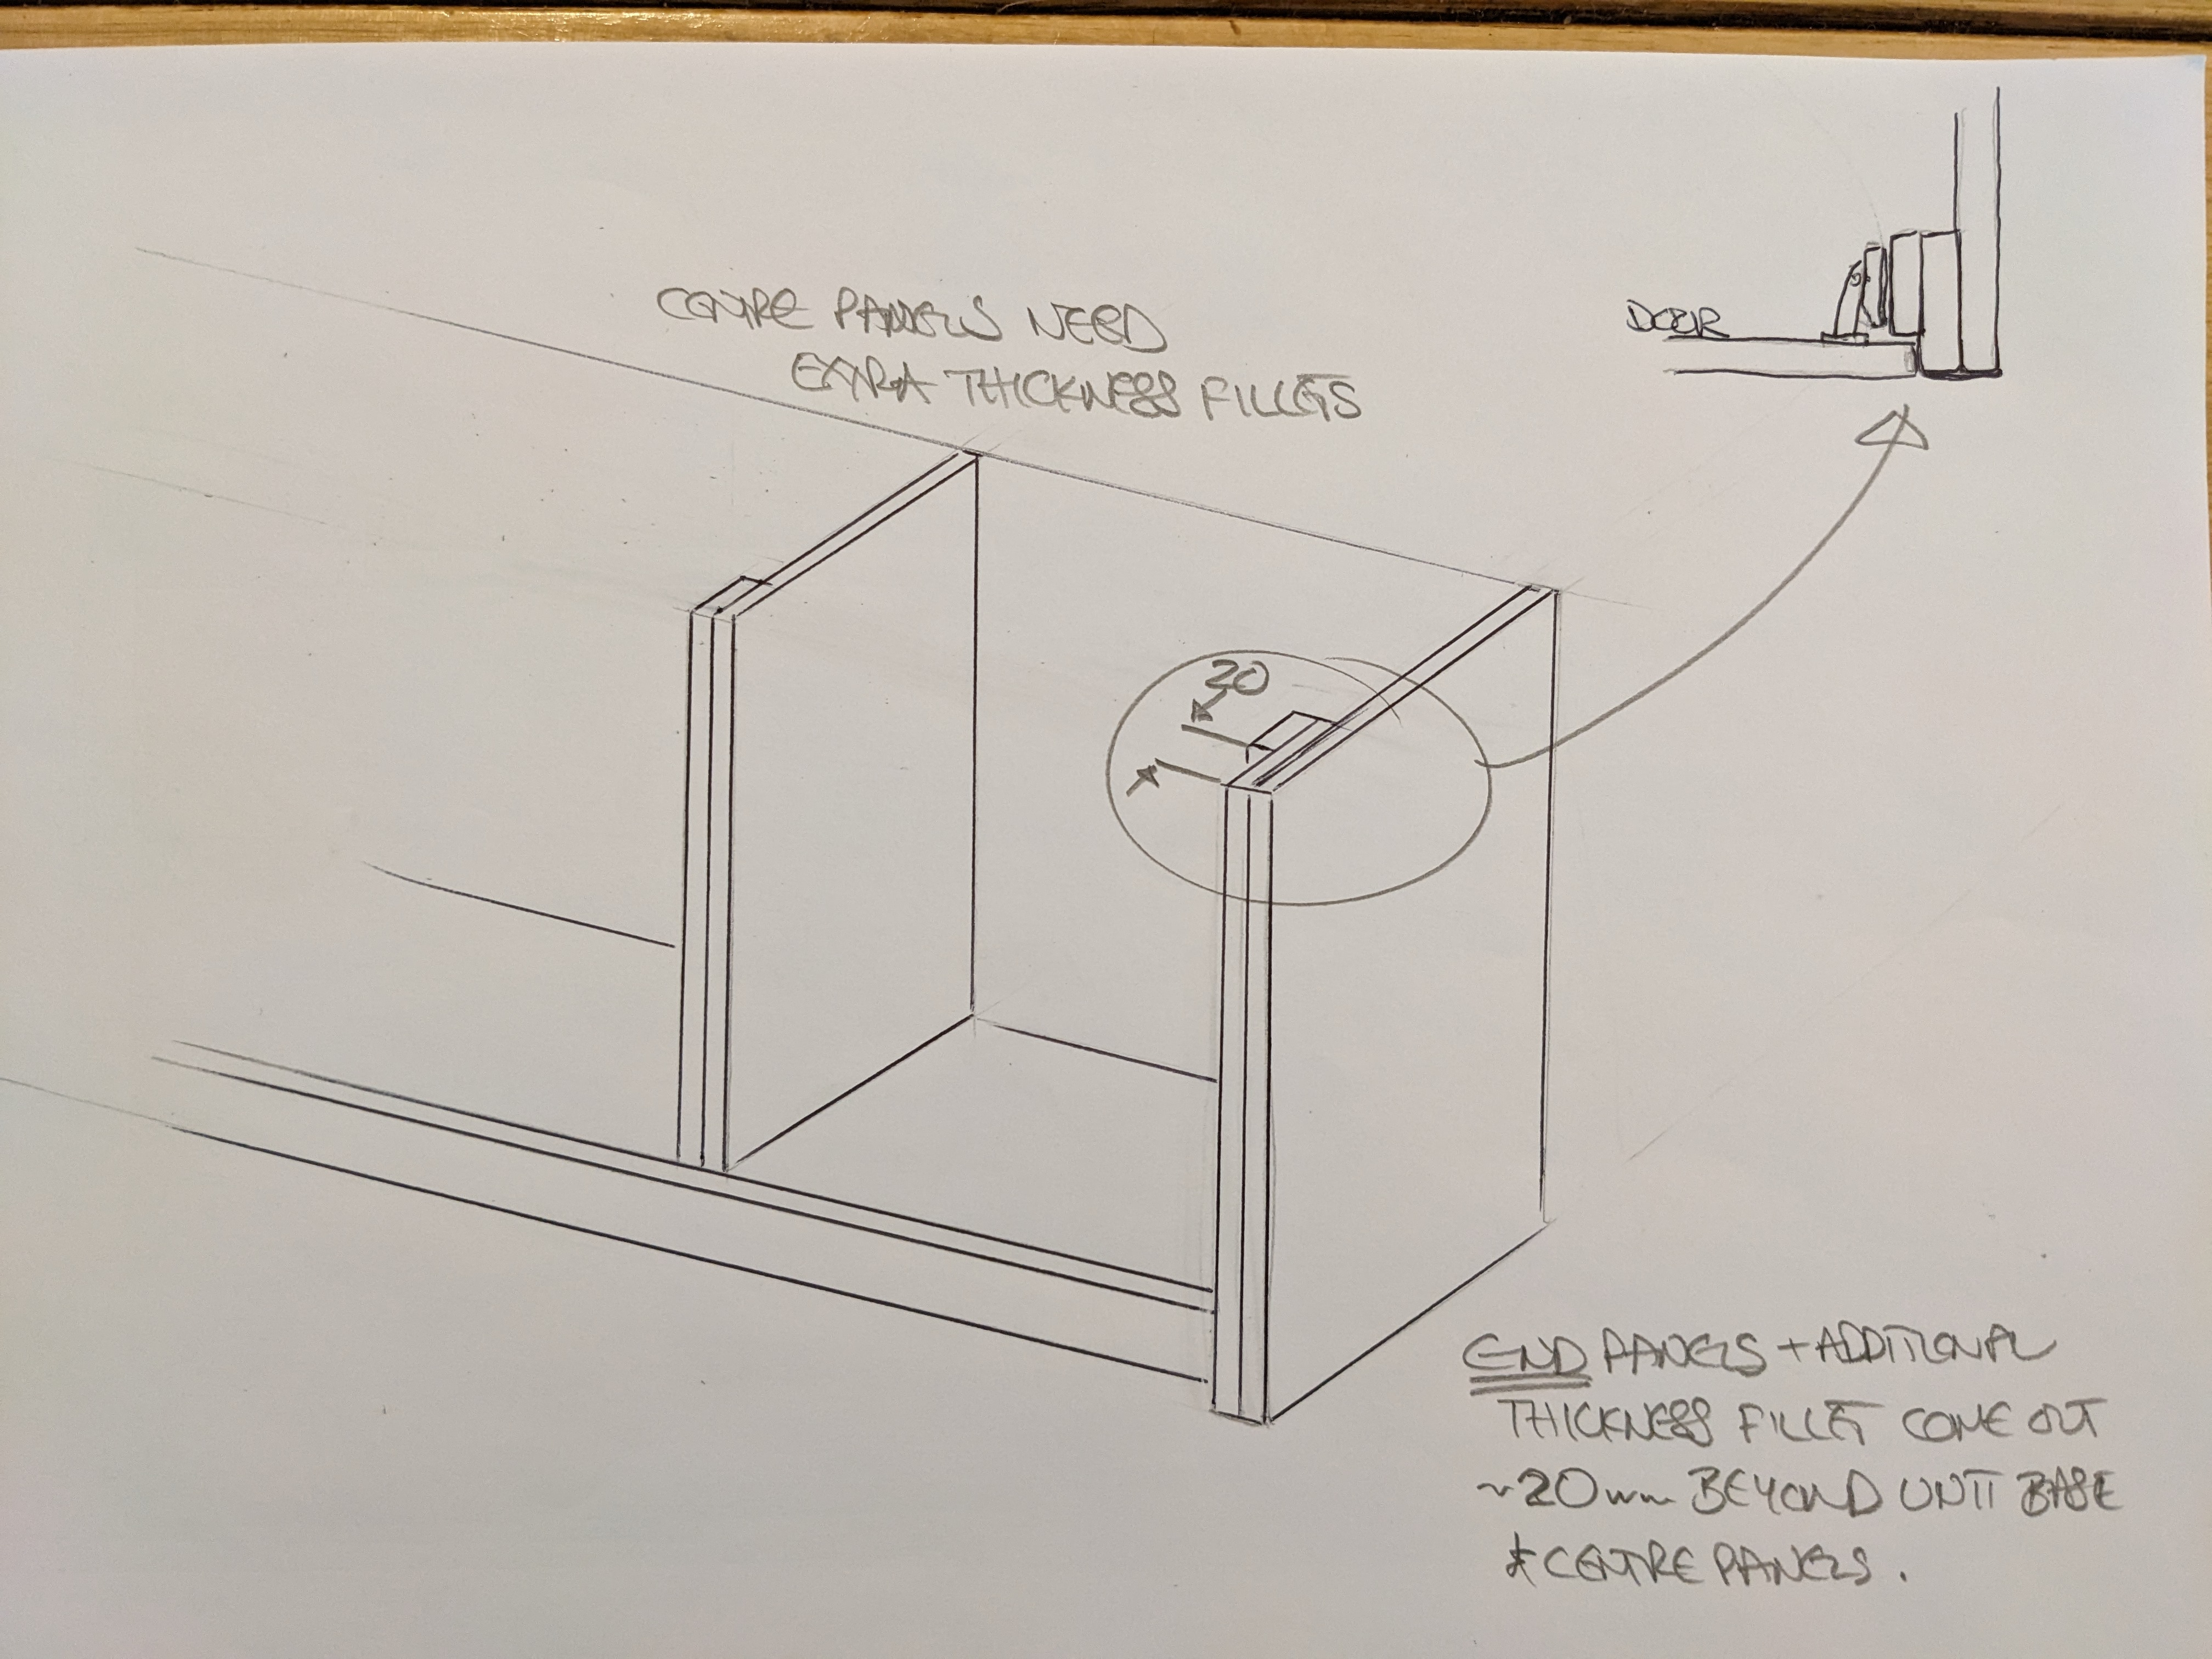
1


Confirm your email address to Create Threads and Reply

Categories
- All Categories
- 354.8K Banking & Borrowing
- 254.5K Reduce Debt & Boost Income
- 455.6K Spending & Discounts
- 247.7K Work, Benefits & Business
- 604.6K Mortgages, Homes & Bills
- 178.7K Life & Family
- 262.3K Travel & Transport
- 1.5M Hobbies & Leisure
- 16.1K Discuss & Feedback
- 37.7K Read-Only Boards