We’d like to remind Forumites to please avoid political debate on the Forum.
This is to keep it a safe and useful space for MoneySaving discussions. Threads that are – or become – political in nature may be removed in line with the Forum’s rules. Thank you for your understanding.
📨 Have you signed up to the Forum's new Email Digest yet? Get a selection of trending threads sent straight to your inbox daily, weekly or monthly!
The Forum now has a brand new text editor, adding a bunch of handy features to use when creating posts. Read more in our how-to guide
Library shelving
Comments
-
Ok, now I really do need some help. Have decided to go bespoke with this and need a plan. How do I go about this? I'd rather go with what is tried and tested rather than design something from scratch and then realise it doesn't work for me.No man is worth crawling on this earth.
So much to read, so little time.0 -
Hi,just had quick look at thread, for that length of shelving and amount of books I would check wallplate and joists are up to the job,if it is wooden floor.Play with the expectation of winning not the fear of failure. S.Clarke1
-
The floor has been stripped back to its original cement and is awaiting a screed before having engineering wood laid. You're right a shelf without supports just won't do.Eldi_Dos said:Hi,just had quick look at thread, for that length of shelving and amount of books I would check wallplate and joists are up to the job,if it is wooden floor.No man is worth crawling on this earth.
So much to read, so little time.1 -
Rosa, could you post a photo of that whole wall, and add dims?
0 -
I've given it a go:
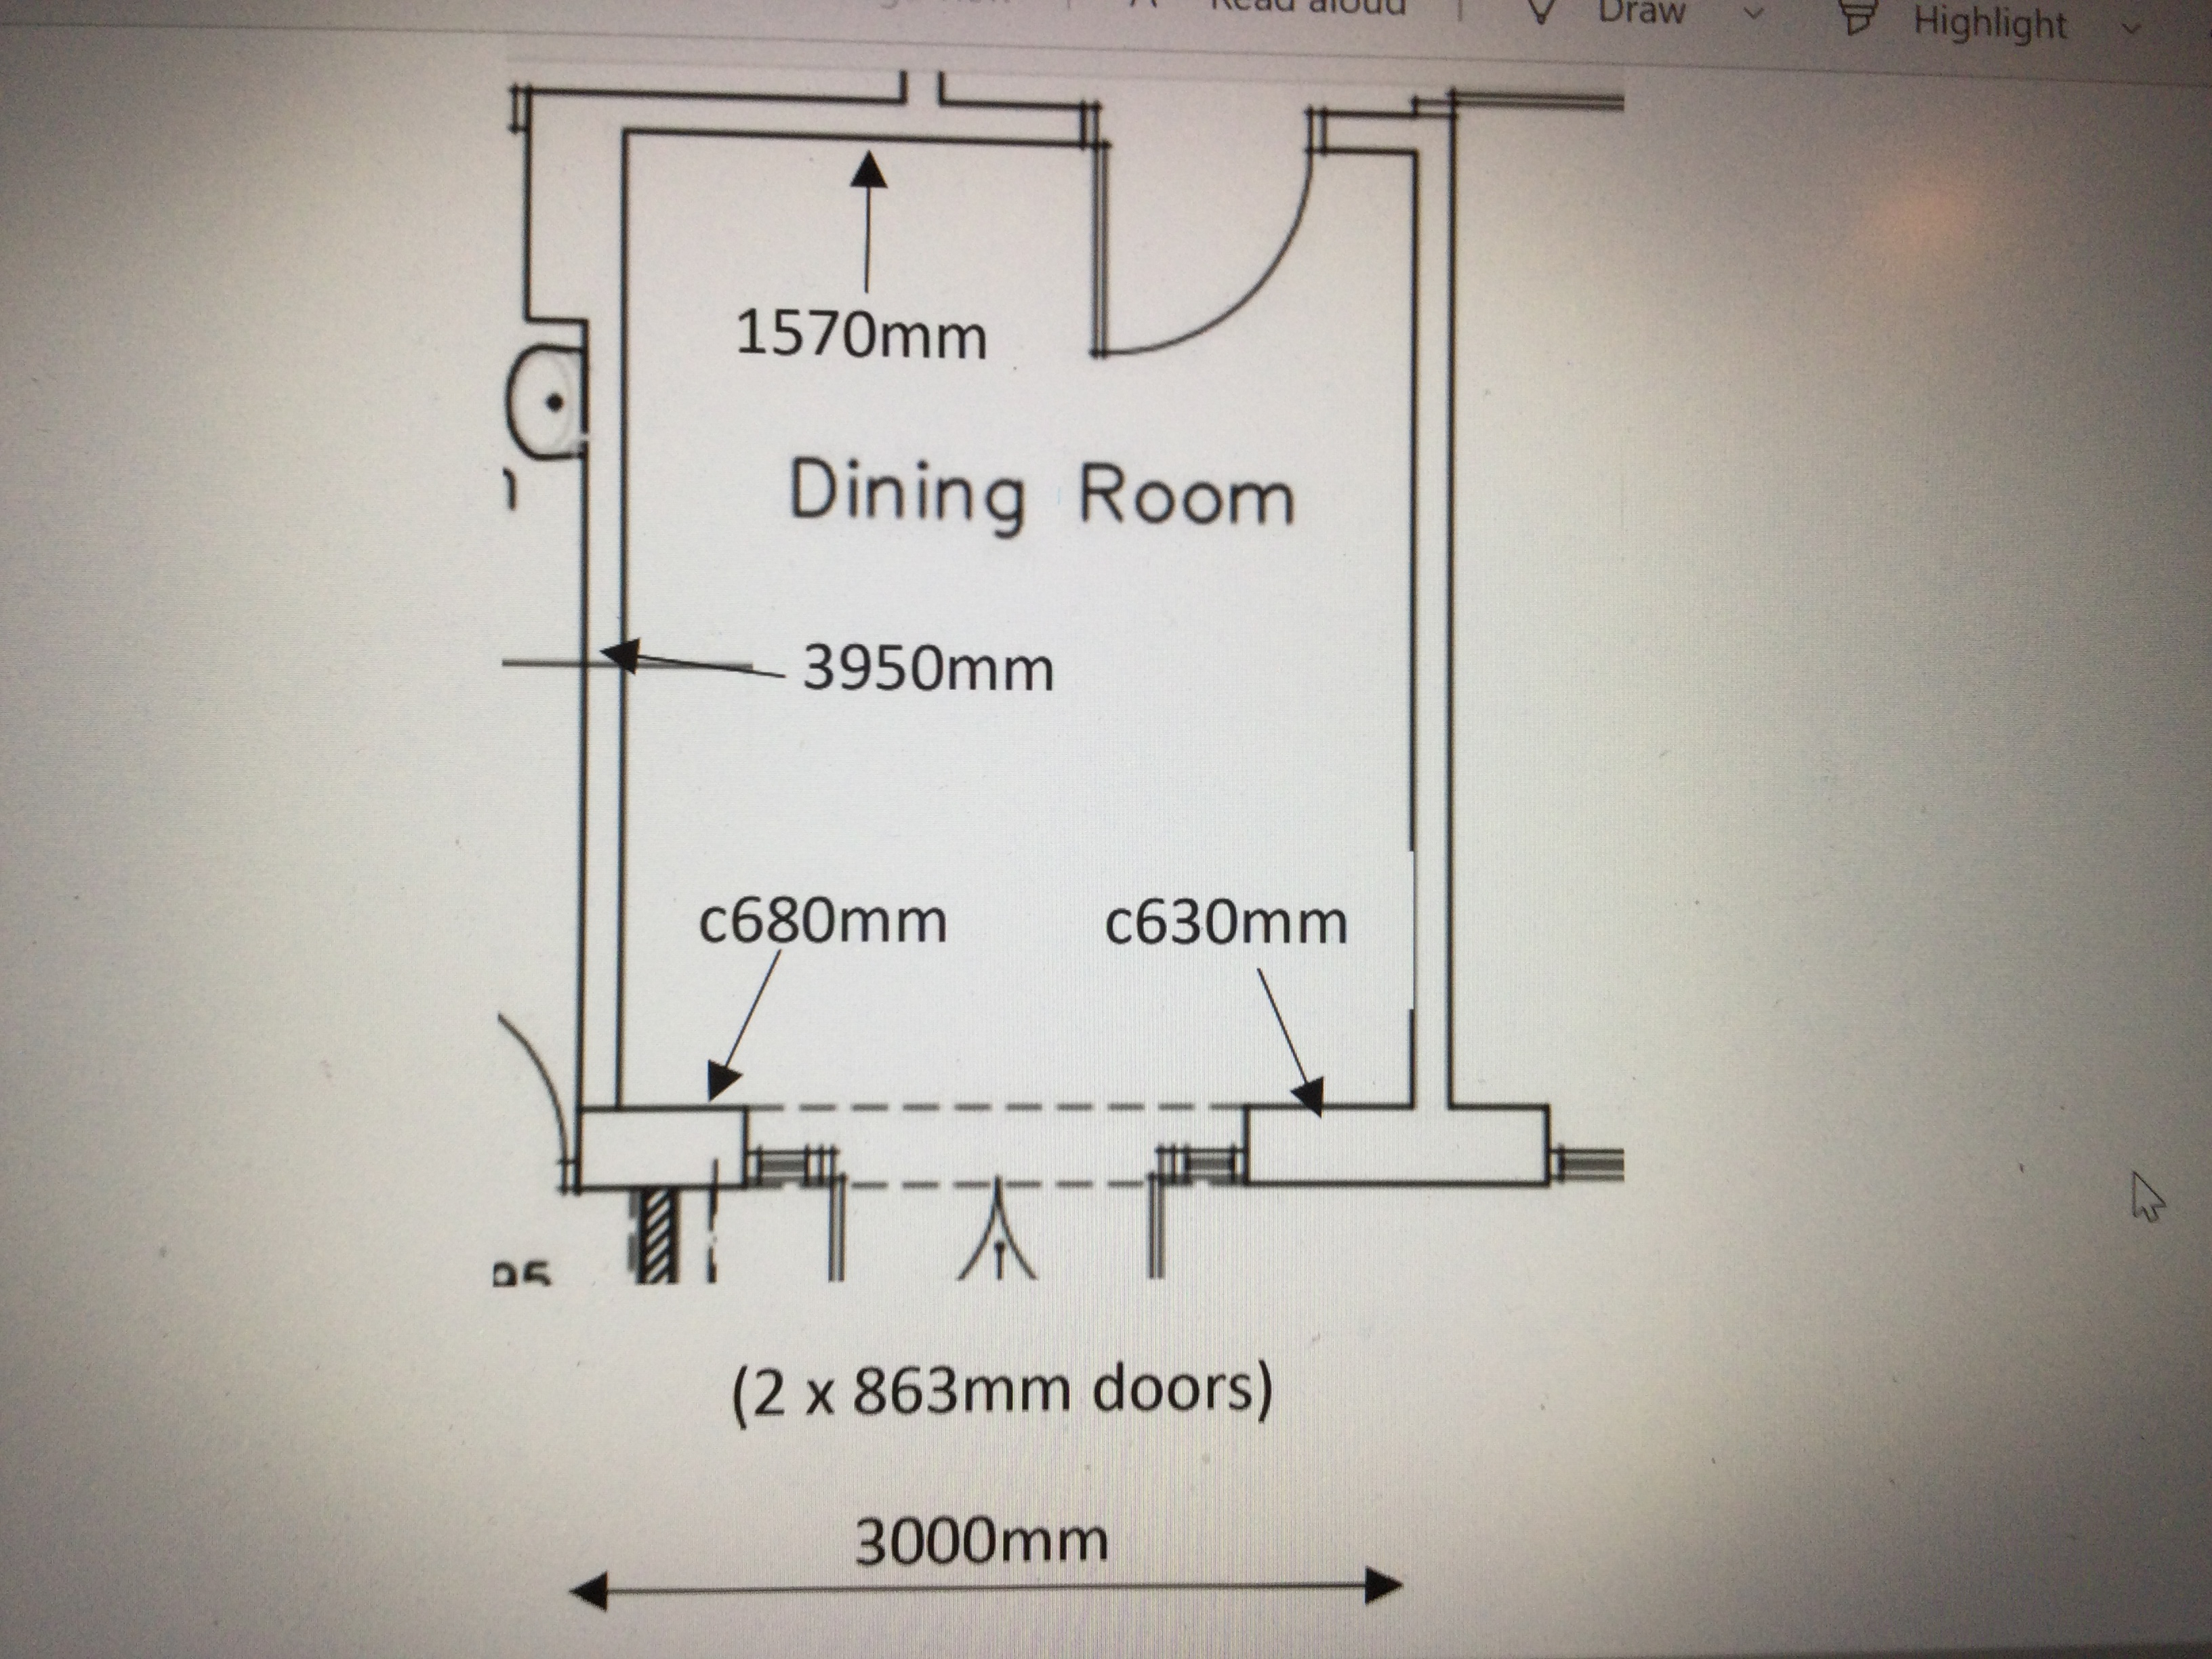
Shelves across the back wall (3950mm) extending along the 1570mm section of the adjacent wall; height 2440mm. The opposite wall has a radiator in the middle and wall lights either side so will have to work something around that, but if you could give me an idea of what's to run along the back wall I'm sure it could also be adapted to the front.
Library double doors went in today and are looking rather fabulous, I must say!No man is worth crawling on this earth.
So much to read, so little time.2 -
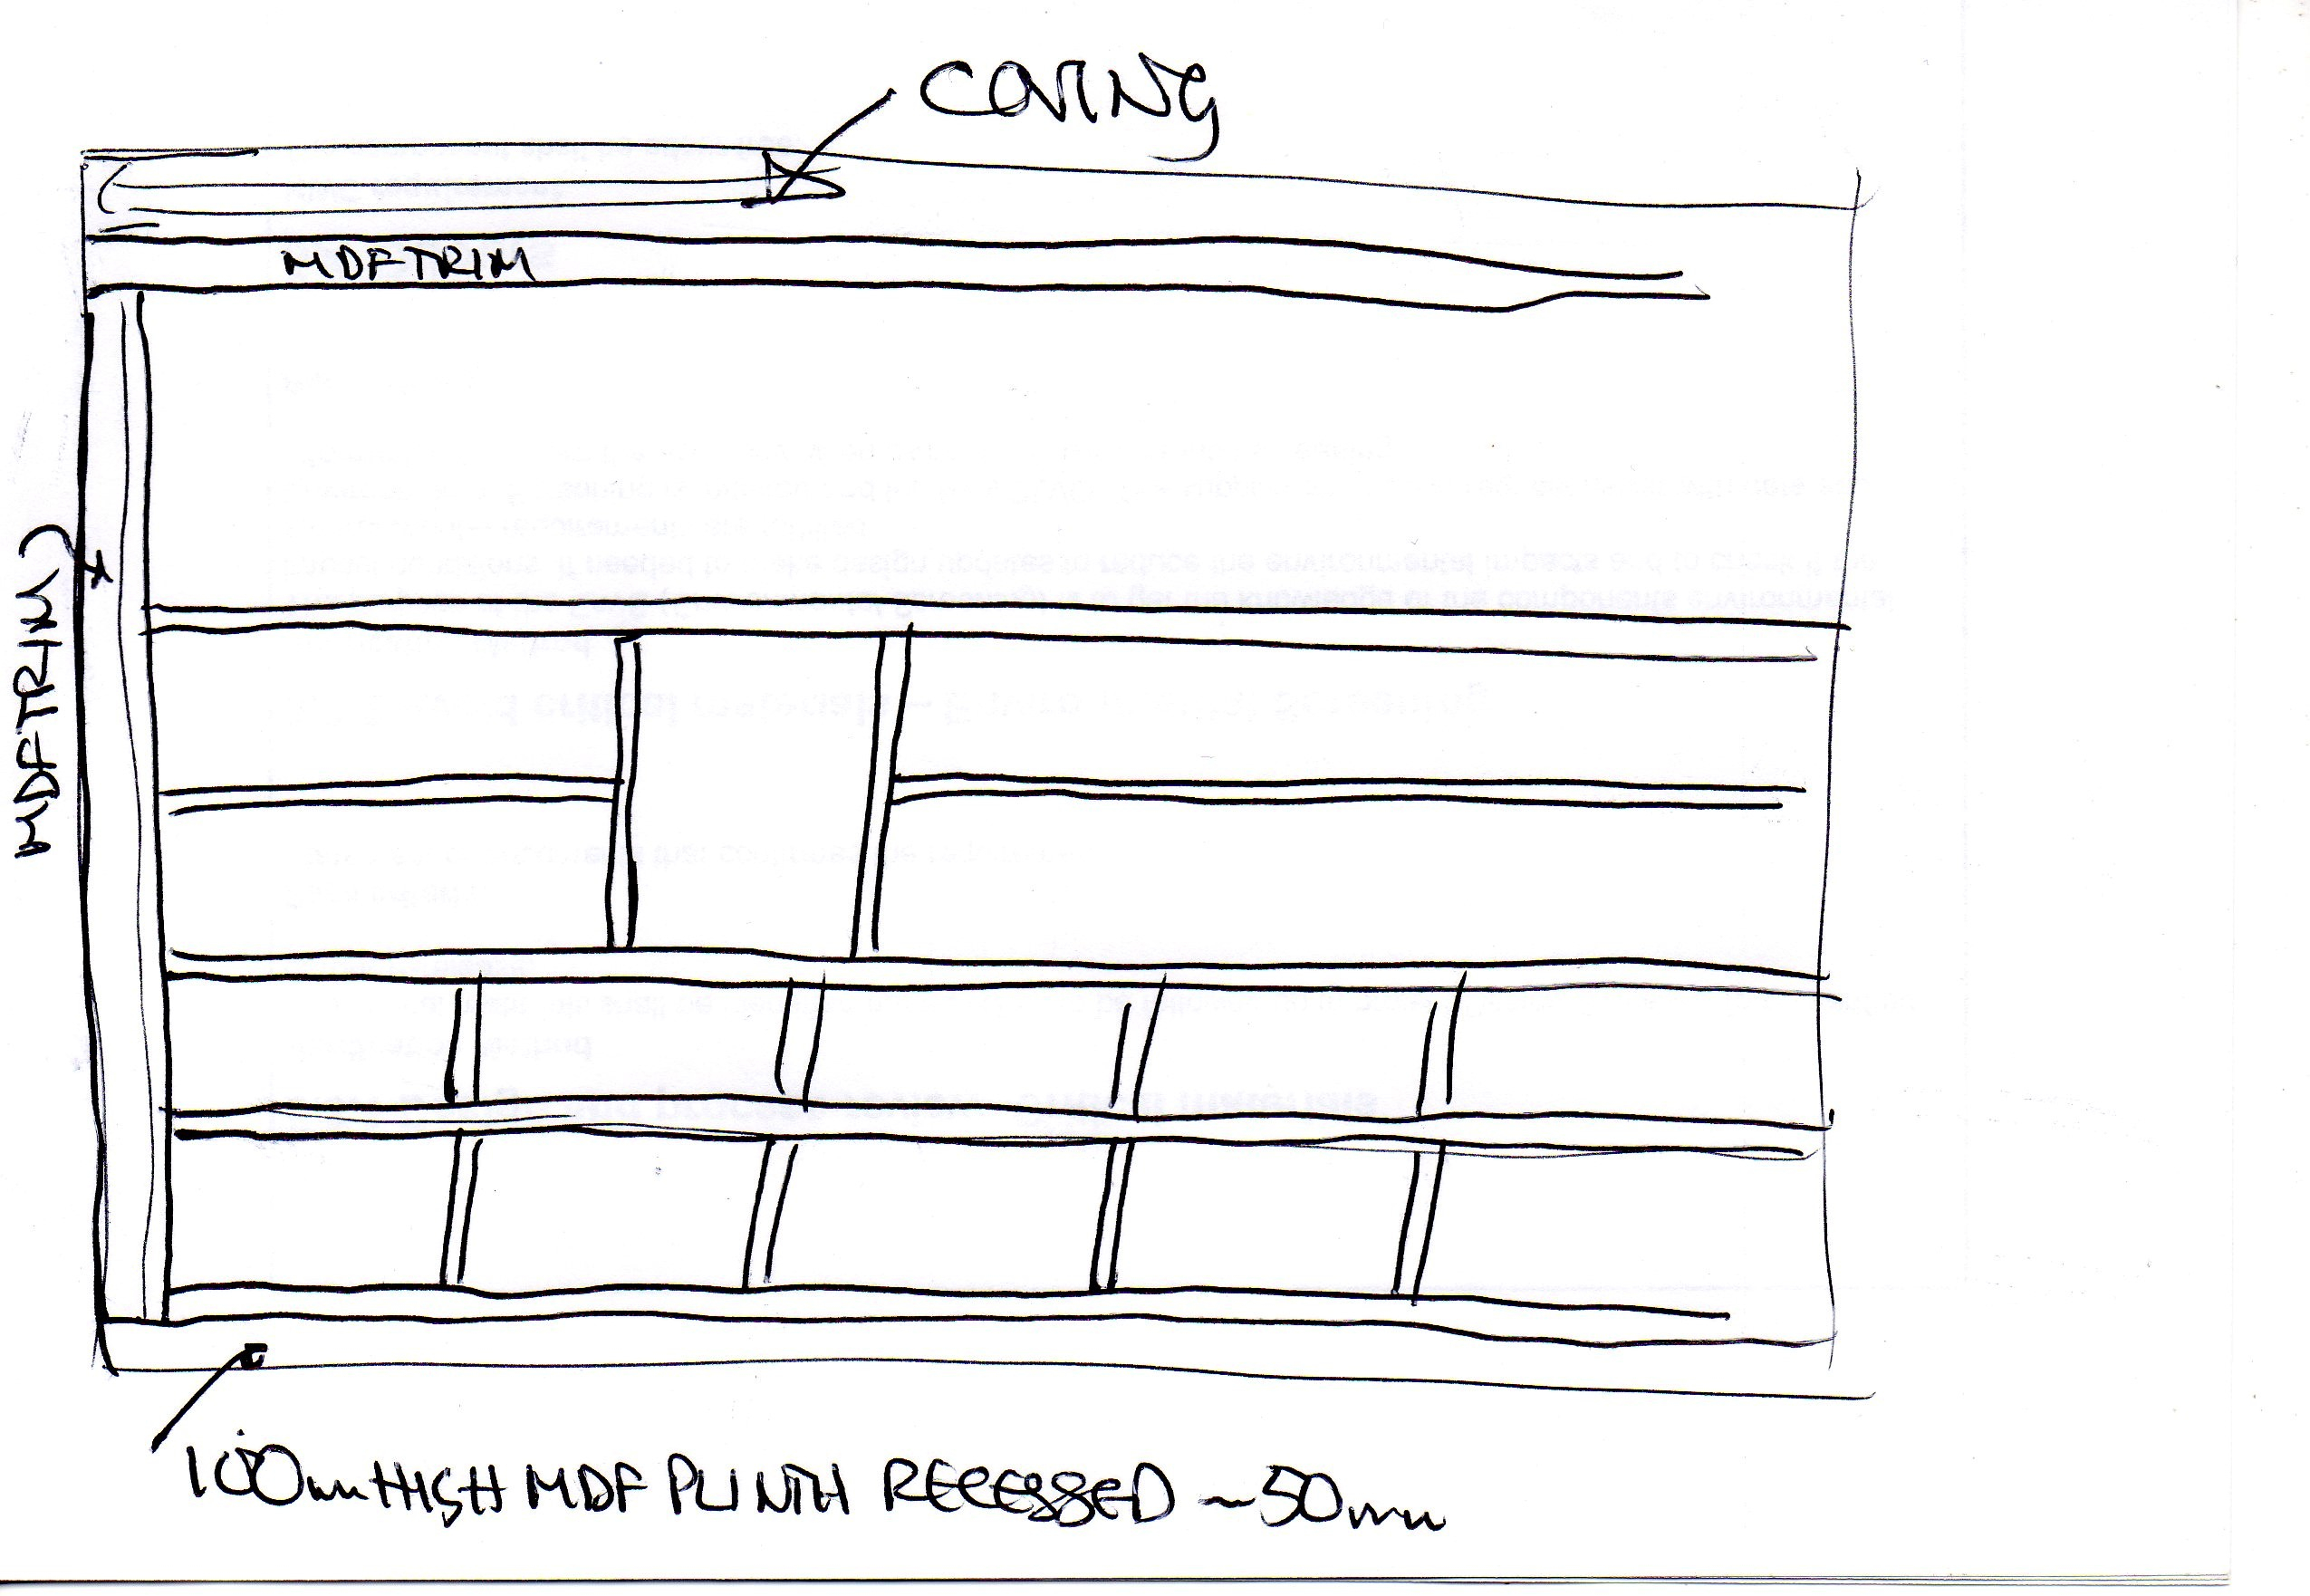
1) Decide on bookcase depth. This should obviously be deep enough to take your deepest books, but also should look right - if you have the room, then consider nicely deep - say 300mm overall. If you want to keep it as flush as possible, then go by your deepest books - 200mm ish?2) Line the walls with T&G panels. Your joiner should be able to route V-grooves into hardboard with no issue (If I can do this on a garage floor, then they should youknow.) This should be a super-cheap way of getting the lovely T&G effect. It's between you and them how to achieve this, or whether you actually want it - but I think it makes the world of difference.Shelves now built out of 18mm MDF cut into planks (even consider 22mm if you can stretch to it, but not at all necessary) of the chosen shelf depths - say 280mm (for a 300mm total unit depth). .3) Start with a 100mm-high frame that'll (a) support the bottom shelf and (b) the front of which will act as a recessed plinth. This will be set in from the front edge by a round 50mm. See sketch.4) Lay the first shelf on top of this. Full length planks to required depth - say 280mm5) Pop vertical side panels along the top at required spacings. These will be shelf-depth (eg 280mm example) x the required height of shelf spacings to suit your books/things. They will need spacing to suit the sagability of the next shelf up, which it'll be supporting.Look at Google 'built in bookcase'. Feast your eyes. Decide on the vertical spacings, and shelf heights. I'd personally suggest larger shelf heights nearer the bottom (ie you might want smaller paperbacks further up?). I think a variety of heights looks more 'bespoke', but don't go crazy.Also consider a variety of widths between vertical panels. Consider spaces purely for ornaments too, or a vase or clock or even a picture. For this, you may even want a 'box' of two shelf-height size. Make sense? Just look at pics, and see what you want. It's all built the same way - nothing more complicated required.6) Add next shelf. 7) Add next verticals. 8) Add next shelf. 9) Add next verticals.10) ditto. Until you get to around 130mm from the ceiling. Last 'shelf' (bookcase 'roof') goes there, followed by an MDF trim piece to which a length of lightweight decorative coving has been glued. Fit this so's the coving either touches the ceiling - and is bonded to it - or leave an obvious gap, whichever you prefer. Or no coving if you want it more contemporary.11) Finishing touches. Definitely vertical MDF trim pieces up each end against the walls. These go on top - in front - of the shelves. Could be plain MDF strips say ~95mm wide, or could have a V-groove routed to fit in with overall scheme like I did. Either leave the rest of the shelves as they are or - better, I think - add occasional vertical strips every, ooh, metre or so, but this will vary depending on the vertical spacings you've chosen. Again these can be either plain or V-grooved. I think better visually if they are slightly narrower than the ends ones - say 70mm. Something like that, but no actually need for these.12) Consider LED lighting in the top - and any other - shelves firing downwards. Or perhaps just where you leave an alcove for a decorative piece.13) For corners, look at pics for examples. I guess best would be to continue shelf around in a flow, and then just have the vertical end pieces at the very ends. Or, end each shelf run with a narrower trim and another at the start of the next shelf so they are like an 'L'. But no rocket science to this.14) Paint in your chosen colour and finish. I'd suggest matt or eggshell. For 'matt' choose a durable scrubbable type. Remove sharp edges from all shelves. Ideally the joiner will have planed a slight bevel on them all - ask them to. Finish with 120 grit, and paint. MDF primer first, brush into corners and then mini-roller.4
-
Have you seen https://shelfstore.co.uk They are more expensive than ikea but they do look good and have lots of different sizes available.
2 -
Once you sketch out what shelf-heights and vertical spacings you want, your joiner will slice all the MDF pieces out easy-peasy and just assemble them on site; they'll all be to the same chosen depth, 280mm or whatever you want. They'll then assemble them like a playing-card building. Their choice of how to attach them together - dowels, panel pins, a bead of poly adhesive - and then some hidden brackets to the wall.This is simple stuff, but it'll be truly bespoke and look a million squid.Consider colours carefully - either a gentle off-white, or bold with a different back and shelf colour - some stunning combinations out there.And, this should really be relatively 'cheap'. A lot of prep for the joiner, yes, but no complex joints or anything time-consuming on site.

 3
3 -
And on the other wall, you simply build the shelves around and over the radiator.You could even get the joiner to build a bespoke radiator cover for this - same stuff, same method.
 (The tasteless 'cuddling' statue is mil's, the hippo is ours... )2
 -
https://woodbin.com/calcs/sagulator/Jeepers description is textbook!
The above calculator will tell you at what stage material will sag at what length and loadMaybe, just once, someone will call me 'Sir' without adding, 'You're making a scene.'3


Confirm your email address to Create Threads and Reply

Categories
- All Categories
- 354.6K Banking & Borrowing
- 254.5K Reduce Debt & Boost Income
- 455.5K Spending & Discounts
- 247.5K Work, Benefits & Business
- 604.4K Mortgages, Homes & Bills
- 178.6K Life & Family
- 261.9K Travel & Transport
- 1.5M Hobbies & Leisure
- 16.1K Discuss & Feedback
- 37.7K Read-Only Boards