We’d like to remind Forumites to please avoid political debate on the Forum.
This is to keep it a safe and useful space for MoneySaving discussions. Threads that are – or become – political in nature may be removed in line with the Forum’s rules. Thank you for your understanding.
📨 Have you signed up to the Forum's new Email Digest yet? Get a selection of trending threads sent straight to your inbox daily, weekly or monthly!
The Forum now has a brand new text editor, adding a bunch of handy features to use when creating posts. Read more in our how-to guide
Which power of induction hob can I fit?
Comments
-
Thanks WIAWSNB.WIAWSNB said:You have a 'cooker' wall switch - cool. Q - does this switch also supply an oven, or is it purely for the hob?
4th pic - where does that grey cable go to? Does it disappear into the wall, or go to a wall plate, like I linked to previously?
4th again - how does that grey cable avoid the sliding drawer?
The connection is for the hob and a double socket which is on the side of the same island.
Re the 4th pic, I cant see where the cable goes - I assume it's straight to the fuseboard. In the pic, the cable has been brought into the sliding drawer - when I removed the original hob, it was sitting in the one inch gap - when the drawer is fully closed - behind the drawer.
The stonemason is due to widen the hob at midday tomorrow and so I was hoping to get the hob connected in the morning, to ensure that there isn't any issue. I have a Screwfix nearby, would you mind sending a link for a JB you think could work?0 -
fabs35 said:
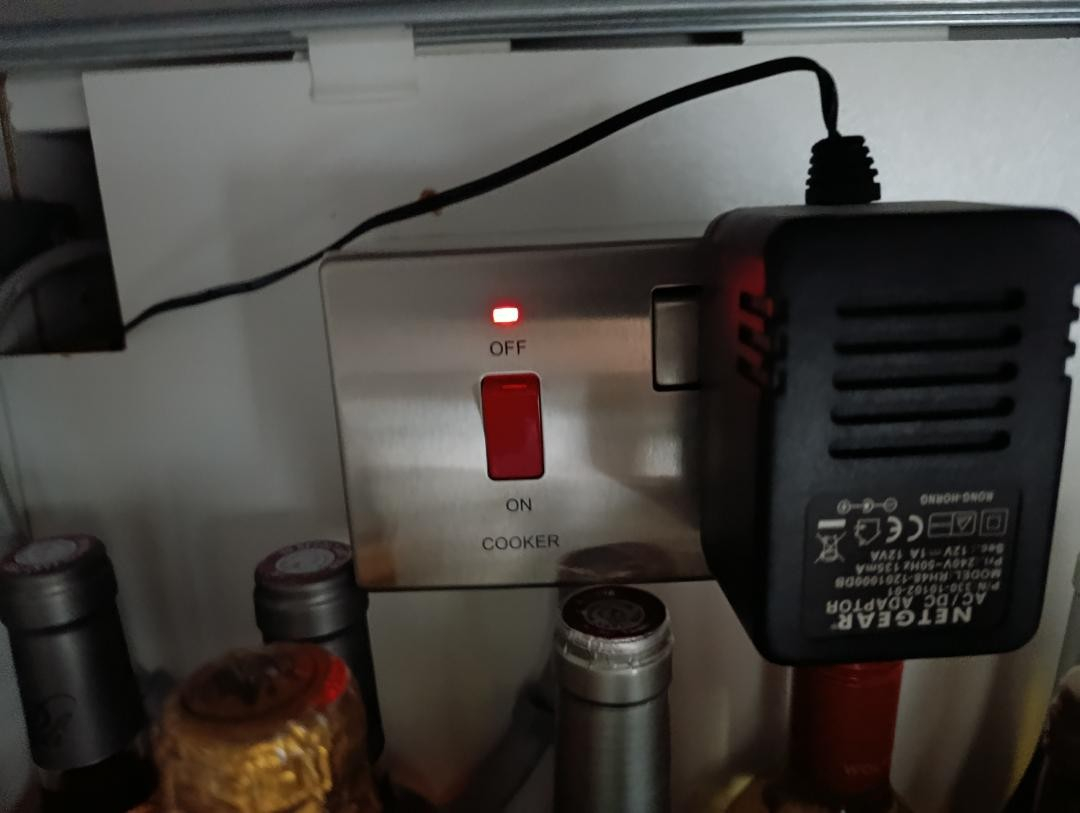 First point - that switch is 'on', and the grey cable is bare. Please tell me that isn't the case? Phew.Any 45A unswitched cooker outlet plate should do the junction-box jobbie here. The LAP, besides being cheap, also seemingly can make do with a shallower pattress box of 35mm, as opposed to the usual 45mm, but I'd personally still go 45mm: https://www.screwfix.com/p/lap-45a-unswitched-cooker-outlet-plate-white/61074First, can you confirm that the cooker switch shown here does NOT supply anything else? When you turn that red switch off, ONLY the hob supply is cut? If so, cool.What I would do in your situation is to find a location under that drawer in the unit space below where I could screw a pattress box to take the 45A faceplate. That could be on the very back, or even on the side, but where it won't get in the way of anything - so as far back and visible as possible. Also, best if it's as high as possible, but neatly clear of the moving drawer.Run the grey cable to this, and connect it to the correct side - presumably the top. You will almost certainly need to 'break' a suitable hole in the pattress box for this - it'll have a number of options, which are designed to be easily broken. Tidy up the edges to remove the sharp bits.Wiring these babies is a pain, as the cables are stiff. The secret is to bare enough of the grey outer sleeving in order to free up the brown, blue and earth wires to allow a bit of 'flex' in them - usually around 3" is fine. The grey will enter the pattress box, and the 3-odd inches of wire will ultimately be folded up inside the box once the front plate is on. NB - you will need green/yellow sleeving for the bare earth wire...Once the pattress box is in place, and the grey cable is wired to the front plate, you can try pushing as much of the spare grey back into the wall as you can to keep the run tidy. Then you will be clipping that cable neatly to the side of the unit or back. You could, alternatively, cut this grey cable to the correct length, but bear in mind that, once cut, it's cut.Then the hob is dropped in. If it's heavy enough, it might not even need clamping down, but you do want to ensure the sealing bead - whatever it is - is properly sealing all around its perimeter.Finally, you bring the hob's cable in to the faceplate - this should occur via the underside of the faceplate, and not through the pattress box. The earth goes to earth - that's important. And the other four wires are connected as explained above - in pairs.On that point, the best way to actually choose the 'best' 45A plate is to check the outlet terminals will take two hob cables each. Explain that to the person behind t'desk.0
 -
Thanks again for the detailed reply!
The wire that is next to the 'cooker' spur is for the under-island LED - when it's switched off, the LED doesn't turn on but the hob still has power. The red switch being turned off only affects the power to the hob - does this mean I could connect the cable that came with the hob directly to the 'cooker' spur?
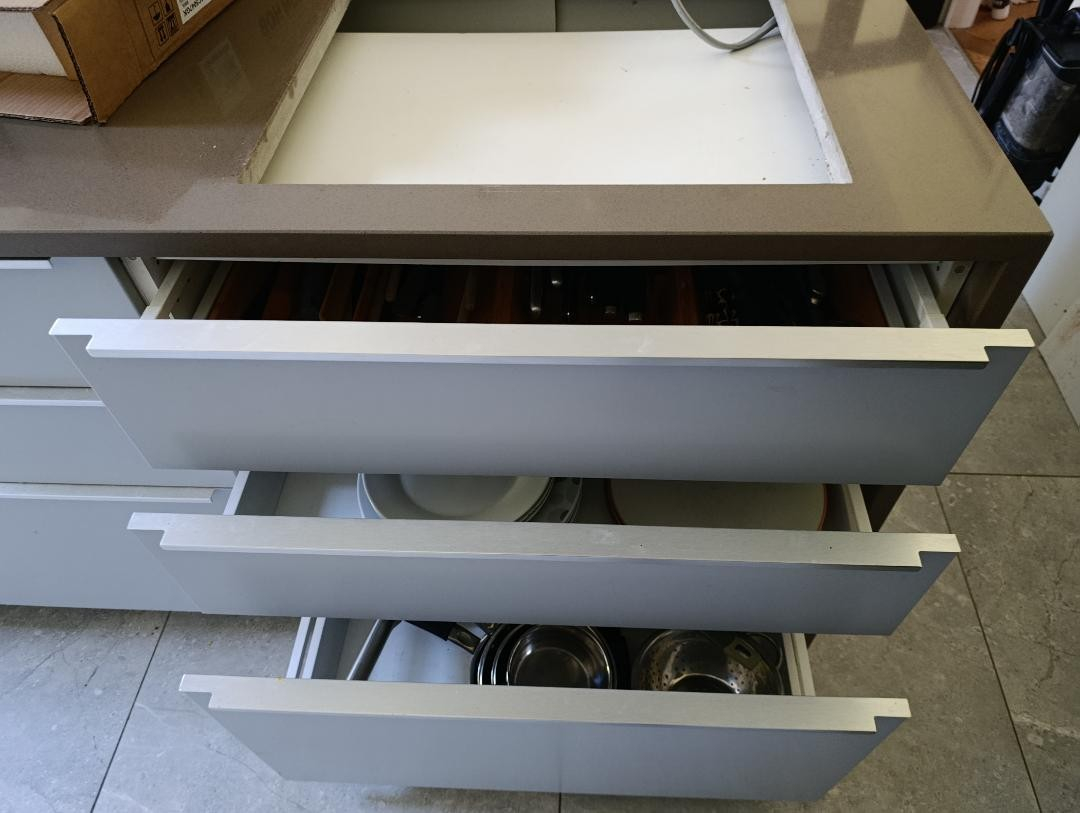
The issue with the JB is the lack of space. There is only a few mm either side of the drawer and the same in between the drawers. The only space is at the back of the drawers - exactly 45mm (see pic), and so the drawer may not close fully if I use a 45mm JB. The other possible problem could be that the backing looks like 3mm chipboard, so may not be very strong (again, see pic)?
For the exposed earth wire, SF only sell 100m reels, which I am not likely to need again for a good while (if ever), however I do have green/yellow tape? I'll get some clips for the spare grey cable, as it has been handy to have enough length to allow the hob to be flipped over, without having to worry about disturbing the connection.
The previous hob had been sealed with some sort of perimeter foam strip however the new one comes with clips. The manual specifically says not to use a sealant if the hob is sitting on the worktop. It should only be use if the hob is inset and is flush with the top of the worktop. Not sure why?!
I'll ask the question at SF but sometimes they can help, other times they don't have a clue. I'll buy both sizes of JB so that I have everything I need.
 0
0 -
fabs35 said:.....
The issue with the JB is the lack of space. There is only a few mm either side of the drawer and the same in between the drawers. The only space is at the back of the drawers - exactly 45mm (see pic), and so the drawer may not close fully if I use a 45mm JB. The other possible problem could be that the backing looks like 3mm chipboard, so may not be very strong (again, see pic)?
...
I'm sorry, that box was 30A and 4mm2, but these ones are 60A and you can use them if their terminals take two cores of your new cooker cable each (most likely they will):grumpy_codger said:....ETA: a cooker plate is, of course, the ideal solution, but if you want to keep the existing cable you can use, say, this junction box to connect two cables:They are much more compact than a cooker plate.And again, wiring the existing 6mm2 cable directly to the hob is still an option.0 -
That unit is a set of drawers? No cupboard underneath?What about the unit(s) next door? The wider hob will span these? Any space under there?Grumpy's revised JB above will also work, provided - as with the 45A Faceplate - the terminals will take twin conductors. Almost certainly it will, since these JBs are designed for up to 10mm2 cable, and that's bulky stuff.Resist the temptation - if needed - to cut off the crimps on the ends of the wires - they are there to keep the hob cable's multi-stands tidy and complete; accidentally snap off a few of those, and its power handling is going to fall.I would not entertain wiring the 'grey' directly into your new hob. Would you 'get away' with doing this? Very likely, yes. But is it correct? Nope.Not only does it go against the manufacturer's guidelines, but T&E cable is not heat-resistant, and not designed to cope with movement. And, you would need to cobble together suitable wire bridges in the hob's terminal block.And there is simply no need to do this.Just find a suitable location for either the 45A jobbie, or Grumpy's JB, and fasten it to somewhere secure, run the grey to it and clip the excess grey cable in place, and then wire the hob's own cable to it.Options: If there isn't room in either side unit to take a cooker outlet (faceplate), then you could cut away a neat square of the 3mm backing board to allow you to fasten it directly to the actual wall - that would likely have only around 20-odd mm appearing inside the unit. Or, go for Grumpy's JB, but secure it in place too.As for the hob 'seal', I have no idea. There will be some form of seal provided for use in the normal manner with a worktop - I think they are saying to not use a liquid 'sealant', like sili.
0 -
Thanks guys.
@ Grumpy - are they the Knightsbridge ones from SF?
@ WIAWSNB:
I agree that the black cable should not be disconnected as it forms a strong connection with the hob. I was thinking that maybe I could remove the grey cable (that currently runs to the existing hob) and instead, connect the black cable (that will run to the new hob)?
Yes, they are stacked drawers and there is no space in between them or on the side. There is also no wall nearby as the six units form an island, with a stone worktop and two 'waterfall' sides. However on the other side of the drawer unit (i.e. behind it), there is a cupboard (where the 'cooker' spur is). Perhaps I could alternatively feed the grey cable (from the mains) and the black cable (from the new hob) through the area circled in red, and then fit a JB onto the side of the 18mm. I could then feed both cables into the void behind the two sheets of chipboard, in order to keep them safe.
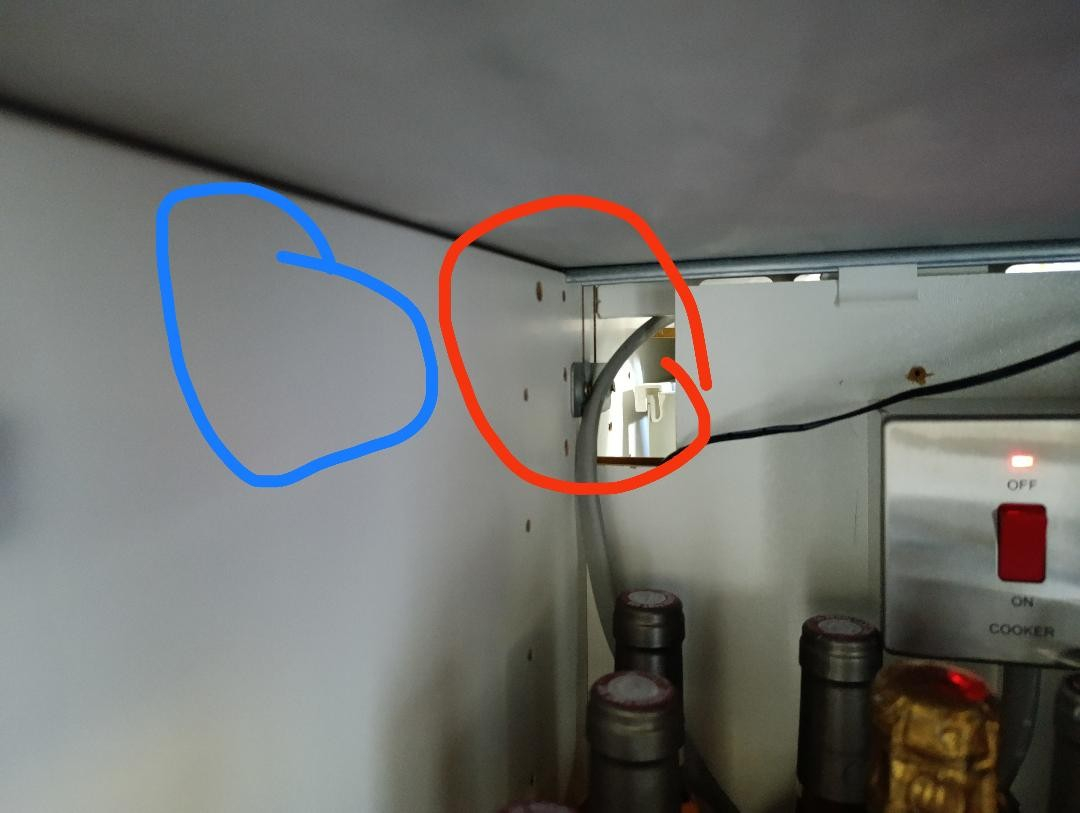
 cabinet (circled in blue)?
1 -
Both pictures are links to SF.fabs35 said:Thanks guys.
@ Grumpy - are they the Knightsbridge ones from SF?1 -
fabs35 said:That unit, with the bottles and the cooker switch (which I'd previously assumed was above worktop height on a splashback) is behind the drawers?And that grey cable disappearing through that red hole is going to the existing hob? If so, what I would do is to mount the 45A FP or Grumpy's JB right next to that cooker switch, leaving a half-inch betwixt them. I'd then cut the grey cable right back, and leave only the shortest-but-neatest loop between the switch and the JB. Then I'd take the new hob's cable through to there and connect into the JB.I'm actually swayed towards the use of Grumpy's 60A JB here; it should be easier to wire the grey cable in to it, as the individual wires will only need to be pared back a small amount (similar to how they are currently) for it to fit the terminals, and also the short piece of green/yellow sleeving should do the job there. Then the hob cable comes in from the top, and the cover is replaced.Please tell me the grey cable is not still exposed with that cooker switch ON?! ISOLATE AT THE CU TOO - turn the bludy MCB OFF!
0 -
Thank you Grumpy - learnt something else today!
@ WIAWSNB:
Yes, the unit with the bottles and cooked switch is at the same level as the drawer unit and behind it. Yes, the grey cable goes through the rectangular gap and into the existing hob.
I did think about cutting the grey cable so that only a short length connects the spur and JB, but wouldn't it better to keep it long, in case the following hobs don't come with their own cable (similar to the current Electra one)?
When you had asked about the exposed grey cable, I assumed you were referring to the one that is plugged in (and powers the LED lighting). Yes, the other grey cable is exposed and the cooker switch is on, as I have reinstalled the original hob. However when I did uninstall it, I turned both the spur and the MCB off before touching anything. Are you saying it should not be exposed at all? If yes, then surely it would be an issue having it exposed between the spur and the JB?1 -
fabs35 said:Yes, the unit with the bottles and cooked s'secured'By 'grey', I have always referred to the 6mm T&E cable. Phew - it ain't 'exposed' and live (by 'exposed', I meant the bare wire ends which will 'cute you.)I would not keep it long, as it's meant to be a 'secured' cable, clipped at regular intervals. And, no, please don't ever connect it directly to a cooking appliance.And it's very unlikely any new hob will come without the correct cable attached.So, yes, I would personally (and strongly recommend you do) cut that cable short, to allow a wee loop to the screwed-down JB. That's the fixed 'house' side taken care of.I repeat - T&E is not designed to cope with movement, and is not heat-resistant. The flexi cable on the hob is.0


Confirm your email address to Create Threads and Reply

Categories
- All Categories
- 354.6K Banking & Borrowing
- 254.4K Reduce Debt & Boost Income
- 455.5K Spending & Discounts
- 247.5K Work, Benefits & Business
- 604.3K Mortgages, Homes & Bills
- 178.5K Life & Family
- 261.8K Travel & Transport
- 1.5M Hobbies & Leisure
- 16.1K Discuss & Feedback
- 37.7K Read-Only Boards