We’d like to remind Forumites to please avoid political debate on the Forum.
This is to keep it a safe and useful space for MoneySaving discussions. Threads that are – or become – political in nature may be removed in line with the Forum’s rules. Thank you for your understanding.
📨 Have you signed up to the Forum's new Email Digest yet? Get a selection of trending threads sent straight to your inbox daily, weekly or monthly!
The Forum now has a brand new text editor, adding a bunch of handy features to use when creating posts. Read more in our how-to guide
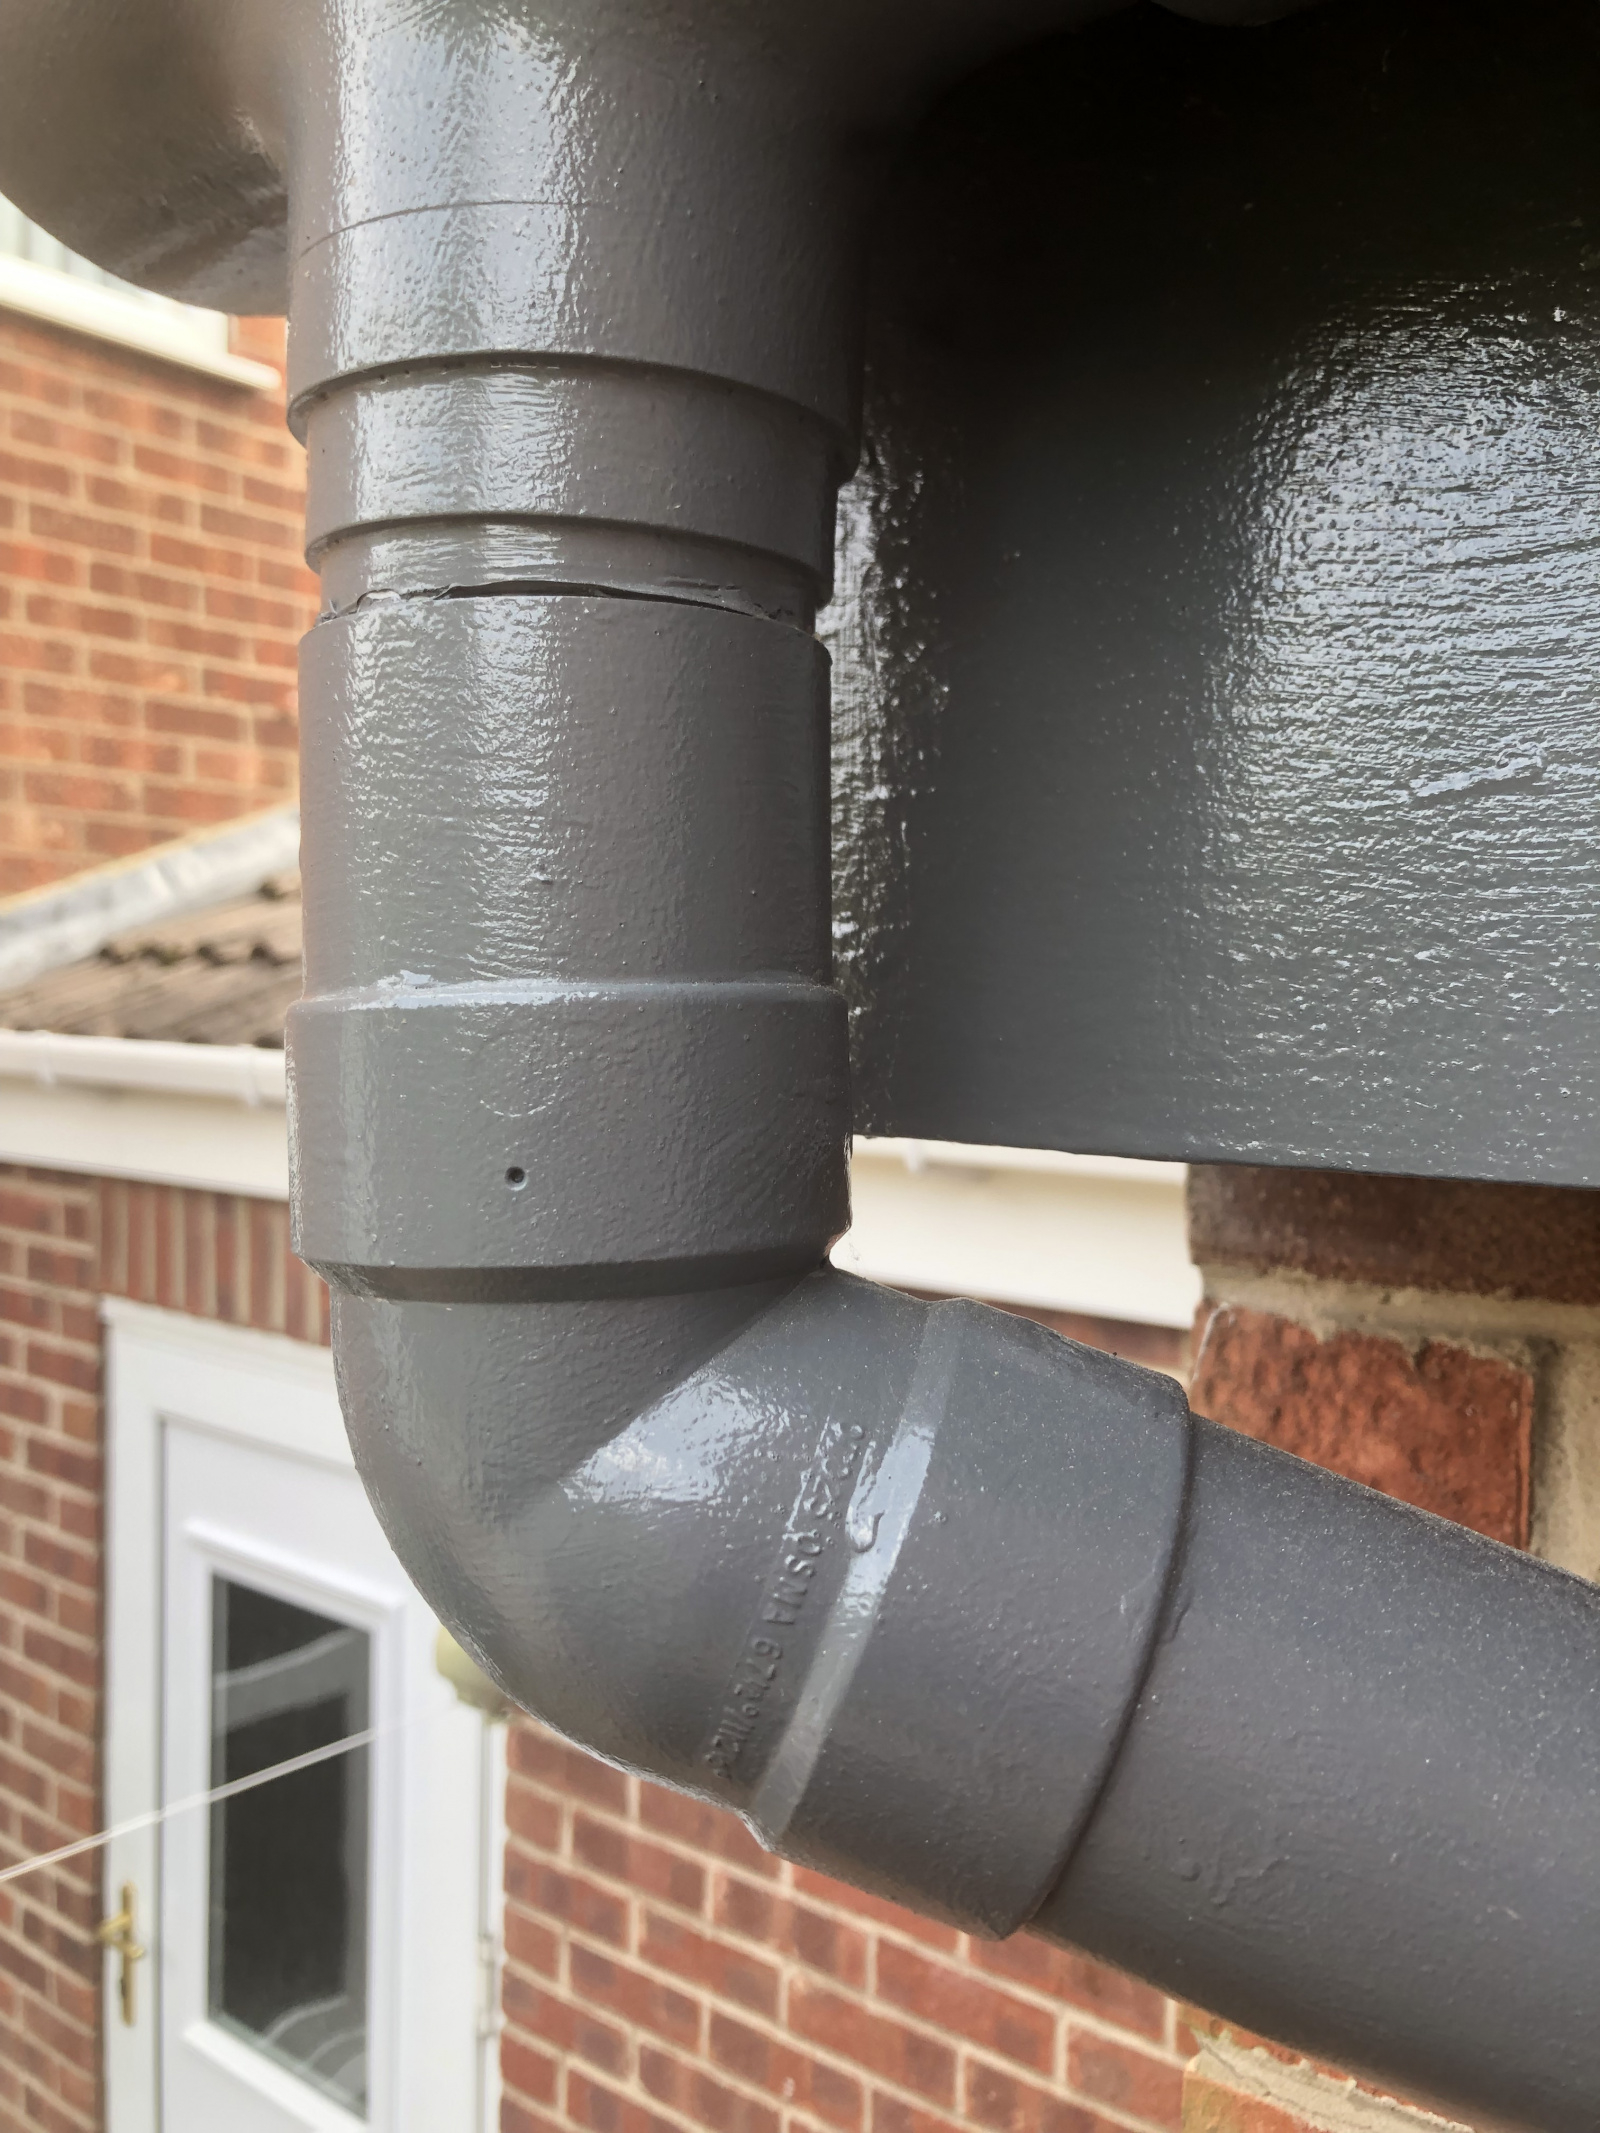
Does this gutter joint need replacing

billiepiper14
Posts: 99 Forumite


Hi
this joint hasn’t been right since I moved in 20 months ago. I’ve recently painted the guttering and have today noticed the joint looks even more out of place and won’t pop back in. Will I need to get a tradesman to replace please ? Thankyou in advance
this joint hasn’t been right since I moved in 20 months ago. I’ve recently painted the guttering and have today noticed the joint looks even more out of place and won’t pop back in. Will I need to get a tradesman to replace please ? Thankyou in advance
On a mission to be mortgage free asap
Sept 2023 65,000, June 2024 61,992
Sept 2023 65,000, June 2024 61,992
0
Comments
-
There seems to be so much wrong there. The bend at the bottom is in backwards & I've no idea what's going on at the top. Rectifying the situation is made more difficult by the paint.
If you can take the bend and the part above it off turn them round and reassemble, you may need a short length of downpipe just below the gutter outlet.Tall, dark & handsome. Well two out of three ain't bad.1 -
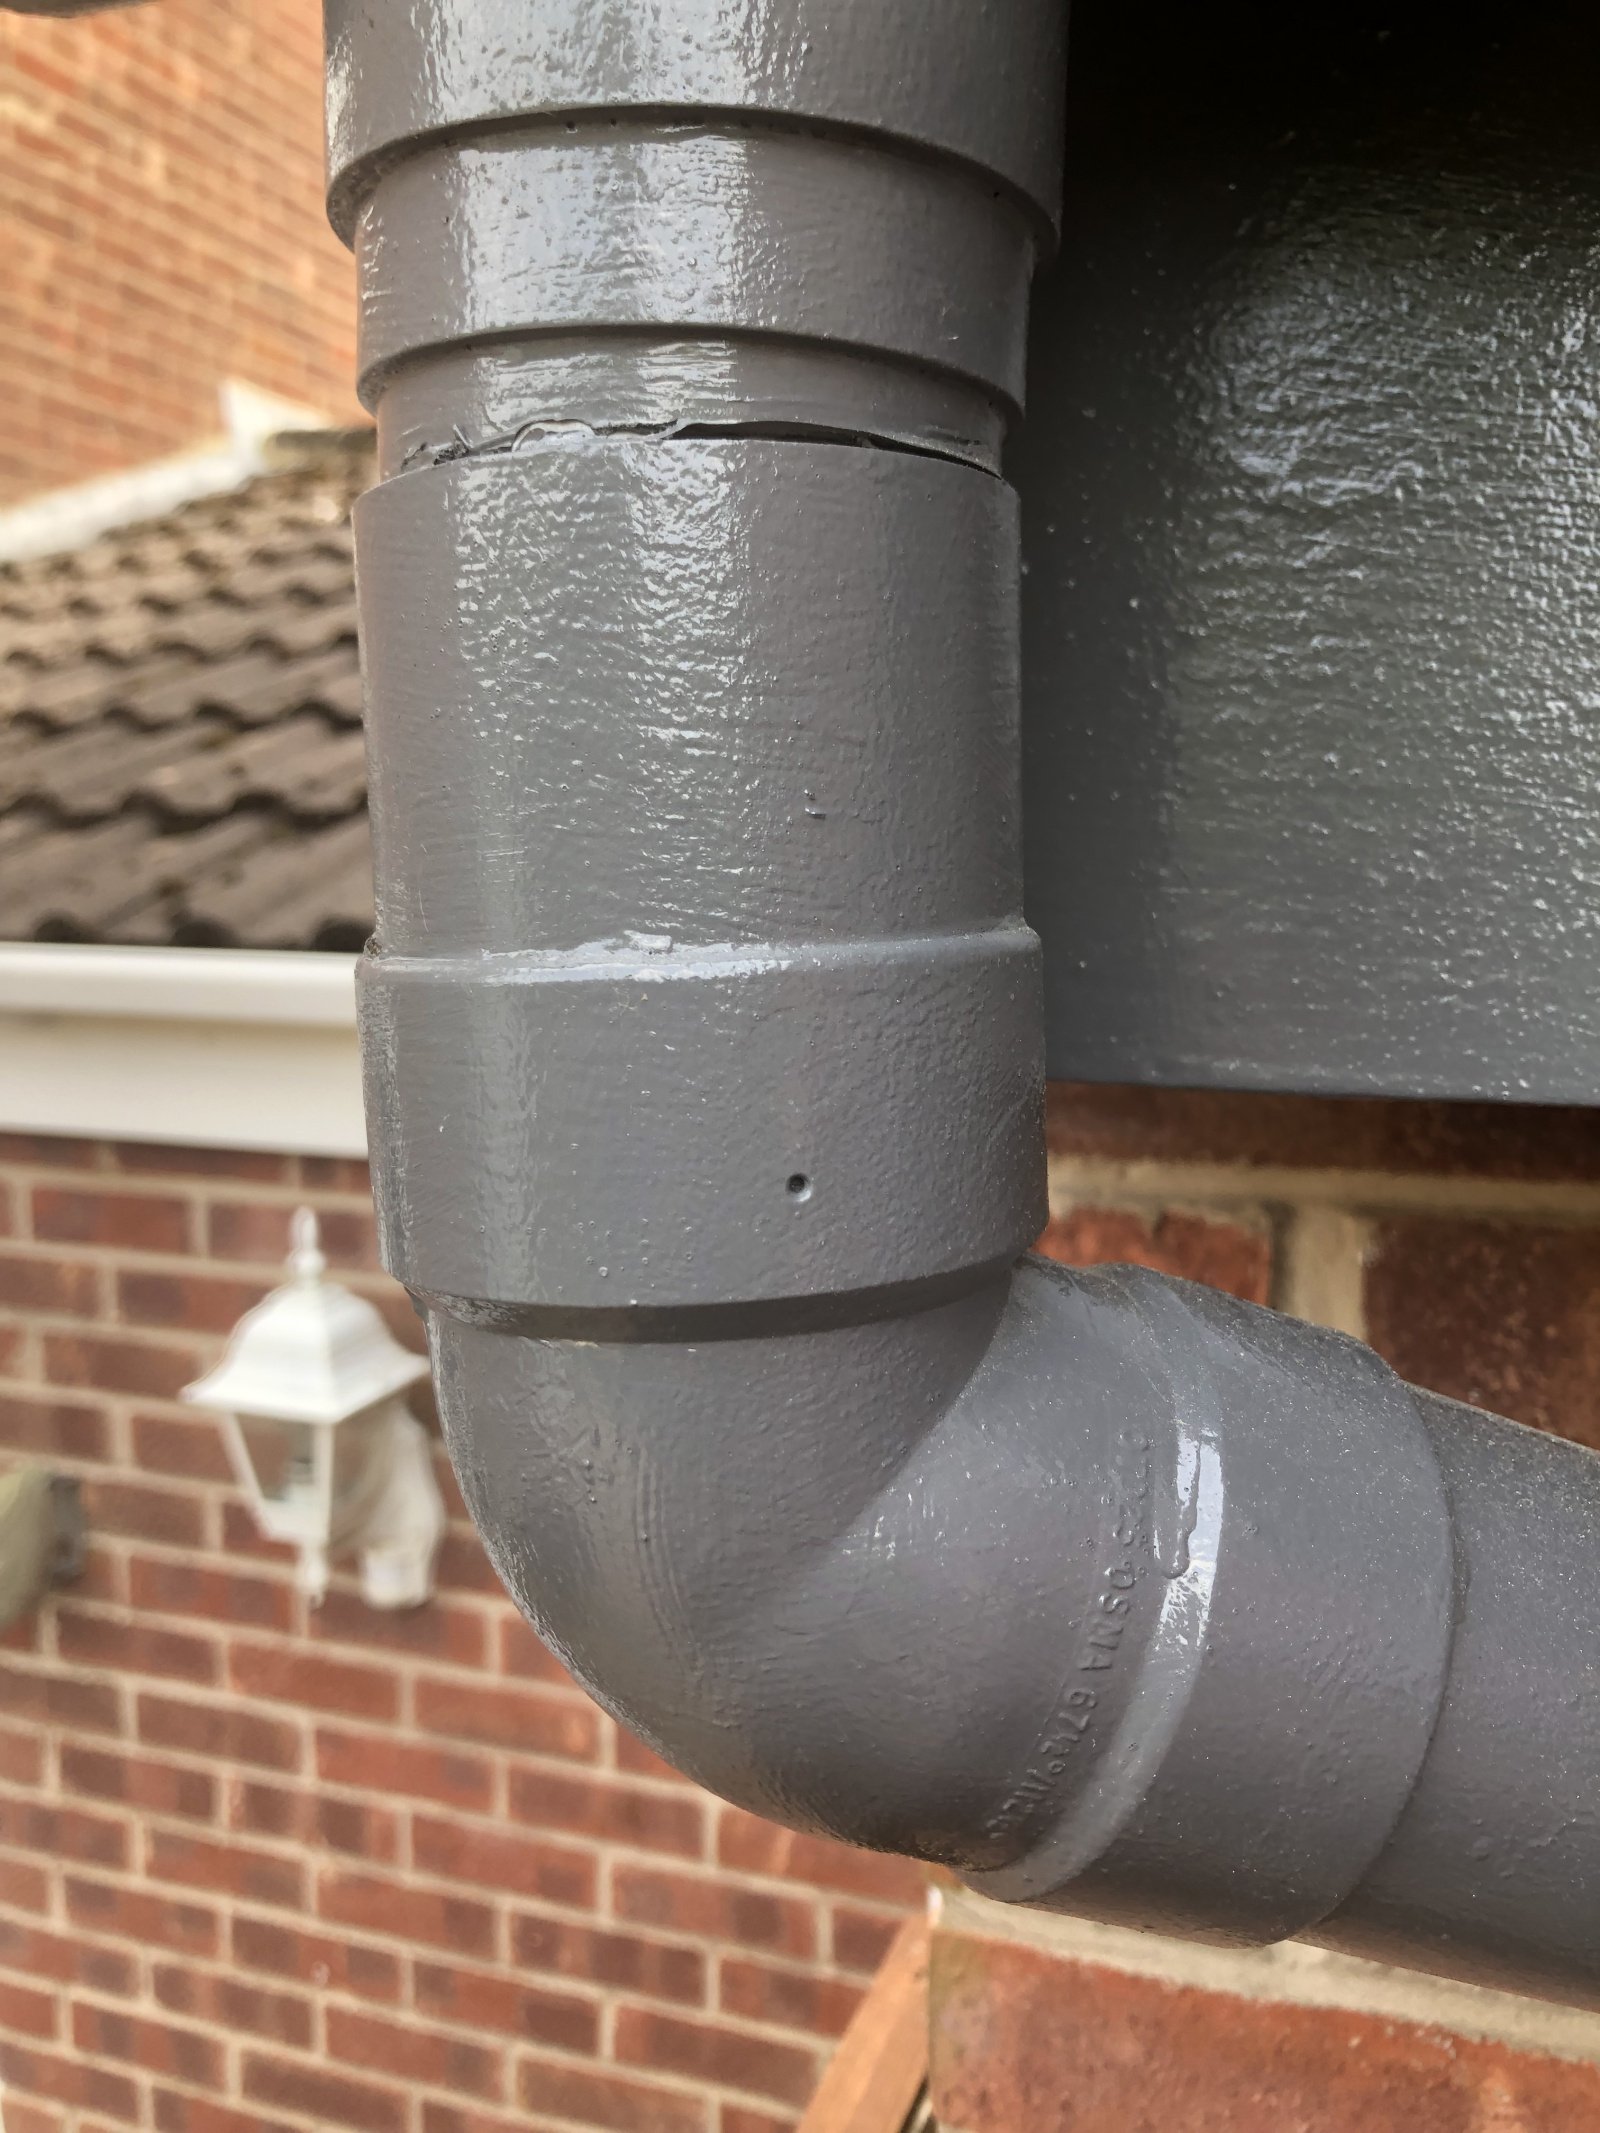
Can you post a slightly wider angle photo showing the gulley at the top and the top of the downpipe and the top bracket.1
-
Hi Billie.When you say the fitting 'won't pop back in' (orange arrow), do you mean that it will go in, but then just falls out again as soon as you let go? Or, it literally won't go in? I'm assuming the former.And, is the lower joint (yellow arrow) nicely tight, sealed and fixed?
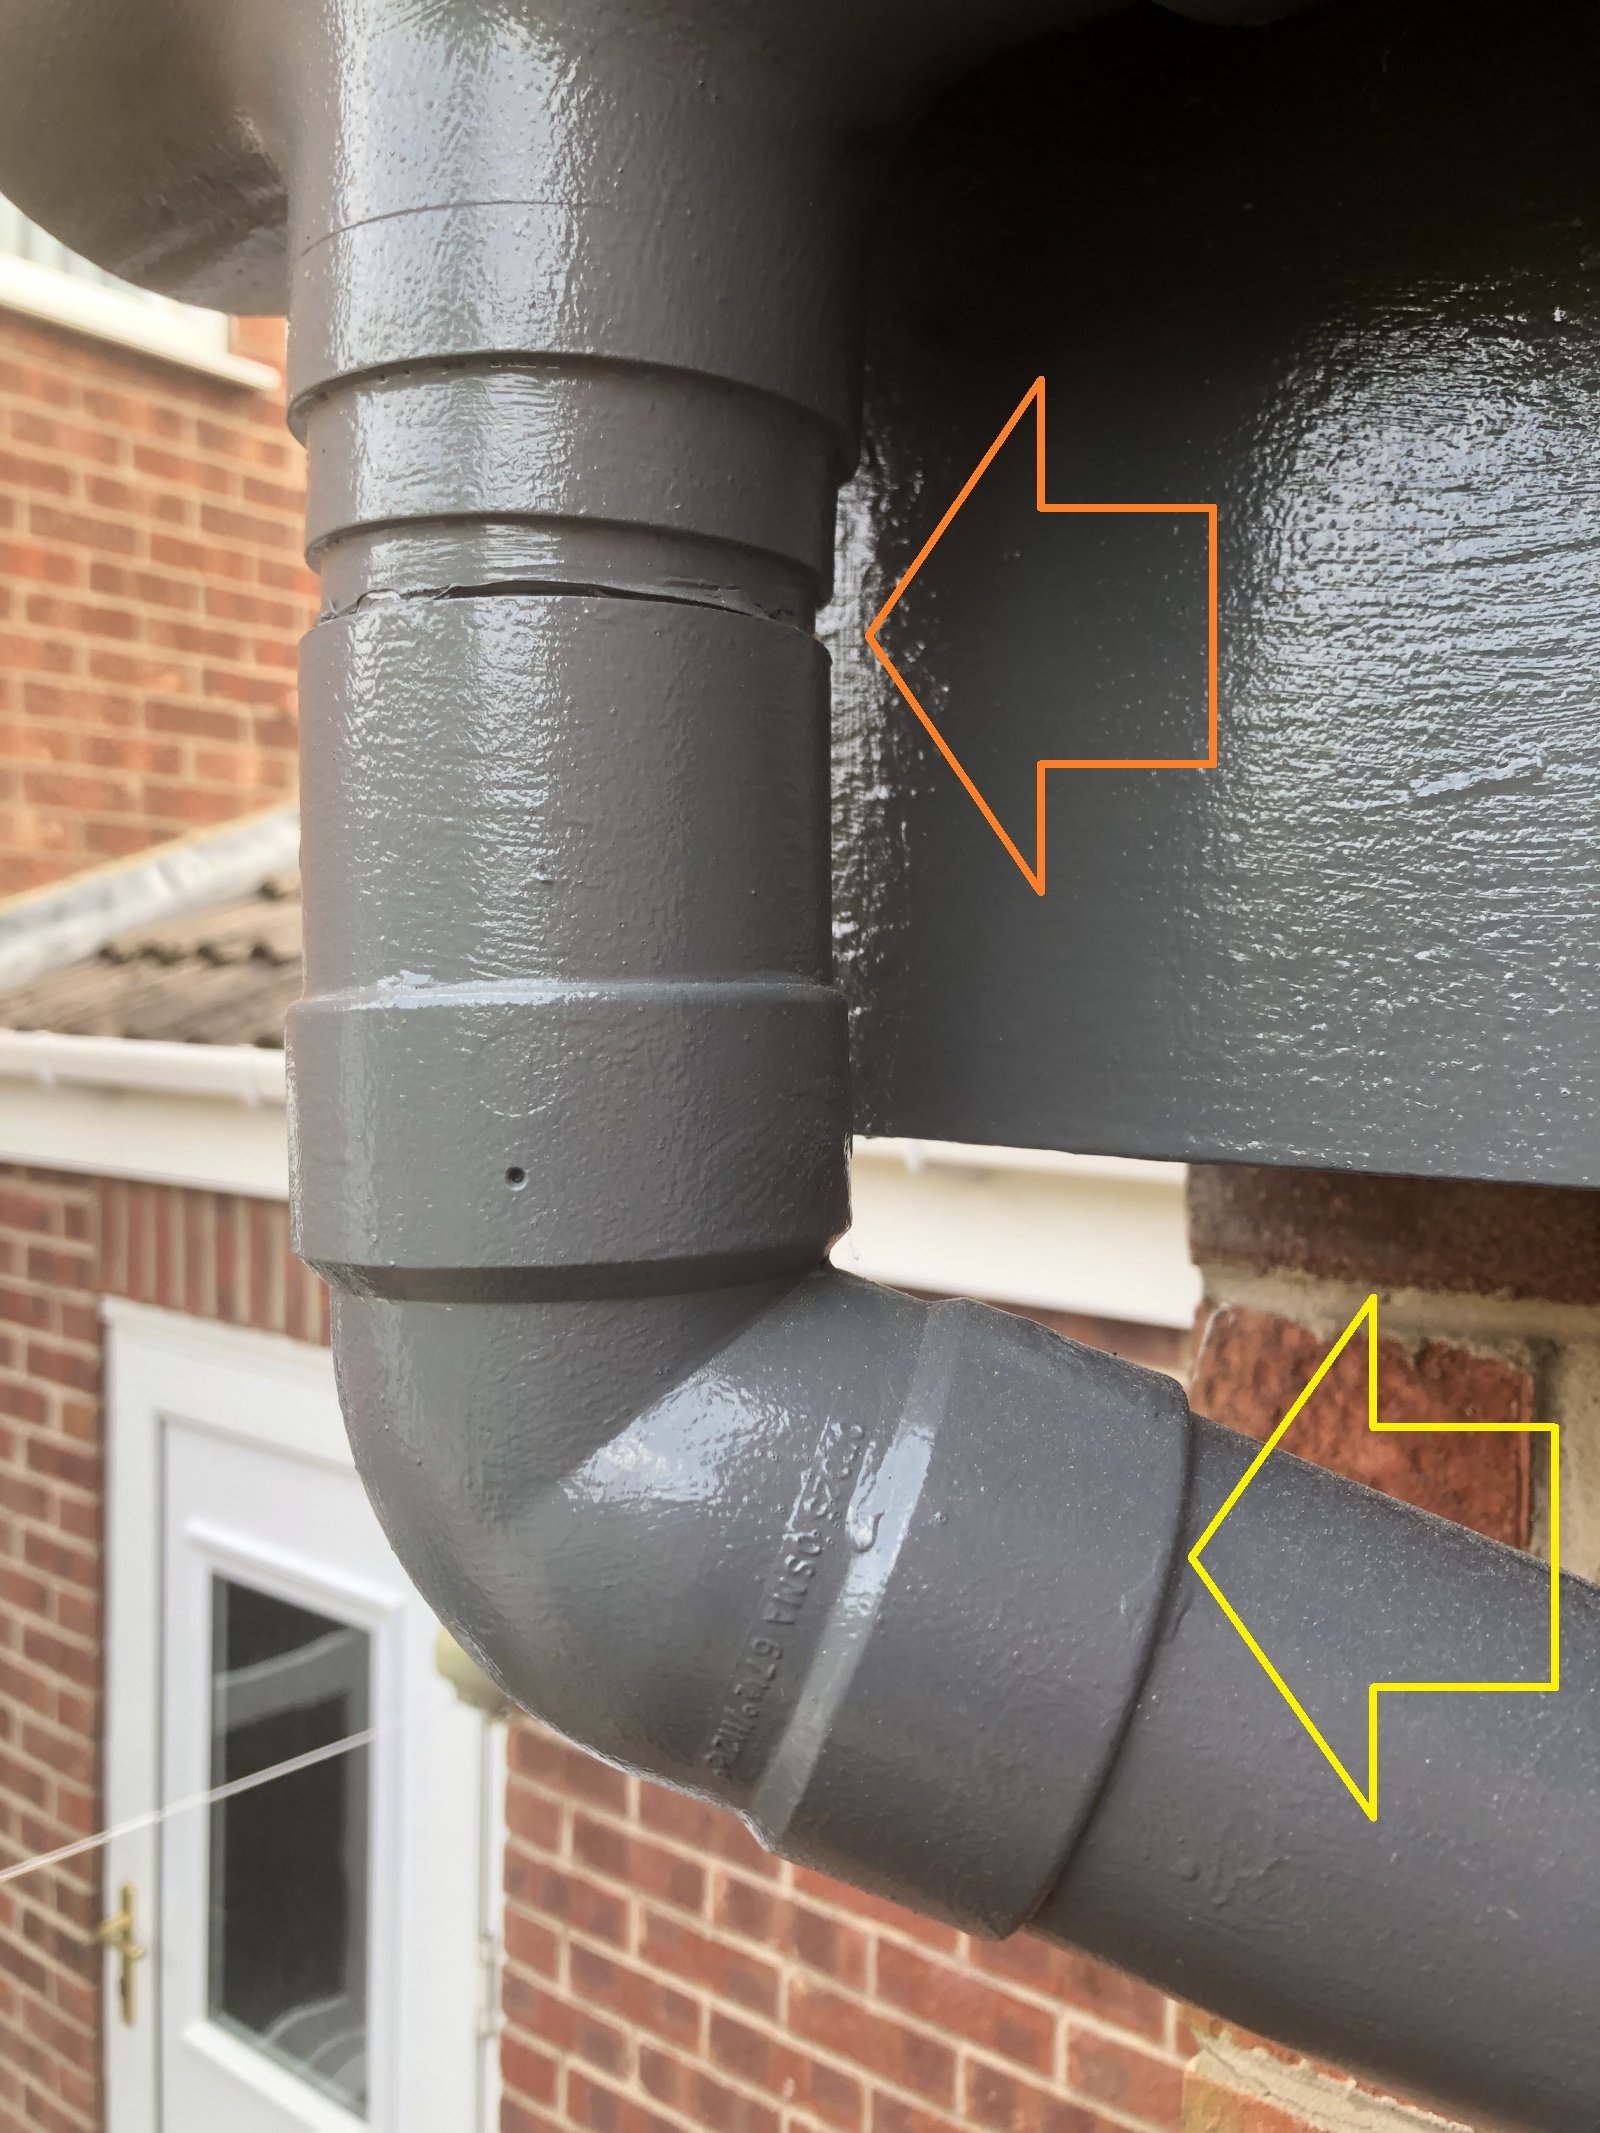 As said by others, there is a proper way to sort this, as what you have there isn't correct. But, hey, who wants to go there if there's a successful bodge that can be carried out?
 Ok, there should be at least two, hopefully three, clips securing the vertical downpipe. Are there? How securely do they hold the pipe - can the pipe slip down within the clips? Have you painted it all, or can you push the downpipe upwards an inch? And, what's at the very bottom of the pipe? Is there a 'shoe' which directs the water into a grid, or does the pipe pass through into a hidden gully?Ok, assuming that you can push the pipe upwards a half-inch in order to remake that open connection, then I'm going to suggest you can DIY this using a tube of grey StixAll, and a method of holding that downpipe from slipping back down. For the latter part of the task, you'll need to show us the DP clips, and the very bottom of the DP.Anyhoo, assuming there is a means of pushing that DP up the required half-inch, and also of holding it there afterwards, then almost certainly a nice bead of StixAll smeared all around that top spigot (orange), and the lower section then pushed back up over it, will seal it off nicely, and will perform much of the holding task - StixAll is a very tough and sticky product. A good smear, push up, hold in place, and wipe the stuff smoothly all around the join. Leave a day to set. Overpain if you wish.Then it's how to support the pipe in that position, so it doesn't keep pulling down on these fittings. The clips can do much of this task, so you just need to ensure they grab the pipe securely. Again, a smear of SA will do this, or perhaps just another coat of whatever paint you have used - looks good, by the way. Best, tho', is if there's a way of supporting the DP at ground level, perhaps with a wee spacer or wedge under it, but we'd need to see what the story is there.So, ~£6 for a tube - which will have a multitude of other uses around the house - and a bit of fettling will almost certainly sort this for you.1
 -
Fairly sure that is Ok as it is - Osma bends like this have a smaller diameter spigot which fits inside the pipe, the outer part is cosmetic to make the joint look better (hiding the cut end of the pipe).EssexExile said:There seems to be so much wrong there. The bend at the bottom is in backwards & I've no idea what's going on at the top. Rectifying the situation is made more difficult by the paint.
If you can take the bend and the part above it off turn them round and reassemble, you may need a short length of downpipe just below the gutter outlet.
1 -
Lorian said:Can you post a slightly wider angle photo showing the gulley at the top and the top of the downpipe and the top bracket.
 here we are Thankyou 😊
On a mission to be mortgage free asap
Sept 2023 65,000, June 2024 61,9921 -
WIAWSNB Thankyou so much for the detailed reply it won’t let me quote you. Wow that’s a lot lol. Let me try digest that my diy skills are very very limited hahaOn a mission to be mortgage free asap
Sept 2023 65,000, June 2024 61,9921 -
Thankyou everyone who has offered advised I’m working through them piecing it together. I’ve been trying to get a roofer out for months about a clip on the house gutters leaking maybe if he ever comes it’s something he could advise but need a plan b as I don’t think he will comeOn a mission to be mortgage free asap
Sept 2023 65,000, June 2024 61,9921 -
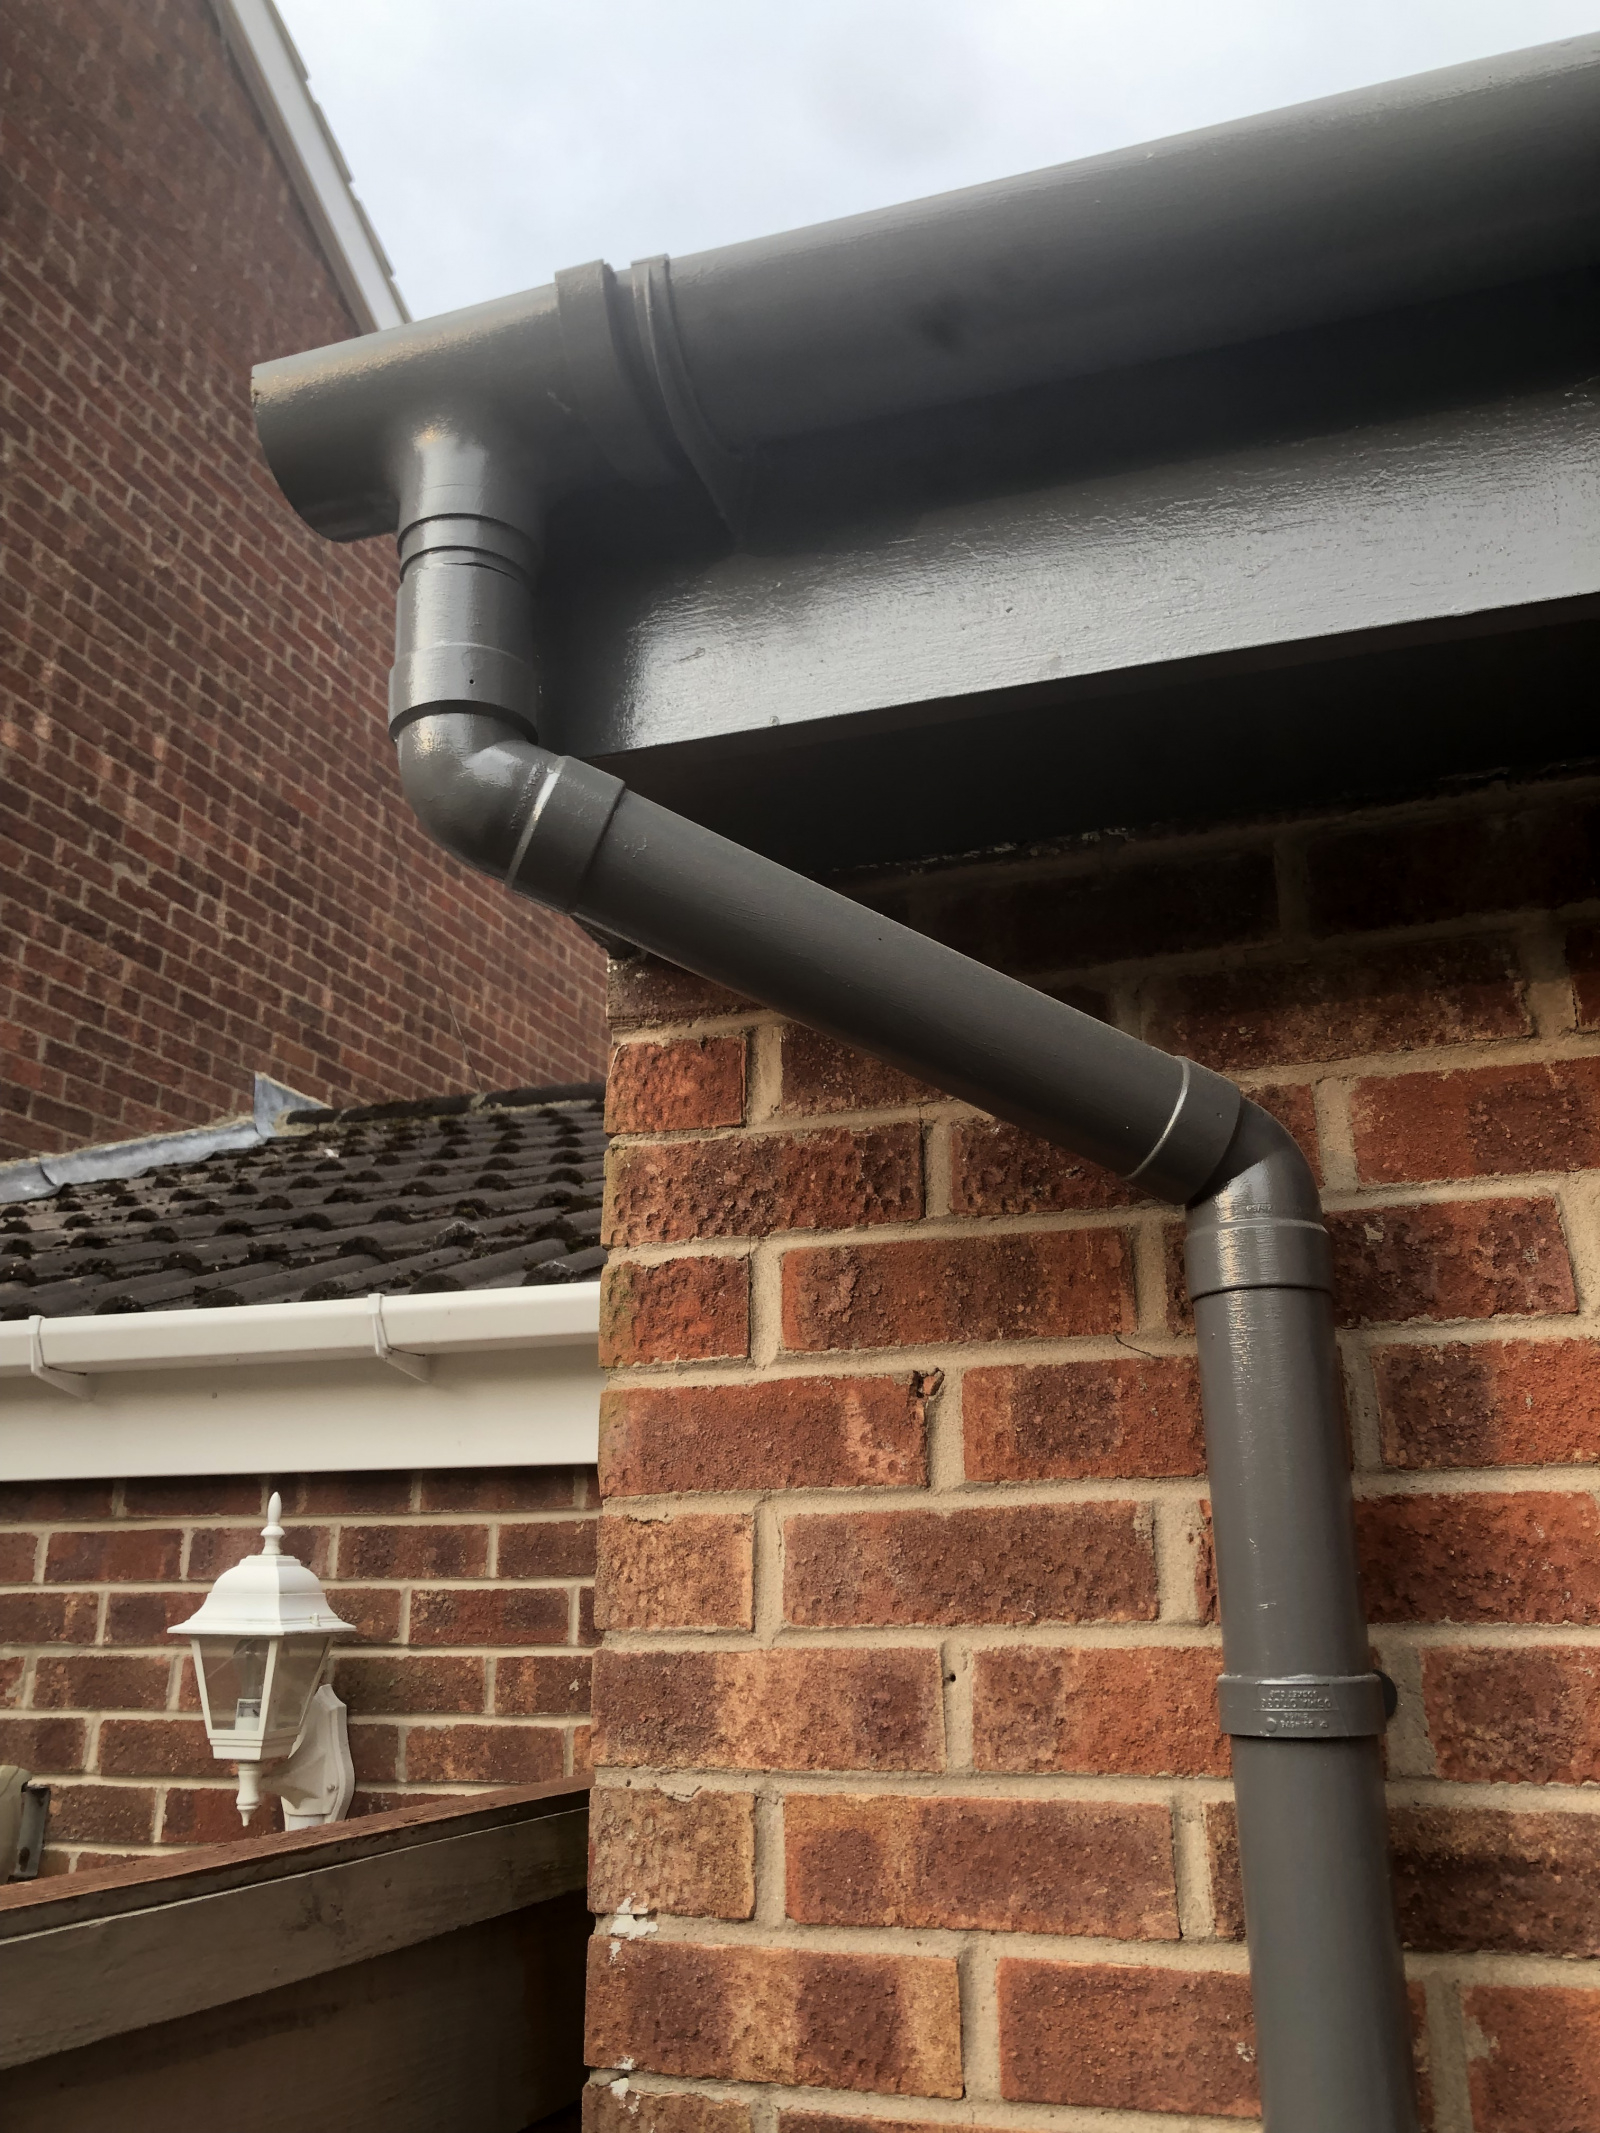
Thanks for the new photo.First thing - you don't need a 'roofer' for this, but just a general handyperson/property maintenance fellow. You seemingly have two wee issues that need sorting on your guttering, so that should make it worthwhile for them.Ask on local media - Fb pages, etc - for recommendations, and sort through them. Although a simple job, this does need doing properly, so make sure the person you choose is au fait with gutter systems.For instance, ignore everything I said in my previous post
 I can now see that the 'stopend outlet' on your gutter is not completely inline with the gutter itself - see yellow line. This is not a biggie in itself, but you do need to ensure that any repair does not pull down any further on that fitting - which my previous suggestion could have. In fact, it would be ideal if it could be slightly propped up, and this would require the correctly-sized fitting to be used in the gap.What I think I also now notice is that the 'popped-out' fitting isn't actually 'open' at all (orange arrow), but I'm just seeing a paint line? Can you confirm - no water actually comes out of this?And, finally, I can see that you have painted over the DP clips (green arrow), so they are now effectively 'as one' with the pipe! That's ok, but it means you cannot simply push the pipe upwards to close the fitting gap.It could even be that the short vertical pipe - indicated in red - is literally that - a short vertical piece of DP? In which case, the solution would be to very simply replace that piece with a half-inch longer version, and replace the outlet. Jobbie jobbed. But, I cannot tell from this side of the screen.
 I'd suggest the fix involves leaving all the DP, clips, and bends in place, and simply removing the stopend outlet at the top - it simply unclips. Then you can examine the best way to extend that short pipe by the required 1/2" or so. This may require a short length of 68mm dia pipe, or an Osma fitting like their pipe connector, in order to close that gap, and also ensure the outlet is now straight.These can be got cheaply - eg: https://www.ebay.co.uk/itm/226774988769?NB: I do not know what the diameters are of the existing parts where they meet, so I also don't know if that fitting will pop in there directly, or will it need modifying.1
 -
If it's not leaking then it's fine as it is. It looks like the 'gap' is just where the paint has split due to slight movement of the gutter, maybe due to thermal expansion.3
-
chrisw said:If it's not leaking then it's fine as it is. It looks like the 'gap' is just where the paint has split due to slight movement of the gutter, maybe due to thermal expansion.This would be my view, if it isn't leaking then the only issue is cosmetic appearance, and there's no guarantee after paying an odd job person £50 to 'fix' it that it will end up looking any better.I'd say the most likely cause of the (red arrowed) pipe dropping is that the offset is somewhat longer than average, so there's more than enough weight in the sloping pipe to pull the upper offset bend down. It is probably this (and the lack of support) which is also causing the gutter outlet to dip down as well.What they should have done is to solvent weld the short (red arrowed) pipe onto the gutter outlet so the pipe couldn't slip down. Actually what they should have done if they wanted a proper job was to use a running outlet with a short length of gutter to the left so the offset length would have been shorter and the gutter properly supported right to the end.The paint will make it harder to get solvent to work now, so although it isn't great practice to use screws on uPVC gutters, if there is a leakage problem I'd be minded to just use a small short screw to fix the (red arrowed) pipe onto the tail of the gutter outlet, and if necessary to secure the upper offset bend onto the (red arrowed) pipe. Screws can be removed easily if the pipe needs to be disassembled for cleaning or repair, and less of a bodge than smearing the thing with any kind of sealant or squirty adhesive.2


Confirm your email address to Create Threads and Reply

Categories
- All Categories
- 353.5K Banking & Borrowing
- 254.1K Reduce Debt & Boost Income
- 455K Spending & Discounts
- 246.6K Work, Benefits & Business
- 602.9K Mortgages, Homes & Bills
- 178.1K Life & Family
- 260.6K Travel & Transport
- 1.5M Hobbies & Leisure
- 16K Discuss & Feedback
- 37.7K Read-Only Boards