We’d like to remind Forumites to please avoid political debate on the Forum.
This is to keep it a safe and useful space for MoneySaving discussions. Threads that are – or become – political in nature may be removed in line with the Forum’s rules. Thank you for your understanding.
📨 Have you signed up to the Forum's new Email Digest yet? Get a selection of trending threads sent straight to your inbox daily, weekly or monthly!
LOW COST homemade christmas gifts
Comments
-
Last year I made the flannel gifts plus the chocolate snowman drink all wrapped in cellophane for 18 children and they loved them. I did leave it until the last minute though!
This Christmas I shall make the pots of gold and start looking for the gold pots NOW, rather than later! :j. If anyone can suggest another present for children they have made and went down well I would be grateful. Many thanks.:)0 -
I find it hard to think of crafty gifts that the person would actually want. For example if someone gave me a flannel cake or a tissue box cover I'd be really grateful about the time they put into making it and the fact it was unique, but probably wouldn't end up using it!
So far my ideas for homemade gifts are:- 'Night in' boxes. E.g. girls night in, movie and popcorn night in, pamper night etc. Basically a box filled with bits and bobs.
- Soy candles - I have some friends who love candles and some who hate them so I make sure not to give candles to those who won't use them.
- Hampers of chutney and jams with oatcakes and crackers, maybe some wine/beer too
- A crafting kit - a nice box with buttons, ribbon, maybe some fabric etc
- Basic notebooks or photo albums covered with nice fabric to make them look more deluxe!
- Cakes and biscuits - everyone likes biscuits right!
- Make-up bags
0 -
Some fantastic ideas!
I managed to pick up some lovely, and very cheap, fabric off-cuts, so I am on the look out for cheap diarys, address books & notebook (6 of each) I am going to use the off cuts, plus my ribbon & button stash to create 6 x matching sets, and I am determined to get them done for less than £5 a set, but hopefully will look much more expensive when I have finished! ... wish me luck!It's not about getting what you want, It's about wanting what you get.0 -
I think one of the things I might try this year is home made bath bombs.
There are so many recipes for them online I am having a time trying to choose!
A few pix for inspiration (not mine, I am just Googling the night away):
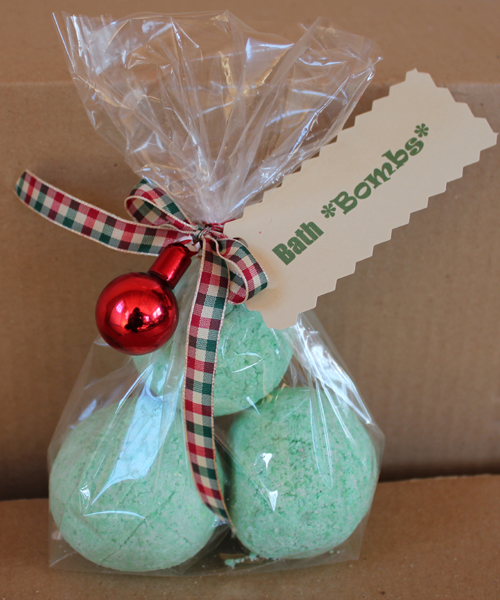


I think it'd be a fun little thing to include for all the ladies... and the guys cuz i know they like baths as well! Would just have to make mens ones manly and ugly and graarhhhh tough?0 -
I have looked for gold coloured little pots for "pots of gold" but I think it's a bit early as they are all coloured or silver atm. However I have got gold coloured 5" little square boards. So I am going to use those by either buying cellophane sweetie bags when the Christmas items start appearing and put them in the bottom or I shall put all the little gold sweets etc in a pile on the boards. Wrap round in cling film or use gold coloured tissue paper and then put into cellophane tied up with gold ribbons.
") 0
0 -
teamshepherd wrote: »I think one of the things I might try this year is home made bath bombs.
There are so many recipes for them online I am having a time trying to choose!
A few pix for inspiration (not mine, I am just Googling the night away):
I think it'd be a fun little thing to include for all the ladies... and the guys cuz i know they like baths as well! Would just have to make mens ones manly and ugly and graarhhhh tough?
Bath bombs are super easy to make and go down a real treat, me and my eldest dd make a load up each year (around november time) and put them into hampers, stockings, and use as gifts for teachers and friends. Check out ebay for a basic starter kit, and just buy or make your own moulds. Essential oils are best (rather than frabgrances) as the scent lasts soooo much longer! Last year we made bubble bars too (again super easy - ebay do starter kits) and even daddy enjoyed them! I know you will have tons of fun with them - oh, and for men, you could just do little xmas puddings or footballs!I have looked for gold coloured little pots for "pots of gold" but I think it's a bit early as they are all coloured or silver atm. However I have got gold coloured 5" little square boards. So I am going to use those by either buying cellophane sweetie bags when the Christmas items start appearing and put them in the bottom or I shall put all the little gold sweets etc in a pile on the boards. Wrap round in cling film or use gold coloured tissue paper and then put into cellophane tied up with gold ribbons.
I couldnt find gold pots for love nor money last year, so I brought some gold spray from a diy store and used baby food jars lol!
I am in the process of making a load of little fimo xmas santas (a neighbour gave dd's a load of fimo bits and bobs and I have "borrowed" most of it!) I am going to pop ribbon on them to hang on trees and let the children give them as gifts to friends and teachers along with the bath bombs this year .. might have a go at making a few other characters too and keep for our xmas tree!It's not about getting what you want, It's about wanting what you get.0 -
Fimo as in Polymer clay? I cant do a santa (well haven't tried) but I can do his hat as an ornament!
I know we cant do our own links so I'll copy n paste in case anyone is interested.
What you will need to make your own clay Santa Hat Ornament:
- Red Polymer Clay. You can get a block of it for two bucks at Joann's, Michael's or any other crafts store. You will need less than one fourth of the block.
- White Polymer Clay. Same applies as for red.
- A few toothpicks.
- A few sheets of printer paper. You can use other stuff to protect your work surface just make sure none of the color will transfer onto your clay.
- A knife or a crafts razor.
- Some festive string, not too thick.
- Some sort of a stubby screw driver or a different object of a similar shape. You will need this to put the hat on while fluffing the white of it.
How to make your own clay Santa Hat Ornament:
- First set up your work surface, protect it with paper or whatever else you might have decided to use and get your supplies ready.
- Break off a piece of the red Polymer clay, the amount depends on your desired ornament size so be vary of that when deciding how much you will use. Start shaping it into a sloppy cone.
- Once you have the approximate cone shape start working the top end out to shape it like the Santa's hat.
- Every once in a while you might need to stop working on your ornament and let the clay set a bit. This depends on a ton of factors like humidity and temperature, but the point is you don't want the clay to become too soft and flimsy or it will be very fragile and a pain in the butt to work with!
- Take a small piece of white Polymer clay and start working it into a ball, this will be the fluffy tip of the hat. Flatten the ball and wrap it around the red tip of the hat.
- Repeat a few times until you get a bulb like shape on the end, once you have the shape apply one more layer of white.
- Again, be wary of the clay becoming too soft. If it is OK to work with take a bigger piece of white Polymer clay and roll it out into a snake like shape.
- Apply it in circle around the base of the hat press down slightly so that it sticks to red but don't smush it.
- Now that you have the basic shape of the Santa hat going on grab that screw driver and the toothpick.
- Use the screw driver handle as a head and place the hat on top of it. Now, and do this carefully not to knock it off, scratch up the white around the base with a toothpick.
- When you are done it should look something like this:
- Now repeat the process on the ball of white, make sure you are extra careful because the tip is thin and you don't want it all breaking off.
- Once again let the ornament set a bit. You might find this annoying but trust me it will help you as far as flimsiness and stability of it go.
- Take a toothpick and poke a hole at the top of the ornament, the top being where the hat folds. You will make the hole by slowly pushing the toothpick through the clay while spinning it. Have your finger on the other side where it should come out.
- Once you feel it poke your finger gently take it out and repeat the same from the other side. What this does is it ensures that you have a nice clean hole.
- The pre-baked product will look something like this (You can smooth it out if it looks rough like mines):
- Bake your ornament according to the manufacturers instructions please!
- Once it is baked and cooled you can leave it as is or spray it with lacquer to give it shine, totally up to you.
- All you need to do now is pull the string through and your ornament is all finished!0 -
Aw your little santa hats are lovely! I still havent got round to uploading photos yet, but my santas are plump little things, but very cute! My first real go at polymer/fimo so very proud of them! The reindeers on the other hand - look more like road kill with red noses!It's not about getting what you want, It's about wanting what you get.0
-
Oooh please do show us the pics I'd love to see them!0
-


Confirm your email address to Create Threads and Reply

Categories
- All Categories
- 355.2K Banking & Borrowing
- 254.7K Reduce Debt & Boost Income
- 455.8K Spending & Discounts
- 247.9K Work, Benefits & Business
- 605.1K Mortgages, Homes & Bills
- 178.8K Life & Family
- 262.8K Travel & Transport
- 1.5M Hobbies & Leisure
- 16.1K Discuss & Feedback
- 37.7K Read-Only Boards