We’d like to remind Forumites to please avoid political debate on the Forum.
This is to keep it a safe and useful space for MoneySaving discussions. Threads that are – or become – political in nature may be removed in line with the Forum’s rules. Thank you for your understanding.
Rich Editor - Help Guide


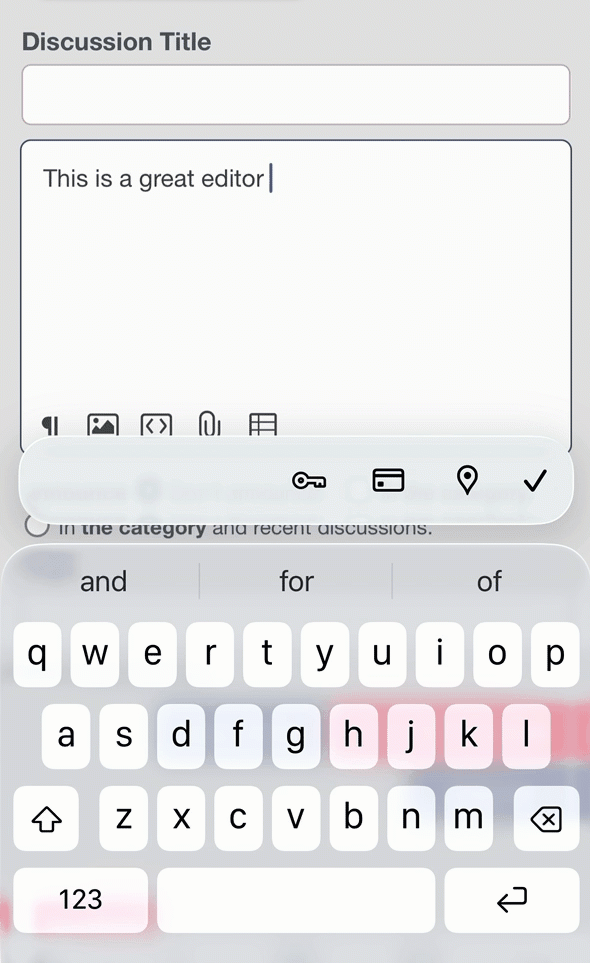
Rich Editor is the editor you’ll use to write and format text when creating forum posts.
It’s designed to be intuitive, so you can usually work out how to use its features quickly without a guide, but in his thread we'll highlight some of those features and offers guidance to help you make the most of them.
Rich Editor - Feedback Thread
Text formatting
Making Lists
Links & Embeds
Tables
Code Blocks
Toggle Blocks
Using Markdown
Using Emojis
Inserting Images
Upload Files
Mentions
💡 Tips
Editing Quotes & Partial Quoting
Linking to Posts
Get the Free MoneySavingExpert Money Tips E-mail
To report inappropriate posts: click the report button
Flag a news story: news@moneysavingexpert.com
Comments
-
Text formatting
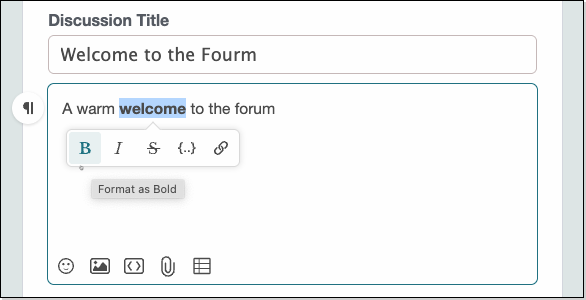
Selecting text in the editor displays the following formatting options: bold, italic, strikethrough, inline code, and hyperlink.

In addition, you can use the following keyboard shortcuts:
ctrl+bor⌘+bfor bold.ctrl+ior⌘+ifor italic.ctrl+kor⌘+kto display the link menu, where you can enter a URL and text to display.
TIP: You can also quickly create a link by copying a URL (e.g., from your browser), selecting text in the editor, and pressing
ctrl+vor⌘+Vto replace the highlighted text with the link.Paragraph formatting
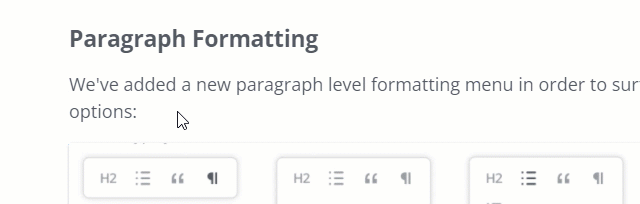
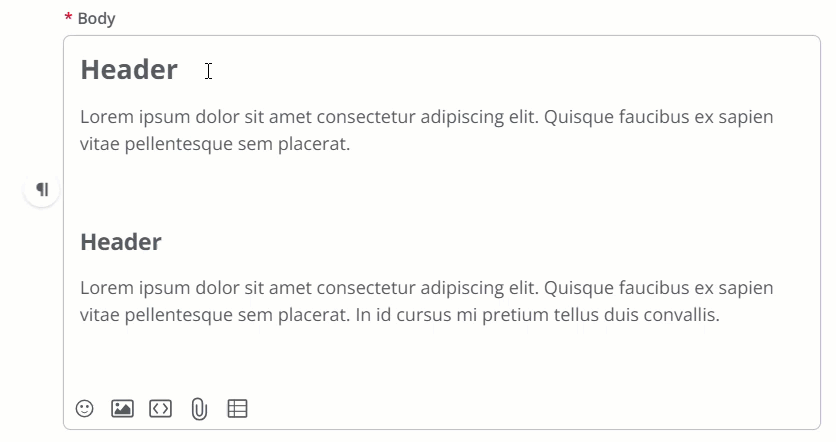
Click into a paragraph to display a paragraph-level formatting menu to the left, as shown below.
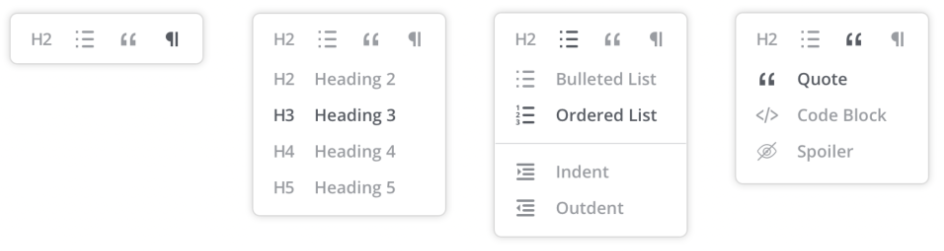
The options in each category are as follows:
Special formatting examples:
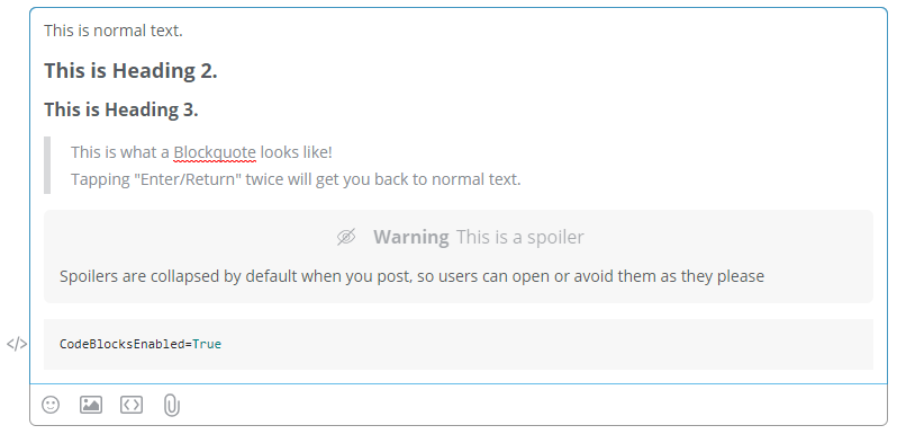
While spoiler text is always visible when editing the post, it will automatically be collapsed when the post is published, until a user clicks to view it. This ensures that each user can decide whether or not to view the content.
✔️ TIP: On some devices, the formatting popup might be covered by the in-built popup. You can usually resolve this problem simply by scrolling a little:
 Join the MSE Forum
Get the Free MoneySavingExpert Money Tips E-mail
To report inappropriate posts: click the report button
Flag a news story: news@moneysavingexpert.com1 -
Lists
Here are a few tips when working with lists:
- Type "-" and press space to begin a bulleted list.
- Press enter/return to drop down to the next bullet.
- Press enter/return twice to end the list and resume standard paragraph text.
- Type "1." and press space to begin a numbered list.
- Press enter/return to drop down to the next number.
- Press enter/return twice to end the list and resume standard paragraph text.
Indent & outdent lists
Indenting/outdenting is possible in two ways:
- Using the list menu shown below:
- Using the following keyboard shortcuts:
- Press tab to indent
- Press enter/return to outdent

📝 NOTE: To outdent via the enter/return key, the paragraph must be blank.
List indentation example

Images in lists
You can include images in bulleted and numbered lists.
For numbered lists, specifically, Rich Editor allows you to insert images and continue the numbering flow. Let's look at an example:
 Join the MSE Forum
Get the Free MoneySavingExpert Money Tips E-mail
To report inappropriate posts: click the report button
Flag a news story: news@moneysavingexpert.com1 -
Links & embeds
The Link menu, which displays when pasting a URL into the editor or selecting one, allows you to display your links in four formats (listed left to right):
- URL
- Button
- Rich Link
- Card

URL example
https://www.moneysavingexpert.com/credit-cards/balance-transfer-credit-cards
Button example
Rich Link example
Card example
Link button configuration
To edit a link button, first select it in the editor and then click the pencil (edit) icon.

A link button can be customised as follows:
- Editing its URL,
- customising its display text,
- and setting its button type (primary or secondary).

Click Save at the bottom right to finalise any changes made.
Join the MSE Forum
Get the Free MoneySavingExpert Money Tips E-mail
To report inappropriate posts: click the report button
Flag a news story: news@moneysavingexpert.com1 -
TablesRich Editor supports tables in two ways. You can:
- Create tables natively within the editor.
- Copy and paste tables into the editor from another source, such as Word or Excel.

Create a table natively
- While creating a post, click the Insert Table icon in the editor toolbar.
- Hover and select your desired table size (e.g., 3x3, 4x2, etc.), then click to insert.
- Enter your data directly into the cells.
- With the table selected, the Table Controls menu appears. Use the Table Options, Column Options, and Row Options sub-menus to edit your table by adding new rows and columns, setting a header row or column, and setting text alignment.
✔️ TIP: You can resize columns by dragging their borders.
✔️ TIP: You can add images to a table in two ways: Click the Insert Image icon in the editor or paste a copied image from another source, such as Windows Explorer.

Copy/paste a table from another source
📝 NOTE: When pasting a table containing images, those images will not be included. You must manually insert images into the table after it's pasted.
- Create a table in your source application (Word, Excel, Google Sheets, etc.).
- Copy the entire table (highlight and press Ctrl+C or Cmd+C).
- In Rich Editor, place your cursor where you want the table and paste the table (Ctrl+V or Cmd+V).
- Edit cell values as needed. ✔️ TIP: Refer to the section and video above for an overview of table-editing options.
- Insert images, if required.

Delete a table
- Click within a table to select it and display the Table Options menu.
- Click the Delete Table icon.

—
Join the MSE Forum
Get the Free MoneySavingExpert Money Tips E-mail
To report inappropriate posts: click the report button
Flag a news story: news@moneysavingexpert.com1 -
Code blocksThe code block format option formats your text as
codeand includes syntax highlighting for some of the more common coding languages. When you input code, the coding language is automatically detected and the syntax is highlighted accordingly.Example
# H1
## H2
### H3
[title](https://www.example.com)
Supported Code
- ADA
- Apache
- AppleScript
- C++
- Bash
- BASIC
- Clojure
- CMake
- CSS
- Dart
- Dockerfile
- Excel
- Go
- Haskell
- HTTP
- Java
- JavaScript
- JSON
- Kotlin
- Less
- Lua
- Makefile
- Markdown
- NGINX
- Objective-C
- Perl
- PHP
- PowerShell
- Python
- Ruby
- Rust
- SCSS
- SQL
- Swift
- Twig
- TypeScript
- XML
- YAML
Join the MSE Forum
Get the Free MoneySavingExpert Money Tips E-mail
To report inappropriate posts: click the report button
Flag a news story: news@moneysavingexpert.com1 -
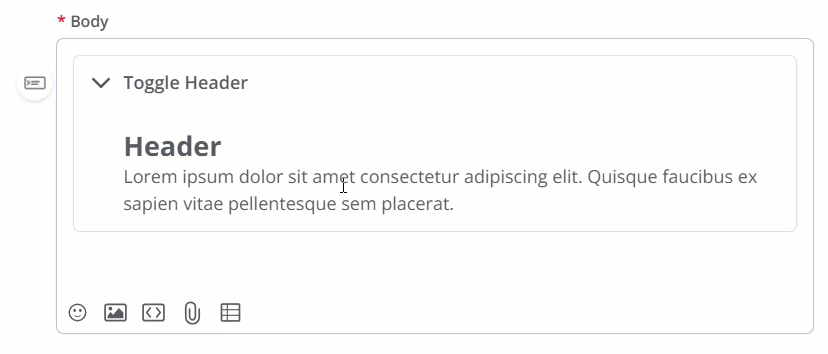
Toggle Block
- The first paragraph of the block is the Toggle Header, which is what the user clicks to expand or collapse the block. The Header can only contain text and emojis.
- The remaining paragraphs are the Toggle Body, revealed when the Header is expanded. The Body can contain formatted text, lists, images, videos, tables, links, and attachments.
- By default, Toggle Blocks are collapsed when an article or post is viewed.
- Toggle Blocks cannot be nested (there can only be a single level).
Create a Toggle Block
You can insert Toggle Blocks in knowledge base articles and all post types that use Rich Editor (discussions, questions, ideas, events).
Let's walk through how to create a Toggle Block from scratch and to convert existing content to a Toggle Block. While the process isn't too different, there is some nuance to make the process easier.
From scratch
Create the Toggle Block first and then add the Header and Body content. This makes it easy to visualize your block in Rich Editor and work within its "bounds."
- Place your cursor where you'd like the Toggle Block to be (a blank paragraph).
- Click the Element Toolbar > Special Formats Menu > Toggle Block.
- You now have a Header line at the top and the Body section below. Add your Header text; this is the text users will see and need to click to expand the block. The Header can only contain text and emojis.
- Add the Body content, which can include all paragraph formatting, like lists, images, tables, etc.
TIP: While editing the Header, you can add "soft" and "hard" line breaks (enter or shift + enter | return or shift + return on a Mac) to expand the Header into multiple lines.
Convert existing
The main thing to remember when converting existing content to a Toggle Block is that all of the content you select will become the Toggle Body; you'll still need to add the Toggle Header manually.
- Click and hold to select all of the existing content you want to make a Toggle Block.
- Click the Element Toolbar > Special Formats Menu > Toggle Block.
- The selected content is now the Toggle Body, and a blank Toggle Header is positioned above. Add your desired Header text.
TIP: While editing the Header, you can add "soft" and "hard" line breaks (enter or shift + enter | return or shift + return on a Mac) to expand the Header into multiple lines.
Remove a Toggle Block
- Click into the block.
- Click the Element Toolbar > Special Formats Menu > Toggle Block.
The block is removed and all content is now reverted to separate paragraphs while retaining its formatting.
 Join the MSE Forum
Get the Free MoneySavingExpert Money Tips E-mail
To report inappropriate posts: click the report button
Flag a news story: news@moneysavingexpert.com1 -
Markdown macrosRich Editor supports the following markdown-based macros:

—
Join the MSE Forum
Get the Free MoneySavingExpert Money Tips E-mail
To report inappropriate posts: click the report button
Flag a news story: news@moneysavingexpert.com1 -
Emoji
At the bottom left of Rich Editor is the Emoji Picker, which you can use to add thousands of emojis to a post. The emojis are grouped into the following eight categories:
- Smileys & People
- Animals & Nature
- Food & Drink
- Travel & Places
- Activities
- Objects
- Symbols
- Flags
 Join the MSE Forum
Get the Free MoneySavingExpert Money Tips E-mail
To report inappropriate posts: click the report button
Flag a news story: news@moneysavingexpert.com1 -
Insert images
There are two ways to insert images into a post:
- Users with permission to upload images can do so via the Upload Image icon highlighted below.
- You can also drag and drop images into the editor.

Image-management options
Select an image to enable the following management options (discussed from left to right):
- Float - You can float the image left, center, or right.
- Size - Four sizing options are available: Inline, Small, Medium, and Large.
📝 NOTE: Refer to the Inline images section below to learn more about how to work with inline images. - Link Image to URL - Add a URL to an image that users will be navigated to upon clicking the image.📝 NOTE: Refer to the Link images to a URL section below to learn more.
- Alt text - Click this icon to display the Alt Text dialog where you can update an image's alt text to help with accessibility and improve SEO.
- Delete - Click the trashcan icon to remove the image. 📝 NOTE: No confirmation is provided, and the deletion is immediate.

Inline images
While the Small, Medium, and Large image options control the size of images added to their own paragraphs, the Inline option enables you to add one or more images directly within a paragraph.

Inline example

How to add an inline image
- While creating a post with Rich Editor, place your cursor where you want the inline image to be. It can be at the beginning, end, or anywhere within a paragraph.
- Click the Upload image button, and then locate and upload the image (it will display at whatever the image's default size is).
- Select the image and set it to the Inline option.
✔️ TIP: Inline images inherit their size based on the format type: paragraph or heading 2—5. As you can see below, the inline image in the paragraph is smaller than the same image in the H2.

Link images to a URL
Rich Editor allows you to hyperlink your images, making them function as clickable links that navigate your users to internal or external URLs. Creating links in this way offers a more visually engaging user experience when navigating your community.
Steps
- Click to select an image in the editor.
- Click the Link Image to URL icon. A dialog displays with the image's default source URL (where it's stored in Vanilla).
- Replace this default URL with any internal or external URL you want.
- Click Save.

Notes
- It is possible to copy images from another source, such as Word or Google Docs, and paste them into Rich Editor. However, the URLs from any linked images will not carry over (you will need to relink them within Rich Editor).
—
Join the MSE Forum
Get the Free MoneySavingExpert Money Tips E-mail
To report inappropriate posts: click the report button
Flag a news story: news@moneysavingexpert.com1 -
Upload files
There are two ways to upload files to a post:
- Users with permission to upload files can do so via the Upload File icon highlighted below.
- You can also drag and drop files into the editor.

Once the post is published, users will be able to download any attached files, as you see below.
 Join the MSE Forum
Get the Free MoneySavingExpert Money Tips E-mail
To report inappropriate posts: click the report button
Flag a news story: news@moneysavingexpert.com1
Confirm your email address to Create Threads and Reply

Categories
- All Categories
- 355.2K Banking & Borrowing
- 254.7K Reduce Debt & Boost Income
- 455.8K Spending & Discounts
- 247.9K Work, Benefits & Business
- 605K Mortgages, Homes & Bills
- 178.8K Life & Family
- 262.7K Travel & Transport
- 1.5M Hobbies & Leisure
- 16.1K Discuss & Feedback
- 37.7K Read-Only Boards