We’d like to remind Forumites to please avoid political debate on the Forum.
This is to keep it a safe and useful space for MoneySaving discussions. Threads that are – or become – political in nature may be removed in line with the Forum’s rules. Thank you for your understanding.
📨 Have you signed up to the Forum's new Email Digest yet? Get a selection of trending threads sent straight to your inbox daily, weekly or monthly!
The Forum now has a brand new text editor, adding a bunch of handy features to use when creating posts. Read more in our how-to guide
Outside tap needs attention
Comments
-
Do you have water pump pliers? It looks to me as tho' they should fit over that collar coming through the wall. Is it plastic? And then an adjustable wrench/spanner on the flats of the tap where it connects.JohnB47 said:Thanks guys. I'd really like to remove the whole tap and work on it in a vice but my problem is there doesn't seem to be enough grip to be had where it enters the brick wall. I'll have a test though with the tools to hand.
Are the washers available to fit the body assembly?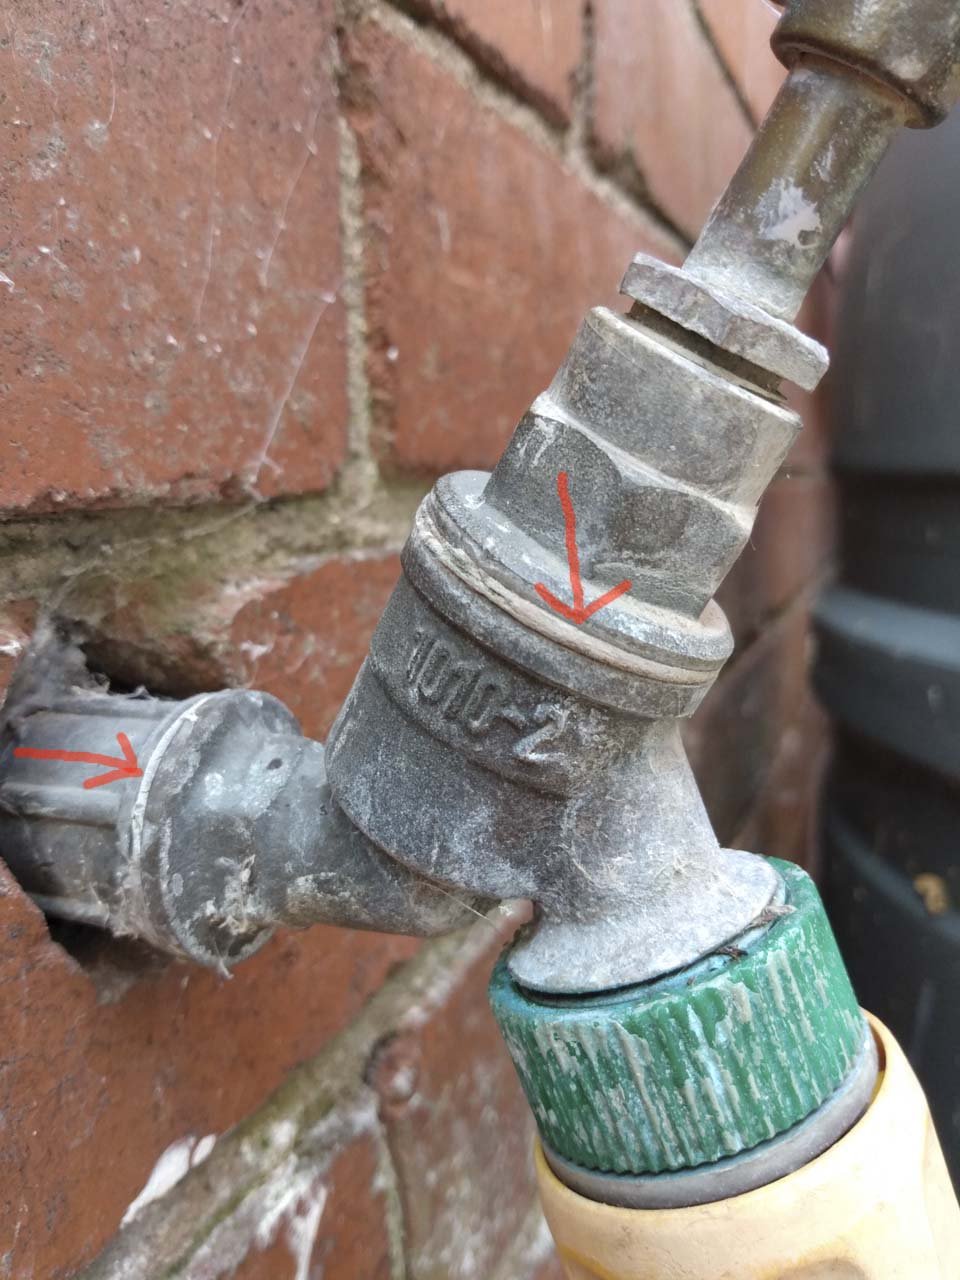
I wouldn't bother trying this without the correct tools. They are cheap - I bought a WPP and a set of 3 AS's (I kept two...) and took them to my bro so I could replace the 'nozzle' in a ballvalve inside a Grundfos mains booster accumulator, a job that was easy-but-involved, and would have cost silly money for a plumber, most of whom have never seen one of these. Tools left there for any future jobs.
If you are DIYish, then enjoy buying these tools as it's an investment!
The rubber 'tap' washer is easy to get anywhere, but the larger washers you point to will be more tricky. Chances are, tho', you won't need them as they won't be damaged. Smear of silicone grease on all the threads, and each side of the washer.
https://www.toolstation.com/search?q=3/4"+tap+washer
If the tap repair itself goes wrong, then a new garden tap is pretty cheap - see below. The main cost, as always, is labour, so you'll be quids-in regardless.
You are running a risk with that tap, tho', with it not being securely fixed to the wall. I'd be tempted to tamp in something like a suitable exterior filler, finishing it off flush with the brickwork.
I got them: https://www.toolstation.com/minotaur-adjustable-wrench-set/p21779 and would have got these if I hadn't had a spare one myself https://www.toolstation.com/minotaur-water-pump-pliers/p12134
If needed:
https://www.toolstation.com/made4trade-dzr-hose-union-outside-tap-with-double-check-valve/p44121
0 -
I’d have a good think before you undo the whole tap from that fitting disappearing into the wall. If you can’t get that back together cleanly without a leak then you’ve opened yourself up to a world of problems.WIAWSNB said:I wouldn't try dismantling that tap in situ, as it's likely to be very tight, and you don't want to accidentally apply force to the fitting as it disappears through that wall.
So, I'd waterpump-plier the fitting that's in the wall in order to hold it securely from turning, and unscrew the whole tap. You can then dismantle it at leisure - except your water supply will be off...
Yes, the washer in the other tap will almost certainly fit, but why not buy a new one anyway? Also get a tub/tube of silicone grease - really useful stuff.
Yes, pack under the gland nut with oodles of PTFE tape, and a good smear of silicone grease.
To make it silky, undo the handle, clean the shaft, and unscrew it all from the inside. Clean if needed, and a good coat of silicone - super-smooth tap.
Assemble with silicone on all threads, and a good wrap of PTFE over the main replacing thread.
The only way to fit an isolator is to elbow that outlet up, down, or sideways, add an isolator - one with a non-return valve - and mount a proper wall bracket.
Fill in around the pipe hole.
Not to mention that, whilst undoing it you could loosen the fitting behind it on the other side of the wall. It could be soldered, could be compression but either way it’s behind your kitchen units. Not good.Get a pair of grips on the tap body to hold it and then try the valve head. It might come off easily. If it is impossibly tight then try the above.1 -
Absolutely, care is needed, either way.bjorn_toby_wilde said:
I’d have a good think before you undo the whole tap from that fitting disappearing into the wall. If you can’t get that back together cleanly without a leak then you’ve opened yourself up to a world of problems.WIAWSNB said:I wouldn't try dismantling that tap in situ, as it's likely to be very tight, and you don't want to accidentally apply force to the fitting as it disappears through that wall.
So, I'd waterpump-plier the fitting that's in the wall in order to hold it securely from turning, and unscrew the whole tap. You can then dismantle it at leisure - except your water supply will be off...
Yes, the washer in the other tap will almost certainly fit, but why not buy a new one anyway? Also get a tub/tube of silicone grease - really useful stuff.
Yes, pack under the gland nut with oodles of PTFE tape, and a good smear of silicone grease.
To make it silky, undo the handle, clean the shaft, and unscrew it all from the inside. Clean if needed, and a good coat of silicone - super-smooth tap.
Assemble with silicone on all threads, and a good wrap of PTFE over the main replacing thread.
The only way to fit an isolator is to elbow that outlet up, down, or sideways, add an isolator - one with a non-return valve - and mount a proper wall bracket.
Fill in around the pipe hole.
Not to mention that, whilst undoing it you could loosen the fitting behind it on the other side of the wall. It could be soldered, could be compression but either way it’s behind your kitchen units. Not good.Get a pair of grips on the tap body to hold it and then try the valve head. It might come off easily. If it is impossibly tight then try the above.
My suggestion was for what I consider the least-likely-to-cause-such-problems method.
If waterpump pliers can catch that plastic fitting sideways, whilst held flat against the wall, then you should be good to go. And a male 3/4" BSP plug will seal that off quickly if needed.
The tap, which is screwed into a plastic fitting, sealed with PTFE, and unlikely to be done up fully tight in the first place, will almost certainly undo with relative ease. Then you are free to carry out your repair, or just replace the whole tap.
The actual dismantling of the tap body will almost certainly require a lot more force than this, but will be a doddle once the tap is removed, especially if you have a vice to hold it. But to try and do that in situ will very likely apply a lot of unavoidable strain on that plastic pipe, and in all sorts of different directions. And if one spanner slips during this process, well...
In either case, and this would be the situation if a pro plumber were doing it, any resulting leak from behind that wall is going to need sorting. I suspect, actually, that this won't be as awkward as the OP fears, as it would be unusual for it to have been run and boxed in. Good chance the supply pipe can be found, say, under the base units, or - worst - behind a back panel. But obvs I don't know.
If that plastic collar is sticking out far enough to grab, then I'd even consider my first move to be to pack the surrounding hole with exterior filler or mortar - lock that collar firmly in place.
0 -
I'm with Lorian. Just undo the top nut and repack with PTFE.0
-
Sure. Two different ways of attacking the problem.WIAWSNB said:
Absolutely, care is needed, either way.bjorn_toby_wilde said:
I’d have a good think before you undo the whole tap from that fitting disappearing into the wall. If you can’t get that back together cleanly without a leak then you’ve opened yourself up to a world of problems.WIAWSNB said:I wouldn't try dismantling that tap in situ, as it's likely to be very tight, and you don't want to accidentally apply force to the fitting as it disappears through that wall.
So, I'd waterpump-plier the fitting that's in the wall in order to hold it securely from turning, and unscrew the whole tap. You can then dismantle it at leisure - except your water supply will be off...
Yes, the washer in the other tap will almost certainly fit, but why not buy a new one anyway? Also get a tub/tube of silicone grease - really useful stuff.
Yes, pack under the gland nut with oodles of PTFE tape, and a good smear of silicone grease.
To make it silky, undo the handle, clean the shaft, and unscrew it all from the inside. Clean if needed, and a good coat of silicone - super-smooth tap.
Assemble with silicone on all threads, and a good wrap of PTFE over the main replacing thread.
The only way to fit an isolator is to elbow that outlet up, down, or sideways, add an isolator - one with a non-return valve - and mount a proper wall bracket.
Fill in around the pipe hole.
Not to mention that, whilst undoing it you could loosen the fitting behind it on the other side of the wall. It could be soldered, could be compression but either way it’s behind your kitchen units. Not good.Get a pair of grips on the tap body to hold it and then try the valve head. It might come off easily. If it is impossibly tight then try the above.
My suggestion was for what I consider the least-likely-to-cause-such-problems method.
If waterpump pliers can catch that plastic fitting sideways, whilst held flat against the wall, then you should be good to go. And a male 3/4" BSP plug will seal that off quickly if needed.
The tap, which is screwed into a plastic fitting, sealed with PTFE, and unlikely to be done up fully tight in the first place, will almost certainly undo with relative ease. Then you are free to carry out your repair, or just replace the whole tap.
The actual dismantling of the tap body will almost certainly require a lot more force than this, but will be a doddle once the tap is removed, especially if you have a vice to hold it. But to try and do that in situ will very likely apply a lot of unavoidable strain on that plastic pipe, and in all sorts of different directions. And if one spanner slips during this process, well...
In either case, and this would be the situation if a pro plumber were doing it, any resulting leak from behind that wall is going to need sorting. I suspect, actually, that this won't be as awkward as the OP fears, as it would be unusual for it to have been run and boxed in. Good chance the supply pipe can be found, say, under the base units, or - worst - behind a back panel. But obvs I don't know.
If that plastic collar is sticking out far enough to grab, then I'd even consider my first move to be to pack the surrounding hole with exterior filler or mortar - lock that collar firmly in place.
Just pointing out the hazards if you can’t get a really good grip on that collar that’s mostly in the wall.
1 -
Once saw a plumber at work change an outside tap live…..it was like a scene from das boot…..0
-
Thanks folks. Lots of suggestions there - although Lorian, you're missing the point that the tap is dripping, not just weeping via the gland.
I've just watched a video where a guy simply unscrews the tap off from that ribbed collar bit at the back (partly recessed into the brick). Surprisingly he doesn't even grip that collar in any way. Sill, it worked for him (I think the collar might have been mortared in, so it was gripped that way).
I'm thinking now of buying a new tap, presuming that it will have the same thread as fits in that collar. I'll grip the collar or chip away some more brick as mta99 suggests.
1 -
Promise you'll video yourself fixing it
 0
0


Confirm your email address to Create Threads and Reply

Categories
- All Categories
- 353.5K Banking & Borrowing
- 254.2K Reduce Debt & Boost Income
- 455.1K Spending & Discounts
- 246.6K Work, Benefits & Business
- 603K Mortgages, Homes & Bills
- 178.1K Life & Family
- 260.6K Travel & Transport
- 1.5M Hobbies & Leisure
- 16K Discuss & Feedback
- 37.7K Read-Only Boards