We’d like to remind Forumites to please avoid political debate on the Forum.
This is to keep it a safe and useful space for MoneySaving discussions. Threads that are – or become – political in nature may be removed in line with the Forum’s rules. Thank you for your understanding.
📨 Have you signed up to the Forum's new Email Digest yet? Get a selection of trending threads sent straight to your inbox daily, weekly or monthly!
The Forum now has a brand new text editor, adding a bunch of handy features to use when creating posts. Read more in our how-to guide
Air vent not sticking on!

Sekekama
Posts: 93 Forumite


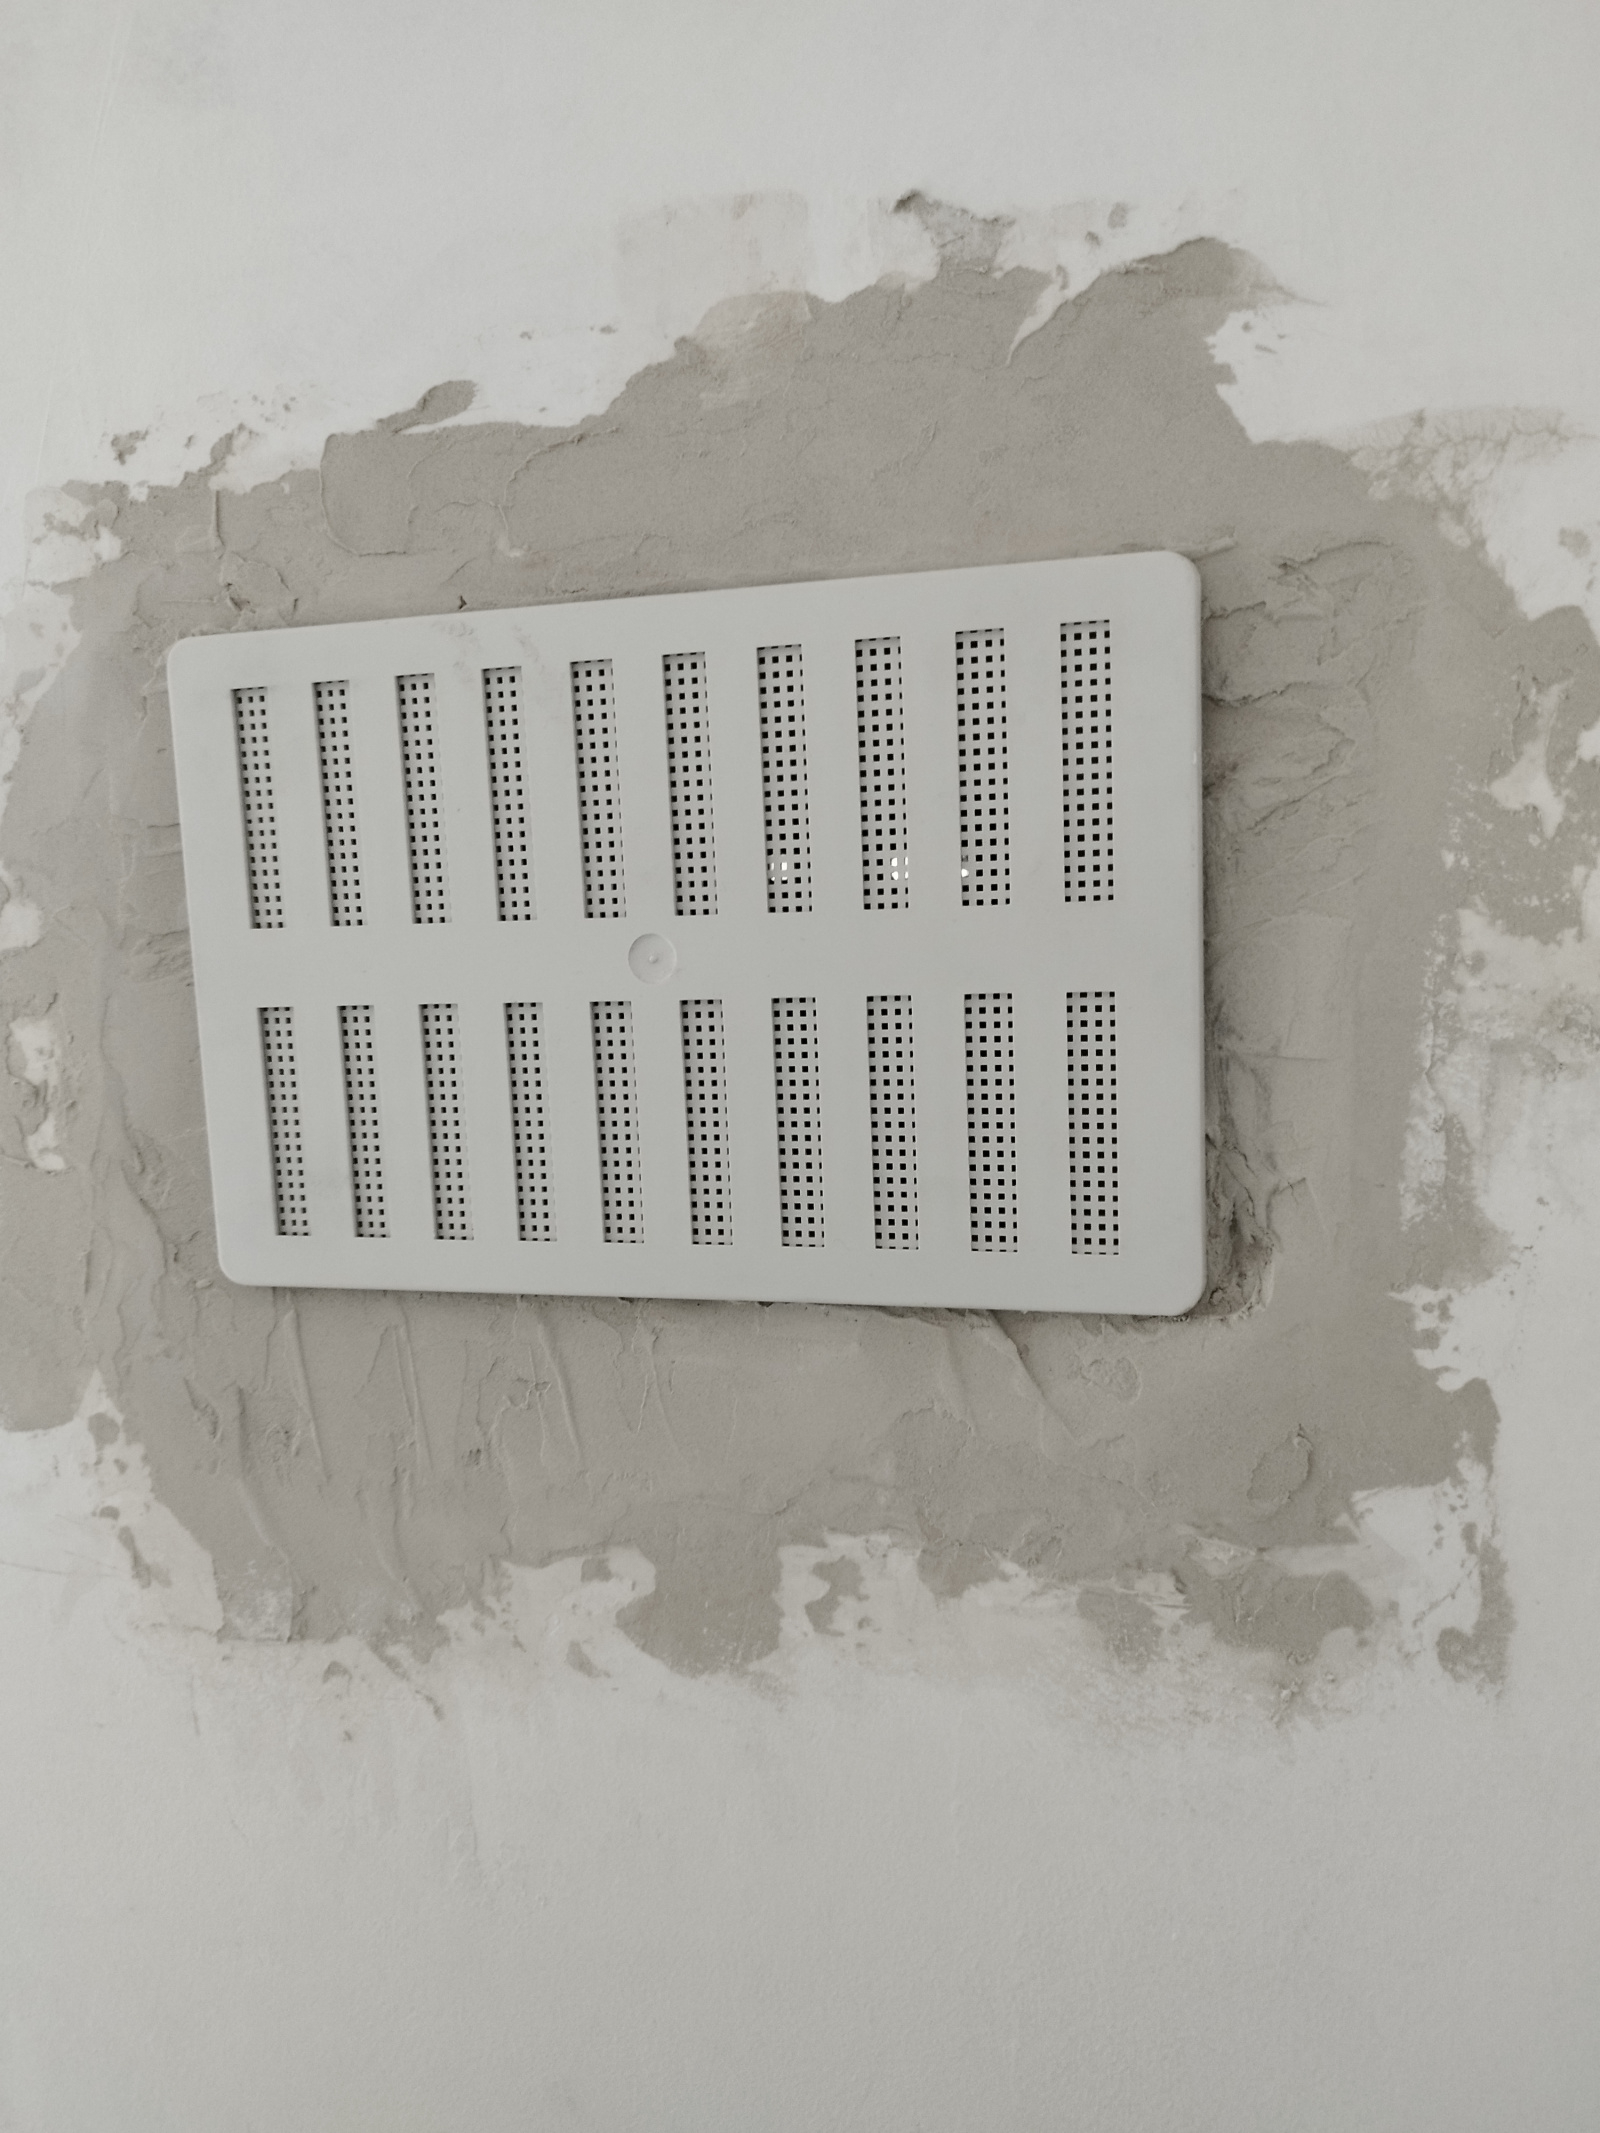
Tried several times to use grab adhesive for it to stay on see all images had a closed vent removed by a friend (which I regret now). I then used polyfilla deep gap fill around the wood frame area.
The only other option I see now is to drill into the brickwork (as the wood frame is too small for vent) and hope the plastering and brick doesn't get damaged.


0
Comments
-
The size isn't clear, however Screwfix and the like sell a variety of sizes - you could just buy a vent the next size up. The model I have fitted has four screw holes in the corners - so well into the area where there's something to attach to. They're only a few pounds.
If you want to use the grab adhesive, you'd need to be more liberal than those tiny dabs, and it'll need holding for a good 12-24 hours whilst it really goes off. Also trying to glue to that dusty surface will never go well - it'd be better to smooth and paint over first.2 -
These blobs don't look squashed at all, so it looks as tho' they just ain't big enough. And, once they are big enough to do the job, they'll take a day to set, as IC says.First, tho' - that area needs flattening using 80 grit paper, finishing with 120 grit for a better finish, and then painting. Then stick on the vent cover.On a different note, that grill isn't closeable, so you are going to have a hellish unstoppable draught coming through from outside. Why was this done?0
-
Looks like a sliding grill to me.ThisIsWeird said:On a different note, that grill isn't closeable, so you are going to have a hellish unstoppable draught coming through from outside. Why was this done?1 -
If you look closely it is a sliding grille, although I thought the same to start with. It has no form of handle to move it back and forward so may not be easy to open and close, particularly with that uneven plaster.
1 -
You push it left and right to close, I regret everything taking this offTELLIT01 said:If you look closely it is a sliding grille, although I thought the same to start with. It has no form of handle to move it back and forward so may not be easy to open and close, particularly with that uneven plaster. 0
0 -
https://www.wickes.co.uk/Manrose-White-Hit+Miss-PVC-Vent---225-x-150mm/p/167614?gclsrc=aw.ds&&utm_source=google&utm_medium=cpc&utm_campaign=PMAX Shopping||Electrical&gad_source=1&gclid=CjwKCAjwgfm3BhBeEiwAFfxrG2gKxg_oB5enOVjeaE3Nyq5jIZ_Hcsr4bgJon3v_GKCwJw-2cBNPOhoCRWoQAvD_BwEic said:The size isn't clear, however Screwfix and the like sell a variety of sizes - you could just buy a vent the next size up. The model I have fitted has four screw holes in the corners - so well into the area where there's something to attach to. They're only a few pounds.
If you want to use the grab adhesive, you'd need to be more liberal than those tiny dabs, and it'll need holding for a good 12-24 hours whilst it really goes off. Also trying to glue to that dusty surface will never go well - it'd be better to smooth and paint over first.
This is the one I've got1 -
This one at Screwfix has the screw holes in each corner - same manufacturer (see the images). The one you have must be designed to cover a very small hole. They do another even larger.
https://www.screwfix.com/p/map-vent-adjustable-vent-white-229mm-x-152mm/7374d
https://www.screwfix.com/p/map-vent-adjustable-vent-white-229mm-x-229mm/2057d
0 -
Make sure it is suitable if there are gas appliances in the room. Some of them have to have the screen bit removed. It will say on the packaging if that's the case.0
-
Sekekama said:You push it left and right to close, I regret everything taking this offThanks IC and Tellit - I can see now it's sliding.Sekekama, why did you change it? What purpose does it serve? Is it essential for that room - for a gas fire or wood-burning stove, for example?Whether open or closed, that grill is going to be bludy cold in winter. It has next-to-no insulation value, and will attract condensation like a condie thing.If it isn't actually needed, then this is what I'd do; you should fill the inner wall skin with insulation, to around a half-inch of the inner wall surface. Best, easiest, way to do this is to look on your Facebook Marketplace, and find someone selling/getting rid of Celotex-type rigid insulation, just an offcut is needed. Ditto a piece of plasterboard sheet - again just a tiny piece. Or, have a wander around any skip you see outside a house being worked on. I walked past a skip just yesterday eve that had whole sections of the T&G rigid insulation in it...Trim it to fit snugly in that hole, and tap it in tightly, until it the back reaches the inner face - ie does not go in to the cavity. If it ain't super-snug - if there are gaps around it - then you may need to add a bead of foam, although Polyurethane wood glue - the expanding type - will do.Alternatively, use expanding foam from a can - it's pretty cheap stuff (if you have other uses for it - sealing around pipes and stuff - then set up all your jobs and do them at the same time before the foam hardens in the pipe :-) ). For this, you'll need a rectangle of card, slightly larger than the hole, with a cord threaded through t'middle. Get it into the cavity, and pull it firmly back to cover the hole; hold it firmly whilst you gently spray foam to fill in that hole in layers - watch how far it expands. Doesn't matter if it comes too far out - it can be trimmed away when set.Then cut the p'board to also fit in there, and a wee surrounding gap is ok. Trim/chisel away the surface of the insulation block until the p'board sits in that hole, just a couple of mm or so deeper than the outer surface. Mix up some more of that filler, add a few dabs to the back of the p'board, press it into place, and force some more filler firmly around the p'board edges to seal it in place; leave to set, and the p'board should be fixed in place.Then add layers of filler over it all, using a straight edge wider than the hole to remove any too-high bits. Let it set, and add a layer more until you know you have it at least flush with the wall.Allow to dry fully.If you have a metal straight-edge - a steel rule, the back of a saw blade, anything like that - then use it to scrape away excess filler until it's essentially flat. Then 80 grit on a sanding block, followed by 120 grit, to get it all perfectly flat and blended in.Jobbie jobbed - once painted.0
-
I had it done because plasterers removed the one in other room and hallway see image and my double glazed windows don't have vents. My friend raked it open but now I regret it just thought a vent would look nice one I could open and close when needed. Taking time away from paintingThisIsWeird said:Sekekama said:You push it left and right to close, I regret everything taking this offThanks IC and Tellit - I can see now it's sliding.Sekekama, why did you change it? What purpose does it serve? Is it essential for that room - for a gas fire or wood-burning stove, for example?Whether open or closed, that grill is going to be bludy cold in winter. It has next-to-no insulation value, and will attract condensation like a condie thing.If it isn't actually needed, then this is what I'd do; you should fill the inner wall skin with insulation, to around a half-inch of the inner wall surface. Best, easiest, way to do this is to look on your Facebook Marketplace, and find someone selling/getting rid or Celotex-type rigid insulation, just an offcut is needed. Ditto a piece of plasterboard sheet - again just a tiny piece. Or, have a wander around any skip you see outside a house being worked on. I walked past a skip just yesterday eve that had whole sections of the T&G rigid insulation in it...Trim it to fit snugly in that hole, and tap it in tightly, until it the back reaches the inner face - ie does not go in to the cavity. If it ain't super-snug - if there are gaps around it - then you may need to add a bead of foam, although Polyurethane wood glue - the expanding type - will do.Then cut the p'board to also fit in there, and a wee surrounding gap is ok. Trim/chisel away the surface of the insulation block until the p'board sits in that hole, just a couple of mm or so deeper than the outer surface. Mix up some more of that filler, add a few dabs to the back of the p'board, press it into place, and force some more filler firmly around the p'board edges to seal it in place; leave to set, and the p'board should be fixed in place.Then add layers of filler over it all, using a straight edge wider than the hole to remove any too-high bits. Let it set, and add a layer more until you know you have it at least flush with the wall.Allow to dry fully.If you have a metal straight-edge - a steel rule, the back of a saw blade, anything like that - then use it to scrape away excess filler until it's essentially flat. Then 80 grit on a sanding block, followed by 120 grit, to get it all perfectly flat and blended in.Jobbie jobbed - once painted. 1
1


Confirm your email address to Create Threads and Reply

Categories
- All Categories
- 354.1K Banking & Borrowing
- 254.3K Reduce Debt & Boost Income
- 455.3K Spending & Discounts
- 247.1K Work, Benefits & Business
- 603.7K Mortgages, Homes & Bills
- 178.3K Life & Family
- 261.2K Travel & Transport
- 1.5M Hobbies & Leisure
- 16.1K Discuss & Feedback
- 37.7K Read-Only Boards