We’d like to remind Forumites to please avoid political debate on the Forum.
This is to keep it a safe and useful space for MoneySaving discussions. Threads that are – or become – political in nature may be removed in line with the Forum’s rules. Thank you for your understanding.
📨 Have you signed up to the Forum's new Email Digest yet? Get a selection of trending threads sent straight to your inbox daily, weekly or monthly!
The Forum now has a brand new text editor, adding a bunch of handy features to use when creating posts. Read more in our how-to guide
My cheating rotten wood filler.

Bendy_House
Posts: 4,756 Forumite


This is just something I've tried, and seems to work, tho' it hasn't had a long-term test yet. Only suitable for 'decorative' repairs, and not structural, and also in areas without high wear or impact.
Having hacked out numerous bits of rot from my own 'pergola' type structure (lawd, 'treated' timber is truly carp these days), and also noticed how much 'foaming' takes place with Polyurethane 'Gorilla' glue - usually to one's great annoyance - I thought I'd take advantage.
Essentially it's:
All obviously rotten bits hacked out, the rest soaked with Everbuild Lumberjack, and then some method of containing the 'foam' within the required repair area. Gorilla doesn't stick well to polythene or PVC, so you can use a piece of old PVC fascia board clamped firmly in place if it's a flat surface, or even cover a wooden block with a polythene bag to serve the same purpose.
Coat the inside of the hole with Gorilla, fit the cover over the majority of the hole, leaving a small gap at the top (unless it's a small repair, when you can just cover it all), and clamp the panel/cover firmly in place. If it's a big void, you can always add bits of timber for padding, and - if needed - trickle some more Gorilla in from the top through the wee gap. Best to keep the quants modest to begin with, as you can always top it up more when the initial foaming has stopped; put in too much and it'll find gaps to squeeze out of.
If all goes well, it'll foam up and completely fill the hole. Once set - give it a good few hours - you should be able to prise away the PVC or whatev cover, leaving behind a fairly neatly filled repair, ready for a light sanding and painting.
Obviously not suitable for staining - it'll need a good, thick, obliterating coat.
I took the idea a step further a few days ago when refurb'ing mil's decking, which has lots of rot... The refurb is only designed to buy some time, as the owners of the retirement village are meant to be looking after it, but their recent 'repair' was piecemeal at best, and left lots of still-soft patches and even holes. Anyhoo, I found a roll of foil tape and tried the following; dug out the rotting holes and gaps in the handrail, posts and balustrade, soaked it in Lumberjack, allowed to dry, smeared on Gorilla to all the sunken surfaces (but not on the good top surfaces), and then applied the foil tape over it, pulling it firmly over the hand rail so's it followed its profile. Press it very firmly down on the good surrounding surfaces. Left to set.
The best results might actually be good enough to directly take the Ronseal Ultimate Deck rescue paint (tho' it's a bit smooth and shiny), but I'll give it a light sanding first to get it fully level, and provide a key. If it works out, I'll post a photo of the final finish. If it doesn't, then, er...
This shows the type of rot (tho' this one wasn't bad enough to bother filling - the ones I did were worse):

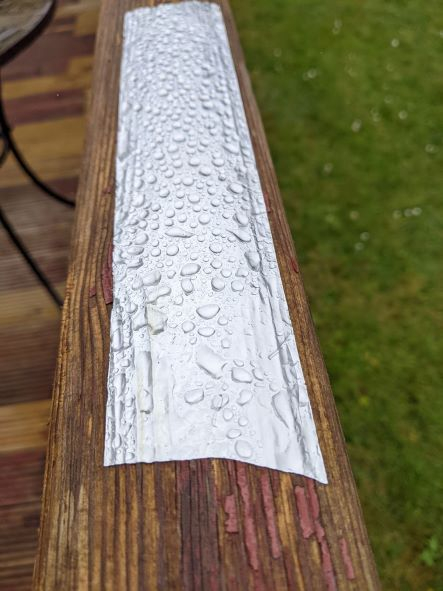
Glue applied and foiled over, pressed down on the surrounding timber very firmly:
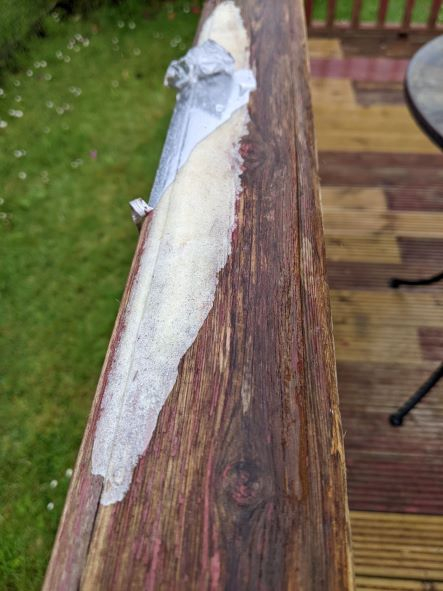
Foil peeled off - largely easily enough - leaving behind;
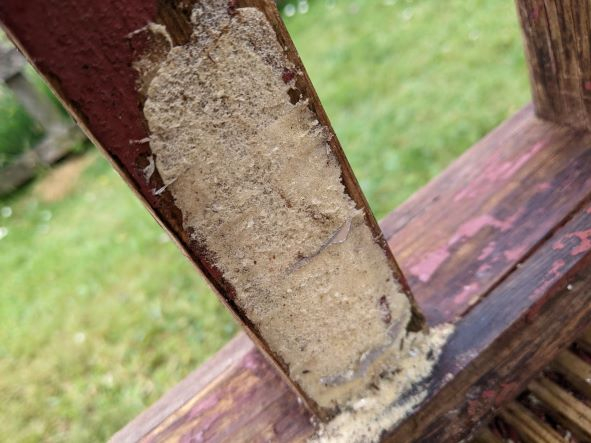
This was a much deeper hole in a spindle, nearly half way deep. Roughly filed afterwards to remove excess (the foil bulged out too much with the foam...), and will be given a sanding before painting. Thick 'repair' paint should hopefully cover it nicely.
Yup, I am truly a cowboy :-) This is only designed as a stop-gap fix, for decking that will most likely collapse in 5 years time; I just couldn't face using proper filler and sanding it all down.
0
Comments
-
Surely this is far more effort than using something like Wickes 2-part filler?1
-
Wouldn't a wood/fence preservative do the job until you get around to replacing?Granted I'm not the one to take advice from. I had an 'interesting' situation when I couldn't find the real stuff to seal a bird bath.I used multisurface paint mixed with food colouring for a very pale lavender grey.The colouring seeped out - from purple to pink to a mix for 3mts!It was funny at first then exasperating. The birds weren't keen.
 The multi surface paint is still there mostly and I can't get the white off. Birds don't seem to mind.
I can rise and shine - just not at the same time!
viral kindness .....kindness is contageous pass it on
The only normal people you know are the ones you don’t know very well
1 -
If I need a splash of colour in a paint, I'll grab a tube of Artist's acrylic paint or grind some raw pigments.twopenny said: I used multisurface paint mixed with food colouring for a very pale lavender grey.The colouring seeped out - from purple to pink to a mix for 3mts!
Any language construct that forces such insanity in this case should be abandoned without regrets. –
Erik Aronesty, 2014
Treasure the moments that you have. Savour them for as long as you can for they will never come back again.1 -
Grenage said:Surely this is far more effort than using something like Wickes 2-part filler?It took less than 2 minutes to smear on the Gorilla, and press down the tape. The result only requires light sanding, and it's soft stuff to do. But it will need a thick obliterating paint over it.BUT, for a proper job, you are right - the proper filler should be used. This is a 'cheat'...0
-
twopenny said:Wouldn't a wood/fence preservative do the job until you get around to replacing?Granted I'm not the one to take advice from. I had an 'interesting' situation when I couldn't find the real stuff to seal a bird bath.I used multisurface paint mixed with food colouring for a very pale lavender grey.The colouring seeped out - from purple to pink to a mix for 3mts!It was funny at first then exasperating. The birds weren't keen.The multi surface paint is still there mostly and I can't get the white off. Birds don't seem to mind.That looks great!All these bits needed filling before painting - the hole in the balustrade was virtually an inch deep. It's just a way of giving it a quick, cosmetic repair. There is no structural strength in the 'foam',I'm also going to give it a soaking in Lumberjack, all the remaining soft bits a Roneal 'hardening', and finally a coat of Everbuild 406 - I'm pretty sure that will help with the adhesion of the 'rescue' paint. The stuff that had been applied before - you can see traces of the horrible reddy-brown colour - was flaking off everywhere, and compounded the problem as it had trapped water under it. A shocking job.0


Confirm your email address to Create Threads and Reply

Categories
- All Categories
- 354.4K Banking & Borrowing
- 254.4K Reduce Debt & Boost Income
- 455.4K Spending & Discounts
- 247.3K Work, Benefits & Business
- 604.1K Mortgages, Homes & Bills
- 178.5K Life & Family
- 261.6K Travel & Transport
- 1.5M Hobbies & Leisure
- 16K Discuss & Feedback
- 37.7K Read-Only Boards