We’d like to remind Forumites to please avoid political debate on the Forum.
This is to keep it a safe and useful space for MoneySaving discussions. Threads that are – or become – political in nature may be removed in line with the Forum’s rules. Thank you for your understanding.
📨 Have you signed up to the Forum's new Email Digest yet? Get a selection of trending threads sent straight to your inbox daily, weekly or monthly!
The Forum now has a brand new text editor, adding a bunch of handy features to use when creating posts. Read more in our how-to guide
Unable to replace outdoor light due to unfamiliar wiring- your thoughts
Comments
-
Thanks for your reply, please see the new photosI was about to complain that your photos didn't clearly show where which CABLE these wires went to. But, I think it's clear enough...Ok. you have TWO cables coming in to that back box. One has conventional wiring colours - brown, blue and (sleeved yellow/green) earth. That's the power coming IN to that backbox.The other cable has Brown, Black and Grey and an earth wire. I think this might be 3-phase cable, but it doesn't matter too much PROVIDED each wire is sleeved to indicate what they now are - which they appear to be.Ok, look at the back of your switch. That has a BLACK wire going to 'L' and two BROWNS going to '1'. Pedantically, these should be the other way around - the 2xbrown to 'L' as they are the LIVE and the black to '1'. But hey, you can leave them as they are...One BROWN is the LIVE supply, and that also goes to another BROWN (it's in the same terminal) in the other cable. This brown goes out through the wall and is a PERMANENT LIVE there. Ie - it'll kill you whether the switch is on or off...Ok, so far? Good. I really want you to understand what these wires are, not just swap them blind.The wire from 'L' on the switch is BLACK and this BECOMES 'live' when the switch is switched ON. So, on the outside of the wall, this will only kill you when the switch is 'on'. That sleeve on the black wire should really be a brown colour to indicate it is usually 'live', but hey...Thankfully, the NEUTRAL wires are correct - they are BLUE or grey SLEEVED in blue. So the GREY outside is your NEUTRAL.Phew. Your new light doesn't need a 'permanent' live, only a 'live' that becomes 'live' when the switch is on.So, to wire up your new light, you need:NEUTRAL (Grey sleeved in BLUE) to go to BLUE on the new light.'SWITCHED LIVE' BLACK (which should be sleeved in BROWN at both ends) to go to BROWN on the new light.BARE earth (which should be sleeved in yellow/green on the outside) to go to YELLOW/GREEN on the new light.The BROWN on the OUTSIDE ('permanent death') should be left safely terminated in that connector as it currently is, ideally with tape wrapped around it.Question - there doesn't appear to be much room for connectors behind that new light - where will it all go?And, if you don't understand the above, you shouldn't be doing this.1 -
Thanks a lot for your brilliant reply, this answers all my questions, I didn't pay attention to the sleeves, now it makes perfect sense why they are there for. Ok regarding the room for new connectors, thankfully the new light comes with a junctions box, once I install that on the wall this would do the job of connecting all of the cables nicely.Jeepers_Creepers said:
Thanks for your reply, please see the new photosI was about to complain that your photos didn't clearly show where which CABLE these wires went to. But, I think it's clear enough...Ok. you have TWO cables coming in to that back box. One has conventional wiring colours - brown, blue and (sleeved yellow/green) earth. That's the power coming IN to that backbox.The other cable has Brown, Black and Grey and an earth wire. I think this might be 3-phase cable, but it doesn't matter too much PROVIDED each wire is sleeved to indicate what they now are - which they appear to be.Ok, look at the back of your switch. That has a BLACK wire going to 'L' and two BROWNS going to '1'. Pedantically, these should be the other way around - the 2xbrown to 'L' as they are the LIVE and the black to '1'. But hey, you can leave them as they are...One BROWN is the LIVE supply, and that also goes to another BROWN (it's in the same terminal) in the other cable. This brown goes out through the wall and is a PERMANENT LIVE there. Ie - it'll kill you whether the switch is on or off...Ok, so far? Good. I really want you to understand what these wires are, not just swap them blind.The wire from 'L' on the switch is BLACK and this BECOMES 'live' when the switch is switched ON. So, on the outside of the wall, this will only kill you when the switch is 'on'. That sleeve on the black wire should really be a brown colour to indicate it is usually 'live', but hey...Thankfully, the NEUTRAL wires are correct - they are BLUE or grey SLEEVED in blue. So the GREY outside is your NEUTRAL.Phew. Your new light doesn't need a 'permanent' live, only a 'live' that becomes 'live' when the switch is on.So, to wire up your new light, you need:NEUTRAL (Grey sleeved in BLUE) to go to BLUE on the new light.'SWITCHED LIVE' BLACK (which should be sleeved in BROWN at both ends) to go to BROWN on the new light.BARE earth (which should be sleeved in yellow/green on the outside) to go to YELLOW/GREEN on the new light.The BROWN on the OUTSIDE ('permanent death') should be left safely terminated in that connector as it currently is, ideally with tape wrapped around it.Question - there doesn't appear to be much room for connectors behind that new light - where will it all go?And, if you don't understand the above, you shouldn't be doing this.
Thanks again for the detailed step by step reply, really appreciate your time and effort. I can now safely go ahead and install the unit with full confidence.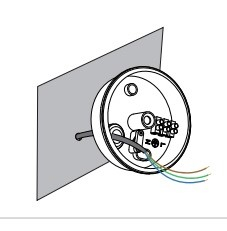
1 -
“I was presented with 4 different cables - I believe Brown(L) and Black (N),tekie said:
I've only asked for an affirmation for my conclusion, that doesn't mean that I'm a complete novice.Swasterix said:To be totally honest, given your initial assessment of the wiring configuration and after the guidance you’ve been offered in the subsequent posts, if you still don’t understand what should be done you may be better off leaving it to a professional. Please don’t think I am being rude, but obviously incorrectly installed electrical equipment can be very dangerous, especially outdoors!Consult an electrician.
To be fair, my last post crossed with your last post, I didn’t see your one asking for confirmation. Only re-posting the photographs
I haven't come across such a configuration before, I've asked at least 2 of my mates who know and do DIY work of their own,
but even they couldn't figure it out. They are not electricians by any means.This is a very common configuration in lighting circuits. Your mates may be good at diy, but have no clue about electricsSo far everyone on these forums was really helpful and if you don't want to help out, please don't but there is no need to offend when someone is trying to figure out a solution. If I were to hire an electrician they are not going to post the issue on this forum. I don't know whether you noticed, the main purpose of this site is for money-saving, and that's the primary reason people are attracted to this website and I don't have 100s of pounds to spend on electrician' fee. When someone starts a conversation by saying don't take it personal or rude, they are doing exactly the opposite.
I didn’t mean to offend, I was genuinely concerned for your safety. If you decide to take offence, I’m afraid that’s your problem.
by the way, I was responding to Jeepers_Creepers request to post further photos, so I'm waiting for him to respond to my query.
ok, but you quoted my post
if Grey is earth why there is a 4th cable” - this was what you said in your opening gambit. Im sure you don’t realise, but had you went ahead and wired it up like this, you could have potentially killed yourself/somebody else.Yes this is a money saving site, and yes the forum is here to help people. But when dealing with electrics the person receiving the advice needs to have more than a basic understanding of what they’re dealing with. I’m afraid you don’t.0 -
Sure, resort to insults. That just tells me that you know I am right.tekie said:Swasterix said:
“I was presented with 4 different cables - I believe Brown(L) and Black (N),tekie said:
I've only asked for an affirmation for my conclusion, that doesn't mean that I'm a complete novice.Swasterix said:To be totally honest, given your initial assessment of the wiring configuration and after the guidance you’ve been offered in the subsequent posts, if you still don’t understand what should be done you may be better off leaving it to a professional. Please don’t think I am being rude, but obviously incorrectly installed electrical equipment can be very dangerous, especially outdoors!Consult an electrician.
To be fair, my last post crossed with your last post, I didn’t see your one asking for confirmation. Only re-posting the photographs
I haven't come across such a configuration before, I've asked at least 2 of my mates who know and do DIY work of their own,
but even they couldn't figure it out. They are not electricians by any means.This is a very common configuration in lighting circuits. Your mates may be good at diy, but have no clue about electricsSo far everyone on these forums was really helpful and if you don't want to help out, please don't but there is no need to offend when someone is trying to figure out a solution. If I were to hire an electrician they are not going to post the issue on this forum. I don't know whether you noticed, the main purpose of this site is for money-saving, and that's the primary reason people are attracted to this website and I don't have 100s of pounds to spend on electrician' fee. When someone starts a conversation by saying don't take it personal or rude, they are doing exactly the opposite.
I didn’t mean to offend, I was genuinely concerned for your safety. If you decide to take offence, I’m afraid that’s your problem.
by the way, I was responding to Jeepers_Creepers request to post further photos, so I'm waiting for him to respond to my query.
ok, but you quoted my post
if Grey is earth why there is a 4th cable” - this was what you said in your opening gambit. Im sure you don’t realise, but had you went ahead and wired it up like this, you could have potentially killed yourself/somebody else.Yes this is a money saving site, and yes the forum is here to help people. But when dealing with electrics the person receiving the advice needs to have more than a basic understanding of what they’re dealing with. I’m afraid you don’t.Carter : Lee how do you manage to stay cool all the time ?Lee : Because I don't get into arguments with stupid people, I just cut it short and say "You are right'Carter : But that's completely irrational and wrongLee : You are rightYou could have killed somebody, JC put you right, you ought to thank him for potentially saving your life or that of a family member...
Please just take this last piece of advice. In future, don’t mess with electrics when you don’t know what you are doing.0 -
Just finished installing it, all looks good and working fine....thank you.tekie said:
Thanks a lot for your brilliant reply, this answers all my questions, I didn't pay attention to the sleeves, now it makes perfect sense why they are there for. Ok regarding the room for new connectors, thankfully the new light comes with a junctions box, once I install that on the wall this would do the job of connecting all of the cables nicely.Jeepers_Creepers said:
Thanks for your reply, please see the new photosI was about to complain that your photos didn't clearly show where which CABLE these wires went to. But, I think it's clear enough...Ok. you have TWO cables coming in to that back box. One has conventional wiring colours - brown, blue and (sleeved yellow/green) earth. That's the power coming IN to that backbox.The other cable has Brown, Black and Grey and an earth wire. I think this might be 3-phase cable, but it doesn't matter too much PROVIDED each wire is sleeved to indicate what they now are - which they appear to be.Ok, look at the back of your switch. That has a BLACK wire going to 'L' and two BROWNS going to '1'. Pedantically, these should be the other way around - the 2xbrown to 'L' as they are the LIVE and the black to '1'. But hey, you can leave them as they are...One BROWN is the LIVE supply, and that also goes to another BROWN (it's in the same terminal) in the other cable. This brown goes out through the wall and is a PERMANENT LIVE there. Ie - it'll kill you whether the switch is on or off...Ok, so far? Good. I really want you to understand what these wires are, not just swap them blind.The wire from 'L' on the switch is BLACK and this BECOMES 'live' when the switch is switched ON. So, on the outside of the wall, this will only kill you when the switch is 'on'. That sleeve on the black wire should really be a brown colour to indicate it is usually 'live', but hey...Thankfully, the NEUTRAL wires are correct - they are BLUE or grey SLEEVED in blue. So the GREY outside is your NEUTRAL.Phew. Your new light doesn't need a 'permanent' live, only a 'live' that becomes 'live' when the switch is on.So, to wire up your new light, you need:NEUTRAL (Grey sleeved in BLUE) to go to BLUE on the new light.'SWITCHED LIVE' BLACK (which should be sleeved in BROWN at both ends) to go to BROWN on the new light.BARE earth (which should be sleeved in yellow/green on the outside) to go to YELLOW/GREEN on the new light.The BROWN on the OUTSIDE ('permanent death') should be left safely terminated in that connector as it currently is, ideally with tape wrapped around it.Question - there doesn't appear to be much room for connectors behind that new light - where will it all go?And, if you don't understand the above, you shouldn't be doing this.
Thanks again for the detailed step by step reply, really appreciate your time and effort. I can now safely go ahead and install the unit with full confidence.0


Confirm your email address to Create Threads and Reply

Categories
- All Categories
- 354.6K Banking & Borrowing
- 254.5K Reduce Debt & Boost Income
- 455.5K Spending & Discounts
- 247.5K Work, Benefits & Business
- 604.3K Mortgages, Homes & Bills
- 178.5K Life & Family
- 261.9K Travel & Transport
- 1.5M Hobbies & Leisure
- 16.1K Discuss & Feedback
- 37.7K Read-Only Boards