We'd like to remind Forumites to please avoid political debate on the Forum... Read More »
📨 Have you signed up to the Forum's new Email Digest yet? Get a selection of trending threads sent straight to your inbox daily, weekly or monthly!
What to do for padding for Skirting boards?
Options
492800
Posts: 192 Forumite


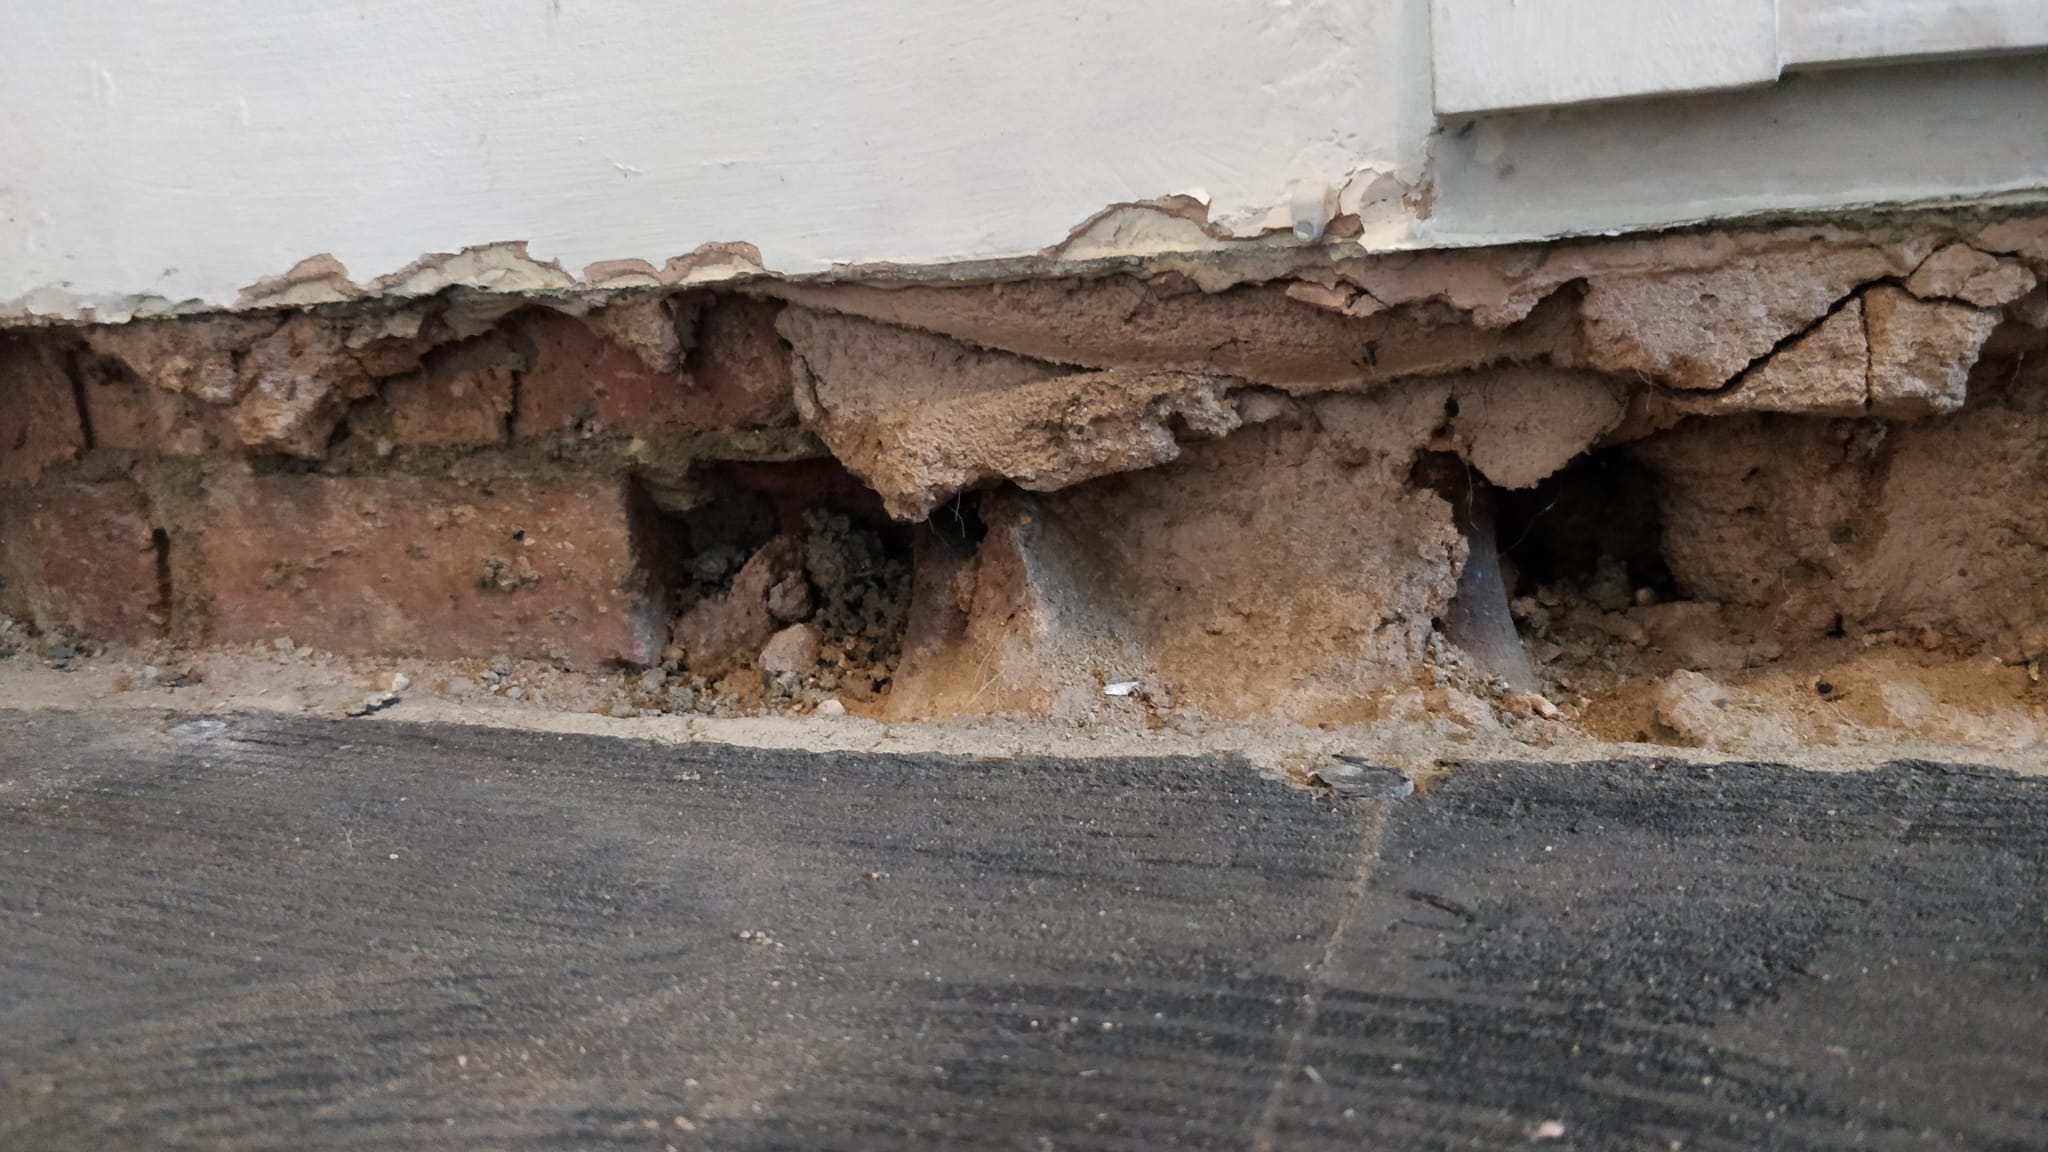
We are prepping our hallway to lay some Engineered Wood flooring and have pulled out the old skirting boards and have revealed that some parts of the wall are slightly missing and up to 2inches deep.
We are wondering what suggestions you might have for padding out the walls so the new skirting board fits a bit more flush.
Small bits of wood to fill it? or foam in places where we would attach the new skirting boards?
Any basic suggestions would be really be appreciated (and preferably in simple wording as I'm relatively low level DIYer)
Thanks so much in advance.


We are wondering what suggestions you might have for padding out the walls so the new skirting board fits a bit more flush.
Small bits of wood to fill it? or foam in places where we would attach the new skirting boards?
Any basic suggestions would be really be appreciated (and preferably in simple wording as I'm relatively low level DIYer)

Thanks so much in advance.


--- Hitting the thanks button as often as is needed ---
0
Comments
-
In the middle picture you can see the wooden wedge, which is what the original skirting would have fixed to using nails - that should be roughly straight with the plaster above. Like you I installed wooden engineered flooring, which essentially lifted the floor level, bringing the new skirting further up the wall with a greater overlap on the plaster. I made sure every so often I had some scrap wood filling the gap, screwed to the brick (using plugs) that was suitably level (maybe every two feet, plus at the ends of any piece of skirting). I then used a grab adhesive to install the skirting, with a line along the top of the skirting, along with blobs on the wedges/scraps I'd installed. Bang it on, and it quickly holds. Clean up any adhesive that oozes out because it quickly sets hard, and then lastly trim up with caulk.
There's plenty of videos on youtube showing people following the same approach.
The adhesive I used was from Toolstation, they don't list it any more, but this looks close to what I used - if a little more expensive: https://www.toolstation.com/eb25-the-ultimate-sealant-adhesive-300ml/p720660 -
I don't know if it's true but years ago I was told not to fill that gap as it's there to stop damp, the brick work has damp proof but plaster doesn't0
-
Blocks of wood fixed to the bricks at regular intervals using a grab adhesive (tip, use the water based stuff and give the bricks a light misting of water first). Put a pencil mark on the wall so that you know where to drill holes, and follow ic's notes.The surface conduit will probably get in the way, as will the (assumed) socket on the end - If you are moving them, please make sure the power is turned off with the big red switch in your consumer unit (fuse board).Her courage will change the world.
Treasure the moments that you have. Savour them for as long as you can for they will never come back again.0
This discussion has been closed.
Confirm your email address to Create Threads and Reply

Categories
- All Categories
- 351K Banking & Borrowing
- 253.1K Reduce Debt & Boost Income
- 453.6K Spending & Discounts
- 244.1K Work, Benefits & Business
- 599K Mortgages, Homes & Bills
- 177K Life & Family
- 257.4K Travel & Transport
- 1.5M Hobbies & Leisure
- 16.1K Discuss & Feedback
- 37.6K Read-Only Boards


