We’d like to remind Forumites to please avoid political debate on the Forum.
This is to keep it a safe and useful space for MoneySaving discussions. Threads that are – or become – political in nature may be removed in line with the Forum’s rules. Thank you for your understanding.
📨 Have you signed up to the Forum's new Email Digest yet? Get a selection of trending threads sent straight to your inbox daily, weekly or monthly!
two more easy crafts for most occasions
Comments
-
RustyFlange wrote: »I have just bought some acetate from ebay
") only 10 sheets but more than enough for me to do what I want ... only thing is that I am not clued up on these kinds of things so could someone kindly just check and make sure it is right please?
only 10 sheets but more than enough for me to do what I want ... only thing is that I am not clued up on these kinds of things so could someone kindly just check and make sure it is right please?
The link is here I have already bought it but if it is wrong stuff I can use for something else
http://cgi.ebay.co.uk/10-A4-SHEETS-ACETATE-OHP-FREE-Card_W0QQitemZ120366401240QQcmdZViewItemQQptZUK_Crafts_Glass_Art_Supplies_CV?hash=item120366401240&_trksid=p3286.c0.m14&_trkparms=72%3A1298|66%3A2|65%3A12|39%3A1|240%3A1318
That's the stuff! I should have some already in my craft stash as I used to use it for aperture cards. I love the tube, think it is so professional looking I'm sure mine won't look anything as good as soblivion's though
  :wave: If you want the rainbow, you've got to put up with the rain :wave:0
 -
I've got to get me some of those but are they not a bit too cute to eat, not sure I could bring myself to do it

I felt the same so only bought 3 instead of 4 ... although I might make myself an easter hamper aswell so I am not left out like I am every year :rotfl:
Thanks for looking at the link rainmac, really appreciate it would have been a bit tough if it was the wrong stuff cause I had already paid for it :rotfl: Raising kids is like being held hostage by midget terrorists0 -
Rusty and rainmac, you ladies will make light work of this I'm sure. I'm looking forward to seeing them and if you come up with an easier way of doing the end bits please let me know, it was easy enough but I'm sure it could be simpler and you'll probably have a different take on it.
re the acetate, mine was quite strong and thick, when it's made up it's very sturdy and solid. It's all I could get here but I just bought it by the sheet so I can't really tell you what it's called but having said that a thinner one will be much easier to work with and if I could find it here I'd try some.0 -
Rusty and rainmac, you ladies will make light work of this I'm sure. I'm looking forward to seeing them and if you come up with an easier way of doing the end bits please let me know, it was easy enough but I'm sure it could be simpler and you'll probably have a different take on it.
re the acetate, mine was quite strong and thick, when it's made up it's very sturdy and solid. It's all I could get here but I just bought it by the sheet so I can't really tell you what it's called but having said that a thinner one will be much easier to work with and if I could find it here I'd try some.
I have to admit it is the ends I am dreading .... I was going to play with one and see if I could come up with some kind of cracker end rather than a stopper? that makes no sense lol ... a few slits part way up then pull it tight with some ribbon so it looks more like a cracker?Raising kids is like being held hostage by midget terrorists0 -
soblivion - Brilliant idea !!:T Have to forage in my drawer -sure I've got a sheet of acetate in there somewhere.Mary
I'm creative -you can't expect me to be neat too !
(Good Enough Member No.48)0 -
RustyFlange wrote: »A quick pic for you soblivion
")

they look so cute - will have to look out for them!saving for ds2's summer international scout camp - £200
£60 deposit paid :j £100 paid:j £40 paid:j0 -
Thank you mary.
Rusty, I'm just about to start one now, do you want me to put pics up of how I did the ends? It will take me a bit though I really don't mind.0 -
Thank you mary.
Rusty, I'm just about to start one now, do you want me to put pics up of how I did the ends? It will take me a bit though I really don't mind.
That would be brilliant if you don't mind please ... I really am not that thick honest lol I just struggle sometimes with crafty stuff Raising kids is like being held hostage by midget terrorists0 -
RustyFlange wrote: »That would be brilliant if you don't mind please ... I really am not that thick honest lol I just struggle sometimes with crafty stuff
No probs, just about to start.0 -
All done. Loads of pics sorry about that. Please see important Edit at bottom of page.

Acetate measures about 8 and a quarter inches by 3 and a half inches but you'd need to wrap it round your eggs or gifts to make certain it fits. Put a strip of double sided tape along one of the longest edges and wrap into a tube.
If doing size above, circles measure 1 and a half inches across. I cut 4 in red as my card is very thin and needed to double up, only do 2 if card is thick. I glued the 2 reds together and then glued on the pattern paper. then did the other the same for the other end.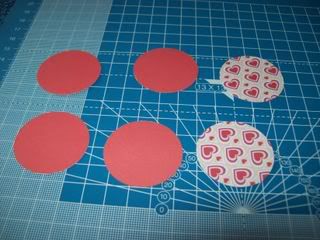
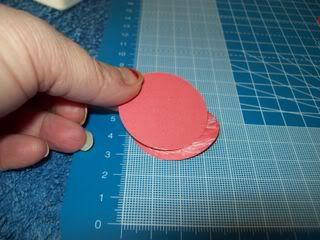
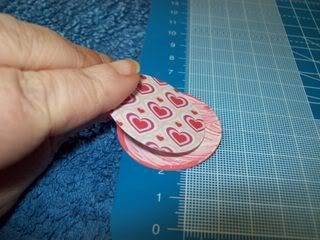
This is what you end up with from all the circles, one side is plain red other side is patterned.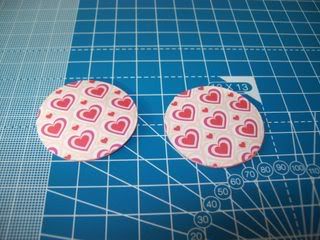
I cut 2 strips of patterned paper if you are doing the size above they measure 3 and a half inches long by 2 inch depth.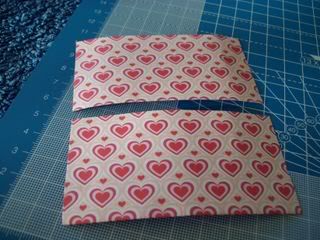
If it's patterned paper you need to make sure that they will be up the right way when they go on the tube. I needed mine like this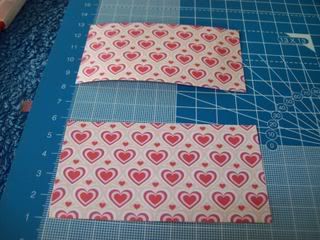
so it meant I had to put sticky strip like this, lengthways across the paper.
Put the paper on the tube half on the tube and half off it. I like to keep my seams altogether at the back, at so start at the seam and go all around keeping it straight so it overlaps a bit. You may have to cut the excess off.
you end up with this
Do the same for the other end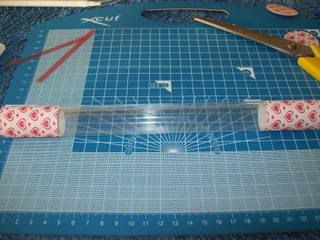
You'll end up having to glue this edge down.
Cut notches in the paper all the way round up to the plastic tube inside
Fold them all inwards and use a bit of glue to hold them down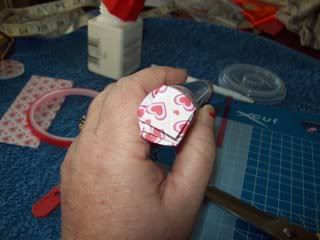
you may have to snip a bit off as the may be too long to fold in
Making sure your paper on the tube is the right way up, glue it down on to the middle of one of the discs, pattern side up. This is the bottom
You have to fill with goodies now.
Do the same with the other end making sure you glue the tube onto the plain side so you have a nice pretty pattern on the top.
Here's the top being held on cos I haven't filled it.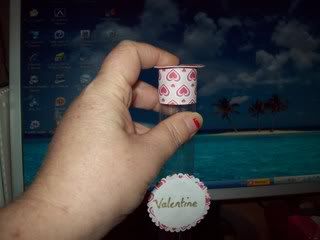
Just add a ribbon round this top bit. I don't have any at the minute.
And the bottom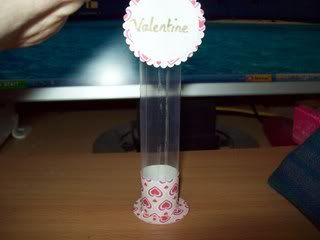
Just stick a message tag to the middle and your done.
Not a very good tutorial but any questions just ask. Hope it helped a bit.
Edit: Haaaa Haaaa Haaaa! I've just notced my papers are upside down, so don't make that mistake. In my defence I was rushing and taking pics too. Oh well back to do another one. They don't take long.
This is how the bottom should look with the hearts the right way up.
and the top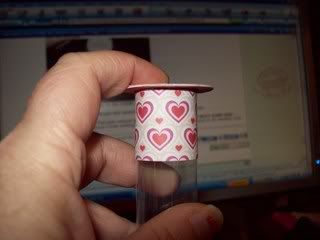 0
0


This discussion has been closed.
Confirm your email address to Create Threads and Reply

Categories
- All Categories
- 355.1K Banking & Borrowing
- 254.6K Reduce Debt & Boost Income
- 455.8K Spending & Discounts
- 247.9K Work, Benefits & Business
- 604.9K Mortgages, Homes & Bills
- 178.8K Life & Family
- 262.6K Travel & Transport
- 1.5M Hobbies & Leisure
- 16.1K Discuss & Feedback
- 37.7K Read-Only Boards