We’d like to remind Forumites to please avoid political debate on the Forum.
This is to keep it a safe and useful space for MoneySaving discussions. Threads that are – or become – political in nature may be removed in line with the Forum’s rules. Thank you for your understanding.
📨 Have you signed up to the Forum's new Email Digest yet? Get a selection of trending threads sent straight to your inbox daily, weekly or monthly!
The Forum now has a brand new text editor, adding a bunch of handy features to use when creating posts. Read more in our how-to guide
We're aware that some users are currently experiencing errors on the Forum. Our tech team is working to resolve the issue. Thanks for your patience.
Is this foam around pipes a cowboy job?

bbbuyer
Posts: 39 Forumite


 Viewed another house that was flipped. Looks ok in from the outset but noticed this foam jobs for the bathroom pipes. How bad is this? (If bad at all)
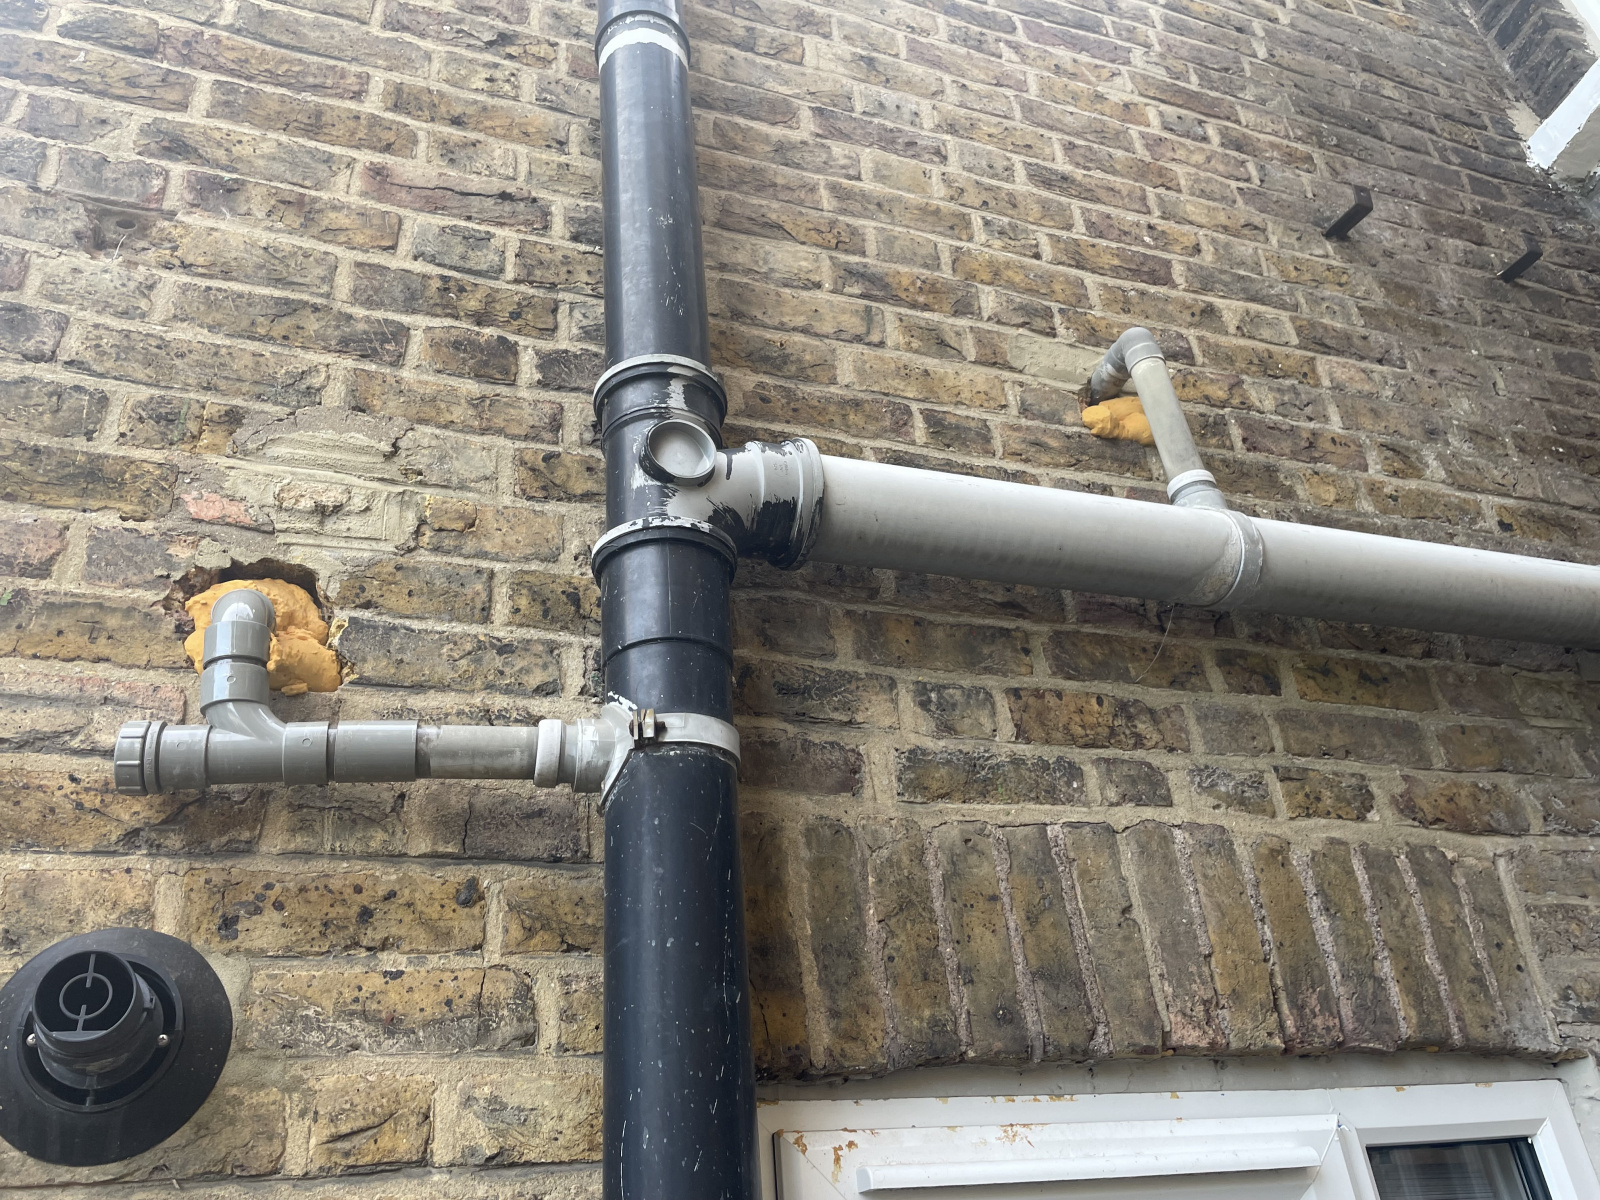
0
Comments
-
I’ll move this to the DIY board.I'm a Forum Ambassador on the housing, mortgages & student money saving boards. I volunteer to help get your forum questions answered and keep the forum running smoothly. Forum Ambassadors are not moderators and don't read every post. If you spot an illegal or inappropriate post then please report it to forumteam@moneysavingexpert.com (it's not part of my role to deal with this). Any views are mine and not the official line of MoneySavingExpert.com.0
-
Needs rendering over.Life in the slow lane1
-
Could be the way the photo was taken, but the pipe looks like it's got a backfall.1
-
Seen it done loads, inc on a new build - don't think it's an issue but needs cement over the top I'd say0
-
Perhaps the plumber never costed for making good the outside
I needs cutting back and matching bricks inserted0 -
It would be better to have a drop on those horizontal pipes to ensure waste and water flow better and reduce risk of blockage.0
-
The left hand "hole" looks like it was excavated with a JCB... Expanding foam is OK for filling some gaps, but it breaks down when exposed to sunlight in the long term. It can also absorb water which destroys any insulating properties.I'd get some "new" bricks from a local reclamation yard (they look like London Stocks), and a tub of lime mortar, not cement. Carefully cut them to plug the bulk of the hole and fit neatly round the pipes, then bed them in with the lime mortar.Any language construct that forces such insanity in this case should be abandoned without regrets. –
Erik Aronesty, 2014
Treasure the moments that you have. Savour them for as long as you can for they will never come back again.0 -
As FreeBear says, that foam will deteriorate in time with UV exposure. It also just looks 'orrible.A much easier solution to bricks and mortar would be to obtain finishing collars a bit like the rubber one around the flue, and seal them in place with Stixall or a similar sealant (leaving a wee unsealed inch at the bottom to allow out any caught water). Obviously, the central holes would need to suit the waste pipes shown. I'd also hope you could get them 'split' so they can be fitted without dismantling the pipes.Then paint all the pipes matt or satin black.0
-
That left hand pipe is definitely backfalling, also probably not ideal for it to be exposed to hot flue gasses from the boiler. As mentioned above, the foam will degrade and does already appear to be turning the orange colour that it does before it turns all powdery and falls apart. Also worth noting, birds and vermin will attack it and with the pipes you have a perfect access route to get to it. In an ideal world cut bricks to patch it back in. As a minimum the foam needs to be cut back and the hole filled with mortar and ideally a mastic seal from the pipe to the mortarSome people don't exaggerate........... They just remember big!0


Confirm your email address to Create Threads and Reply

Categories
- All Categories
- 354.5K Banking & Borrowing
- 254.4K Reduce Debt & Boost Income
- 455.4K Spending & Discounts
- 247.4K Work, Benefits & Business
- 604.2K Mortgages, Homes & Bills
- 178.5K Life & Family
- 261.7K Travel & Transport
- 1.5M Hobbies & Leisure
- 16K Discuss & Feedback
- 37.7K Read-Only Boards