We’d like to remind Forumites to please avoid political debate on the Forum.
This is to keep it a safe and useful space for MoneySaving discussions. Threads that are – or become – political in nature may be removed in line with the Forum’s rules. Thank you for your understanding.
📨 Have you signed up to the Forum's new Email Digest yet? Get a selection of trending threads sent straight to your inbox daily, weekly or monthly!
Extra long planters for bamboo
Comments
-
I'd use some ~1m lengths of 50mm angle or 75mm square posts on each corner and at 1.2m intervals on the long sides. Design in plenty of support rather than adding it as an afterthought when the sides start to bow out.
Any language construct that forces such insanity in this case should be abandoned without regrets. –
Erik Aronesty, 2014
Treasure the moments that you have. Savour them for as long as you can for they will never come back again.1 -
2.4, could we see where you wish to put this, please? And does it have to be a single 7.2m length - could it not be done in two lengths, simply butted up together, or even with a couple of inches gap?
And what will be on the ground in front of it - gravel/chippings? Grass? A patio?0 -
Don't have a picture I'm afraid but it will be similar to the one ive posted in that it will be close (not against) a side fence. It will sit on gravel and have a gravel border of 2-3 inches around it which then becomes grass.ThisIsWeird said:2.4, could we see where you wish to put this, please? And does it have to be a single 7.2m length - could it not be done in two lengths, simply butted up together, or even with a couple of inches gap?
And what will be on the ground in front of it - gravel/chippings? Grass? A patio?
I had mentioned that I preferred the idea of two frames butted up from a practical point of view. If time and skill allowed I would have loved to have tried something more aesthetic but the practical use of them is more important
1 -
Thank you. That's really helpfulFreeBear said:I'd use some ~1m lengths of 50mm angle or 75mm square posts on each corner and at 1.2m intervals on the long sides. Design in plenty of support rather than adding it as an afterthought when the sides start to bow out.0 -
This is going to sound like a really stupid question but with the angle irons, if I'm using them at intervals to brace, then I can fix one side of the angle iron to the wood and the other side of the angle just remains free?FreeBear said:I'd use some ~1m lengths of 50mm angle or 75mm square posts on each corner and at 1.2m intervals on the long sides. Design in plenty of support rather than adding it as an afterthought when the sides start to bow out.
I'm assuming the angle gives strength as supposed to just using a flat single sided brace that is hammered in to the ground?0 -
twopointfour1980 said:
This is going to sound like a really stupid question but with the angle irons, if I'm using them at intervals to brace, then I can fix one side of the angle iron to the wood and the other side of the angle just remains free?FreeBear said:I'd use some ~1m lengths of 50mm angle or 75mm square posts on each corner and at 1.2m intervals on the long sides. Design in plenty of support rather than adding it as an afterthought when the sides start to bow out.
I'm assuming the angle gives strength as supposed to just using a flat single sided brace that is hammered in to the ground?
You are correct about how the angle irons are fixed. One side flat against the timber and screwed to the timber, the other simply remaining free, facing into the raised bed. I just think angle irons are less obtrusive in the bed than 75mm square posts. Angle will be considerably stronger than flat bar. Bar will flex easily, angle will not.
0 -
Thanks.twopointfour1980 said:
Don't have a picture I'm afraid but it will be similar to the one ive posted in that it will be close (not against) a side fence. It will sit on gravel and have a gravel border of 2-3 inches around it which then becomes grass.ThisIsWeird said:2.4, could we see where you wish to put this, please? And does it have to be a single 7.2m length - could it not be done in two lengths, simply butted up together, or even with a couple of inches gap?
And what will be on the ground in front of it - gravel/chippings? Grass? A patio?
I had mentioned that I preferred the idea of two frames butted up from a practical point of view. If time and skill allowed I would have loved to have tried something more aesthetic but the practical use of them is more important
Have you checked what lengths you can get your timber in? Can you get them in 3.6m? If so, that should simplify things.
I think I'd personally keep this as simple as possible, free-standing on short sections of composite post laid flat and levelled on the gravel. I'll try and do some sketches when I'm back home - see if you think it'll be an easier method.0 -
In the interests of simplicity, I think I'd personally do summat like this:1) Lay 500mm lengths of composite post (whatever size - 50x50 or more) flat on their sides, half-buried in the gravel, and levelled - use a plank to guide the level. This will keep the timber sides off the ground. You'll probably only need three per trough as shown, as the actual timber troughs won't be carrying the soil weight (no bottoms).1) Stack the three ~150mm widths of timber plank together to get the required height of ~450mm. These can be joined in a number of ways - dowelled together, biscuit-jointed, or simply fixed on their insides using galvanised strap and screws (from Wickes, or any builders merchants) or timber battens. I'd plump for the metal or batten - after all, this is meant to be easy. It'll be hidden inside.2) Simple butt-joints at the corners, and fixed either using coach screws such as 'Turboscrews' from Screwfix/Toolstation/Anywhere. Two for each plank as shown. Clearance holes in the facing timbers, and pilot holes in the end grain timbers. Perhaps a bead of polyurethane adhesive too. Alternately, have the trough sides overlap the front & back, and drive these in from the sides where they'll be less visible, but you'll now have the side's end grains visible - which you might like. Or, you can stagger the planks and how they overlap at the corners, making them look like large 'box' or 'finger' joints; you extend either the central side plank into the front, or the top and bottom of the sides into the front so you can see alternate end grains - that make sense? Or, if you don't like the look of exposed bolt heads, then simply use hidden galv'd angle brackets on the inside instead. Or, use square timber battens as corner support fillets on the inside and screw&glue through to the trough sides - again, fully hidden. Your call.3) Add 'anti-burst' strength in a couple of places along the ~3.6m lengths by bending and dropping in more galv strap as shown. Set it down inside so's it'll be below top soil level, so hidden. Or, just above soil level and sprinkle gravel or slate or bark chippings over it. You'll also need similar at the bottoms of the troughs. This is to hold the front and backs of the trough together against the settlement of the soil. But if you tamp down the soil quite firmly as you fill the trough, there will be little settlement anyway.4) Looking at the example in your photo, it looks as tho' they either used very thick timber like sleepers, or else added a flat frame over the top to give that impression. I personally think that this extra chunkiness looks good, and would be easy to replicate. Choose whatever width timber you think would make a good top frame - say around 100mm? - and either lay it on top to match the trough's construction (ie. long lengths front and back, and short pieces to infill the sides) or even mitre them in the corners as shown. Dowelled down, or skew-screwed from inside-upwards through the trough wall. Or, if easier, screw down from above, and fill the holes (depending on type of stain/protective to be used). You may even wish to consider using the same 150mm-wide planks, and have them overlap the trough to provide a ~25mm outer lip around the perimeter IF you think you'd prefer the look - there must be lots of examples on Google images/Pinterest. Anyhoo, this top frame would also add to the anti-burst/bendy strength of the long trough sides.5) Troughs sat on the flat comp posts, and the inside lined with a suitable membrane, such as DPM (needs ideally to be UV proof - is DPM?) or perhaps pong-liner. No bottom or floor required in the troughs - the membrane drapes down until it sits flat on the ground, and perhaps a couple of inches of coarse draining gravel added first. If you do decide to go for that top frame, then lap the membrane over the 4 sides first before fitting the frame, and then trim off the outside excess membrane afterwards. I'd double the membrane thickness tobesure tobesure. Punch drain holes as required.6) Use more gravel along the front to hide the membrane from underneath if it's showing. The bottom gap should be small, tho' - ~30mm?
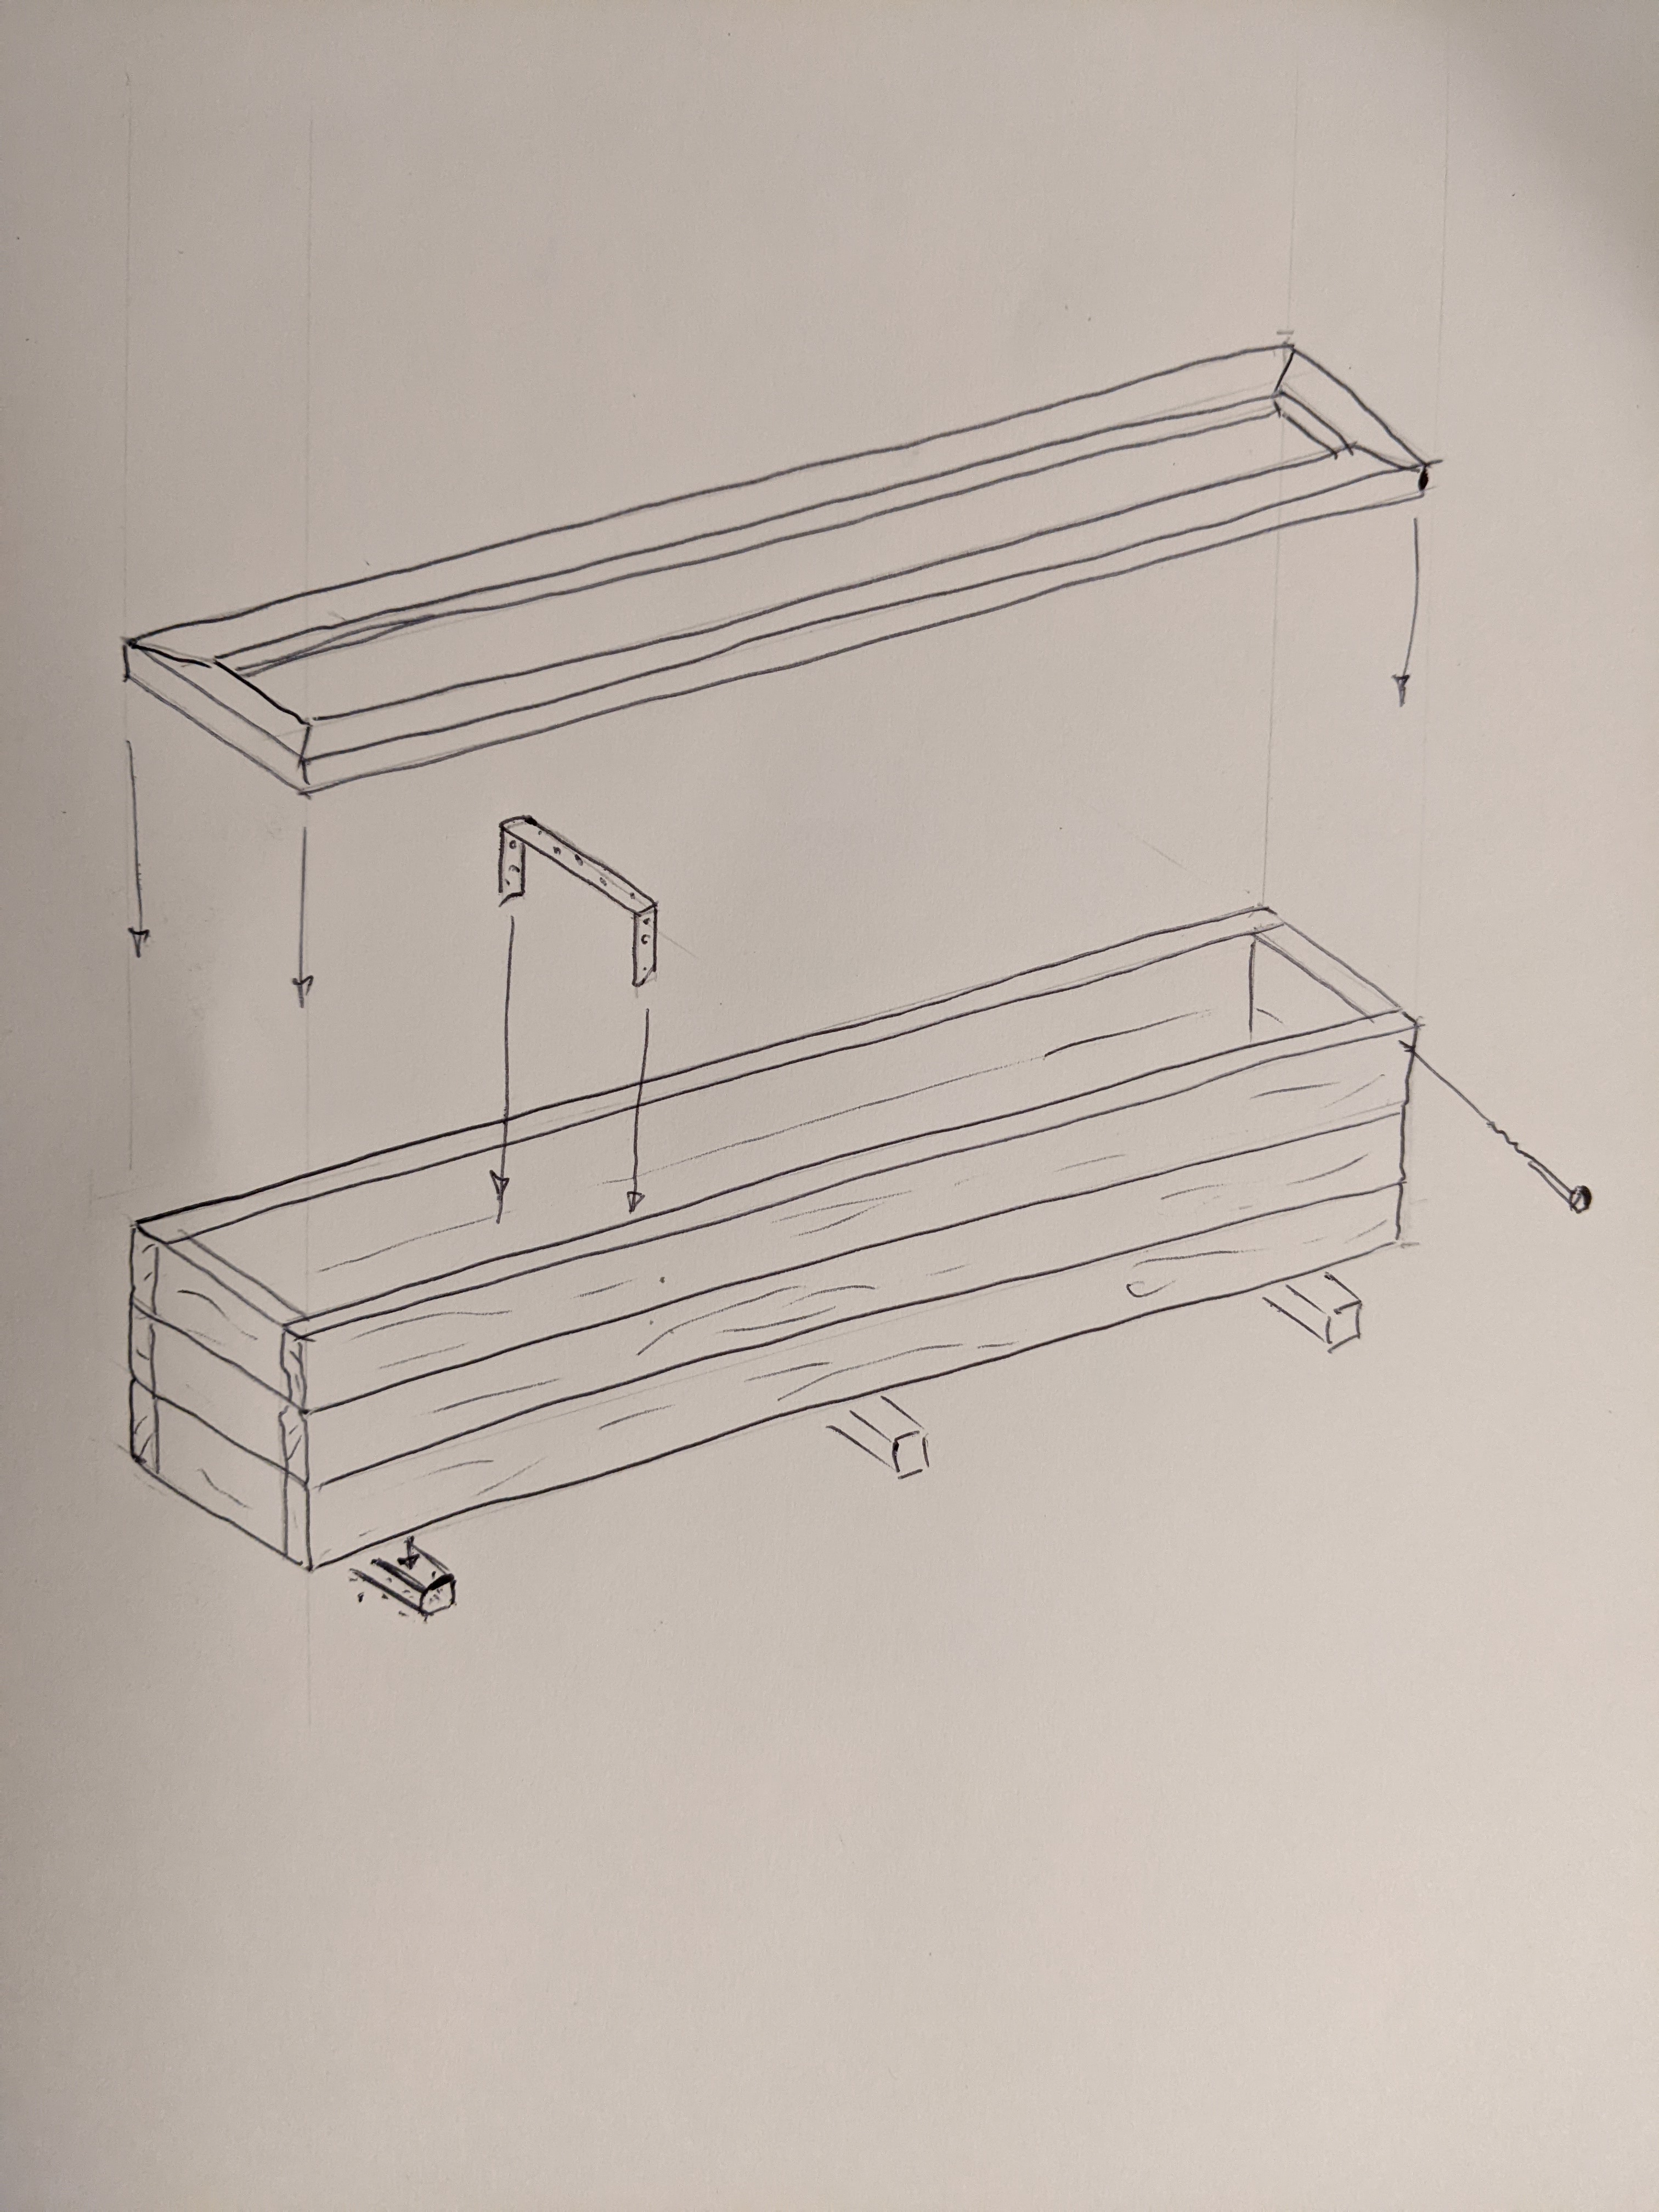 Oh, and please come back and show us the finished product :-)
2 -
Thank you ThisisWeird
That's a really comprehensive response and I appreciate the time you took to put this together.
I'll look at some composite post for the floor to keep it off the ground. I do have some square plastic bases that you use for sheds or a playhouse i could put under the frame. I'm thinking that as long as it's above the ground a little, that this would also work? Would save me some money on buying more materials although appeciate that there would be more contact than just resting on posts.
I have ordered lengths of 3.6m. They will be 3 high. I was thinking that for the bottom and middle layer, i could screw down from the top to the bottom to secure that quite well as well as then bracing with metal.
I'll probably use alternating butt joints to match the style of the raised beds i made from sleepers but will let my partner decide on that one as well.
I like the idea of angle irons for the corners to keep them in place as an extra fitting
The anti burst strapping could be a good idea. I ordered an extra couple of lengths of wood to cut down and then screw between the front and back walls to take this. I do actually think that i have some wider galvanised strapping in my tool room somewhere which is in a roll. Probbaly about 3 or 4 inches think so im thinking i could use that along the sides to strengthen the whole thing
quite happy to over-engineer!
I'll be sure to take some pictures and post them up when done. can't promise a thing of beauty but I'll try my best!
1 -
Anything that works is fine

You can sit it on anything you like - yes, the idea is to keep the timber off the damp ground to prevent rot.Not sure what you mean by screwing down from the top regarding assembling the sides, but bear in mind the planks are presumably 6" wide, so you'd need ~9" screws if I'm reading you right, and I just wouldn't go there... To join the planks on the inside using either timber battens or metal strapping would do, and be easy, strong and hidden. These straps are cheap, pre-drilled with numerous holes, and strong, typically around 30mm wide x 4mm thick.Lightweight versions: https://www.screwfix.com/p/sabrefix-roll-edge-restraint-strap-bend-500-x-100mm-5-pack/85398 Plansk laid flat and tight against eachother, straps laid on top and a dozen 1.25" screws fired in to each - these will prevent your sides from folding outwards. Folding inwards, yes, but they ain't going to do that anyway.
I think the main thing to make it all easy to build and also long-lasting is to have it simply as a 4-sided frame, and no bottom.
1


Confirm your email address to Create Threads and Reply

Categories
- All Categories
- 354.9K Banking & Borrowing
- 254.6K Reduce Debt & Boost Income
- 455.6K Spending & Discounts
- 247.7K Work, Benefits & Business
- 604.7K Mortgages, Homes & Bills
- 178.7K Life & Family
- 262.3K Travel & Transport
- 1.5M Hobbies & Leisure
- 16.1K Discuss & Feedback
- 37.7K Read-Only Boards