We’d like to remind Forumites to please avoid political debate on the Forum.
This is to keep it a safe and useful space for MoneySaving discussions. Threads that are – or become – political in nature may be removed in line with the Forum’s rules. Thank you for your understanding.
📨 Have you signed up to the Forum's new Email Digest yet? Get a selection of trending threads sent straight to your inbox daily, weekly or monthly!
Shower leaks into kitchen

rvnmax
Posts: 17 Forumite


Hi All,
Further to my post a year ago (https://forums.moneysavingexpert.com/discussion/6297893 ), I am still having issues with water leaking from shower into my kitchen.
6 months ago, we got the bathtub resealed again and the bath area regrouted.
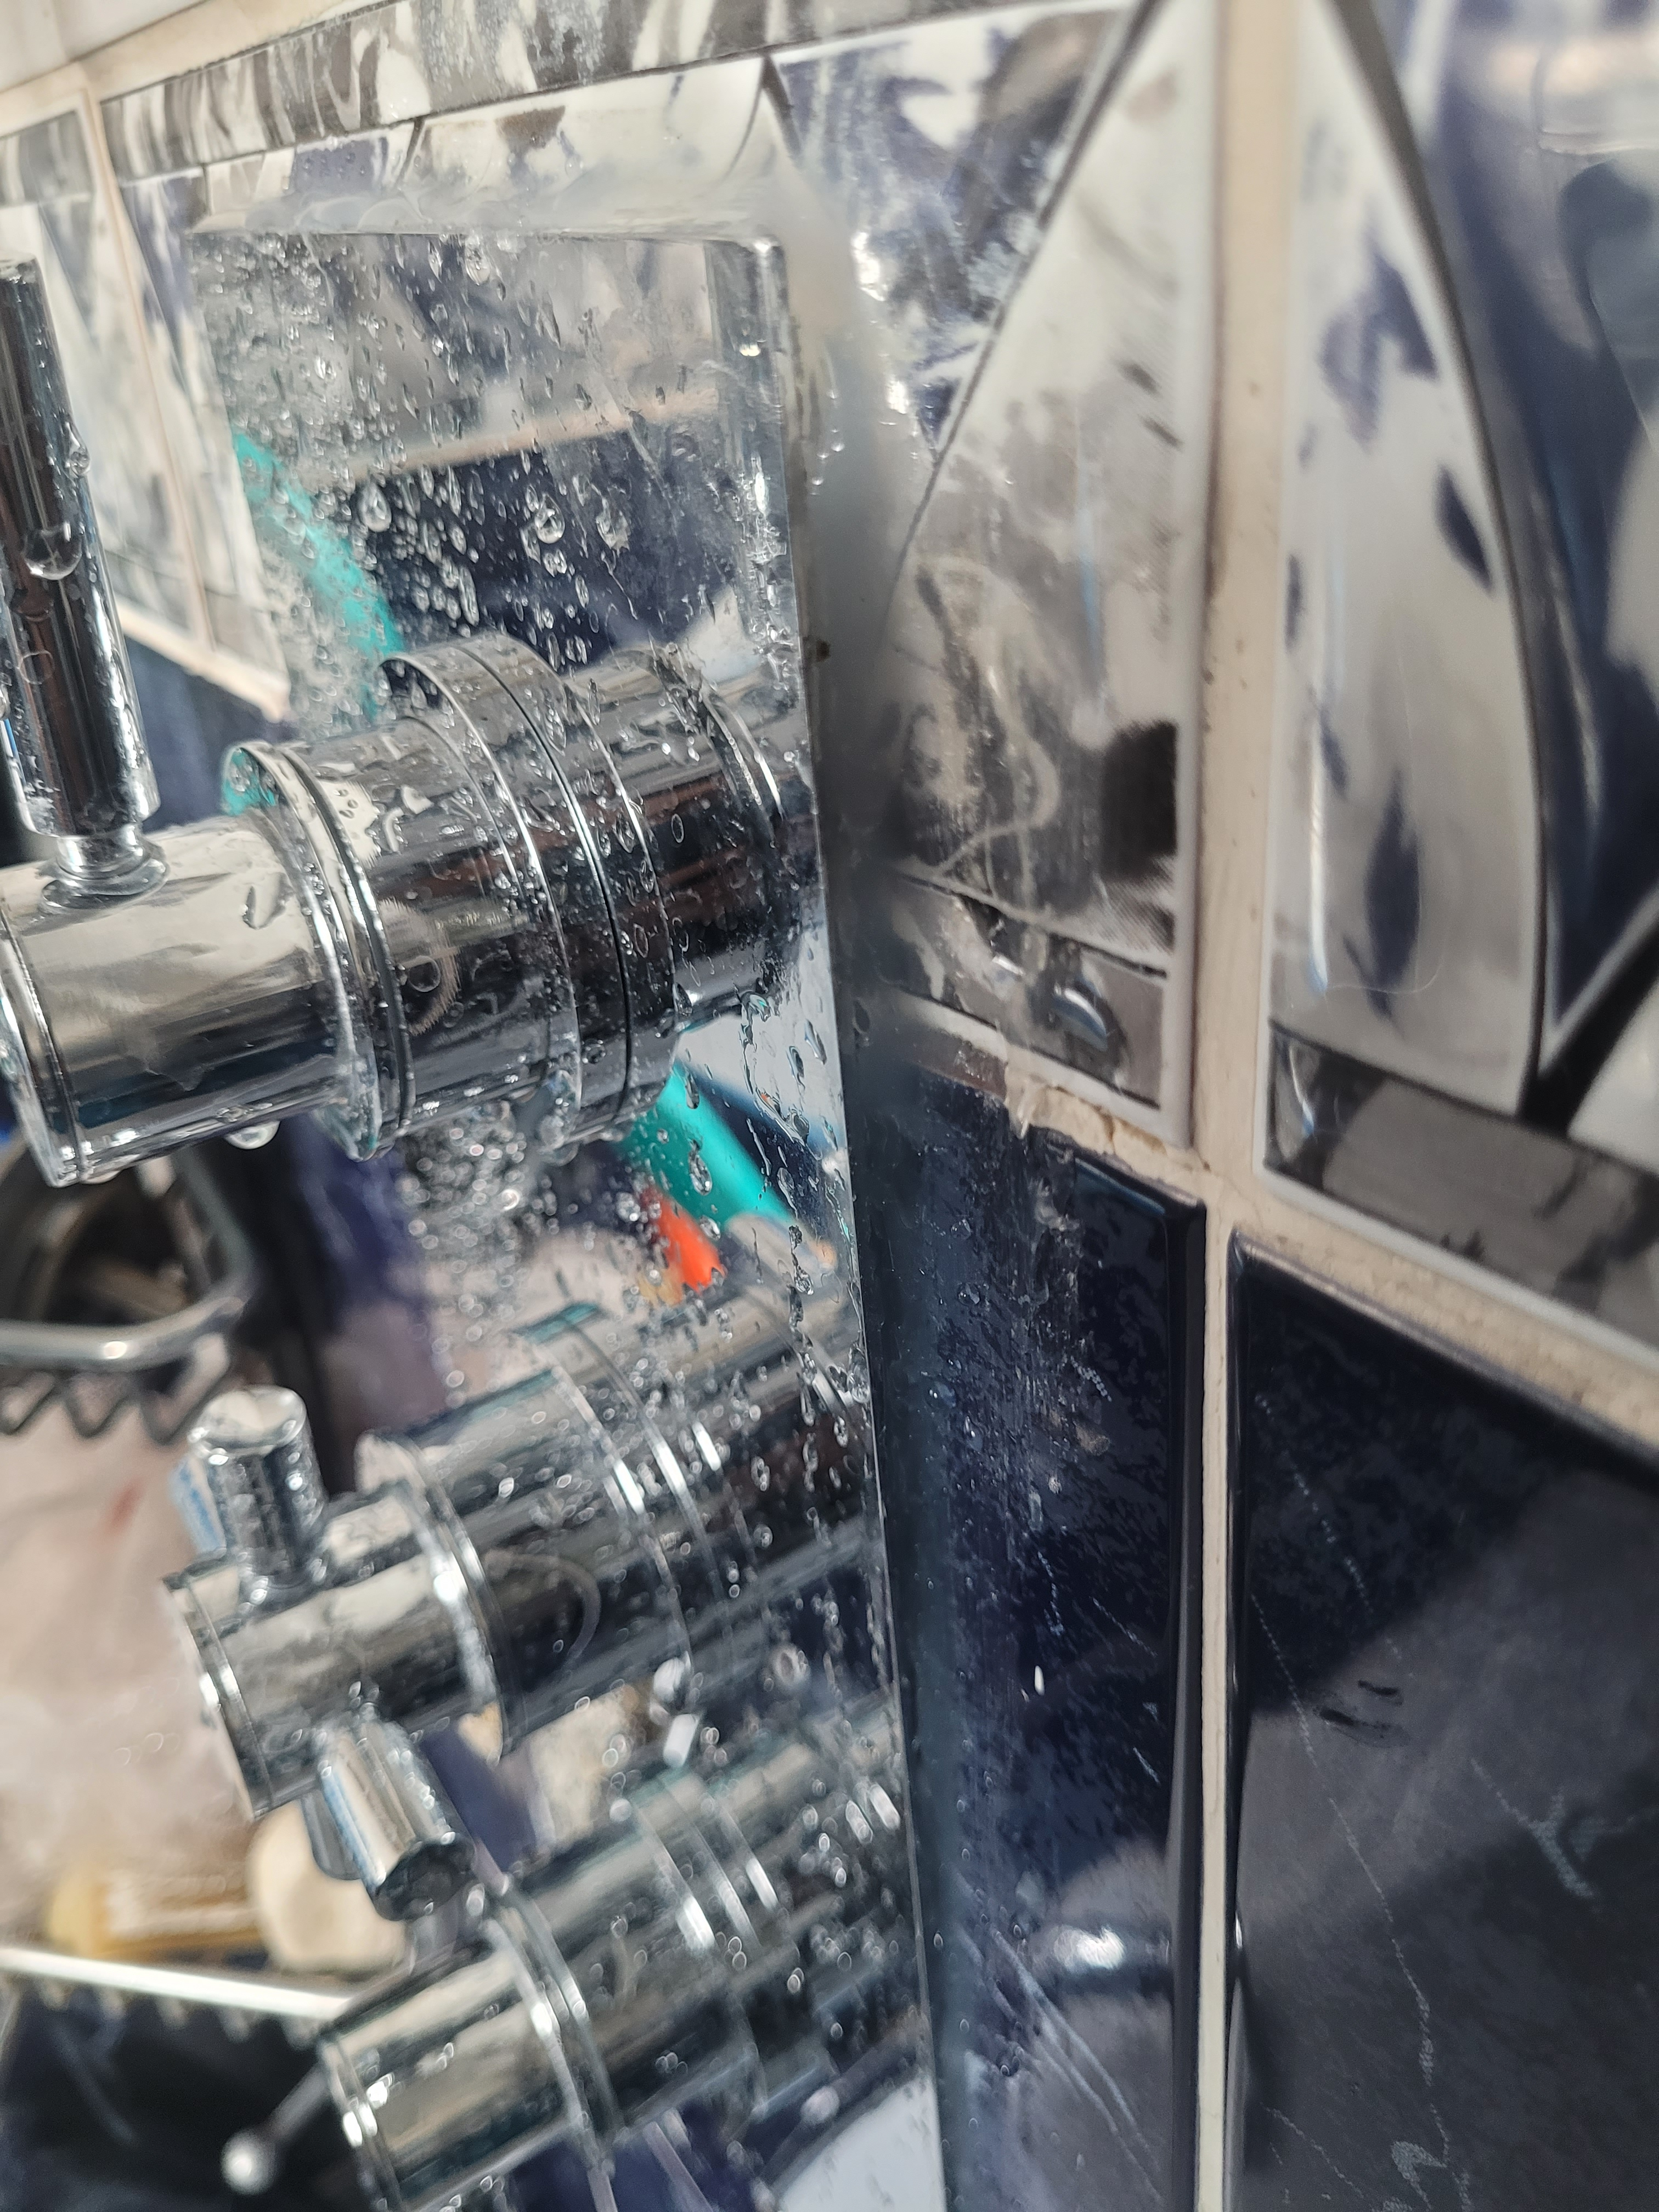
In July, we also got the shower totally replaced. This solves the thermostat issue we were having. However, though sealing around the shower plate had prevented that particular leak, it now leaks again when I spray water there. As you can see from picture 1, the top of the plate is further away from the wall than the bottom, which requires a thick application of sealant. Any ideas here?
However, this is not where the water seems to be leaking from on a regular basis.
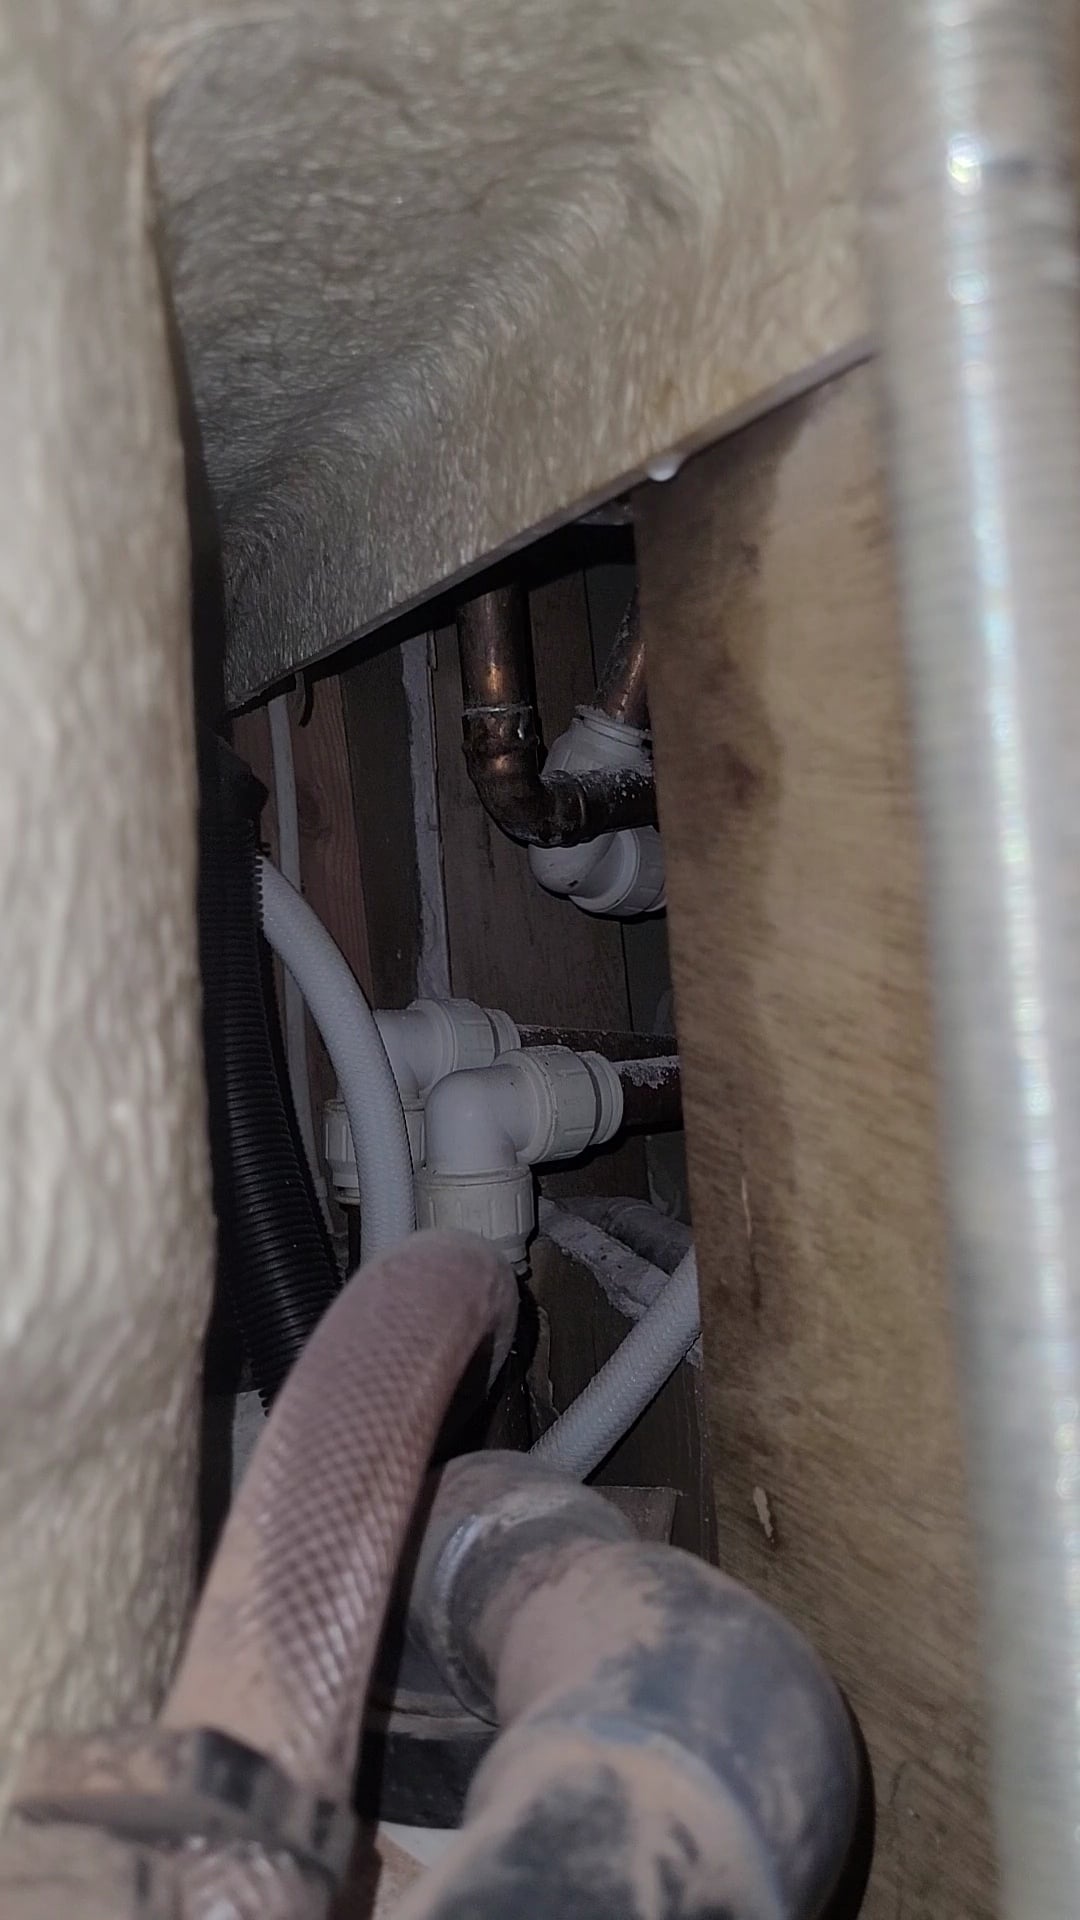
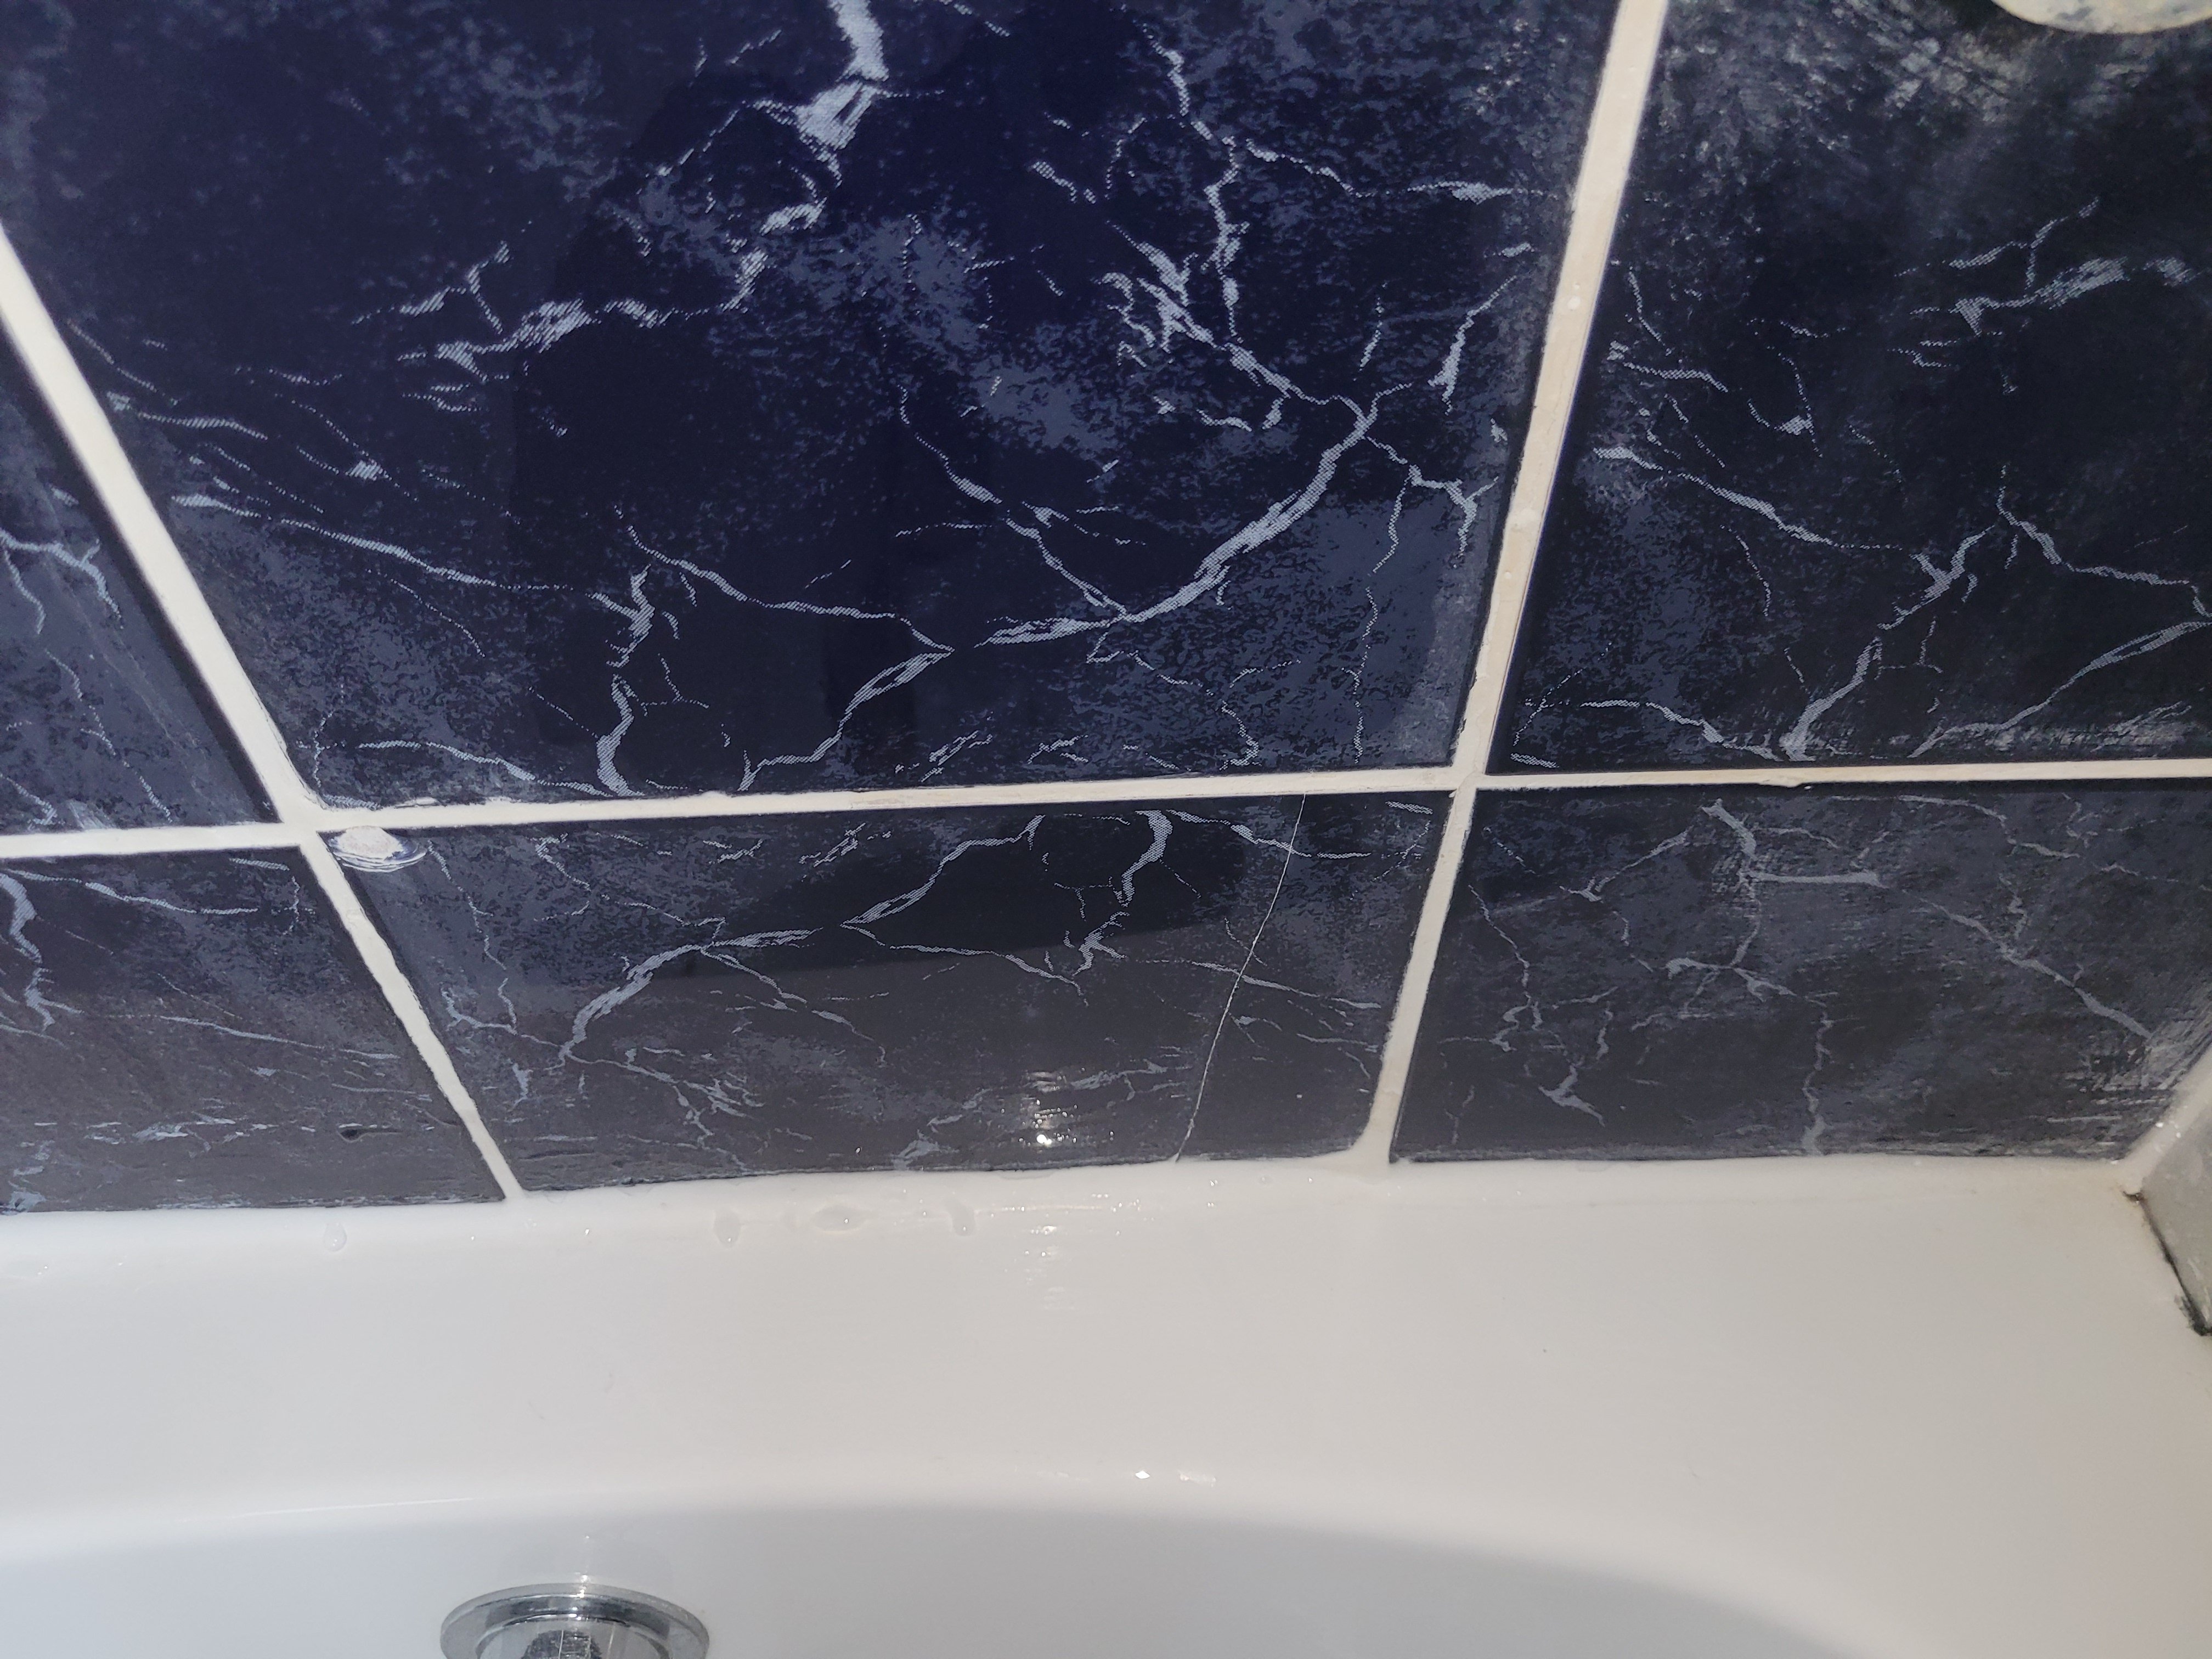
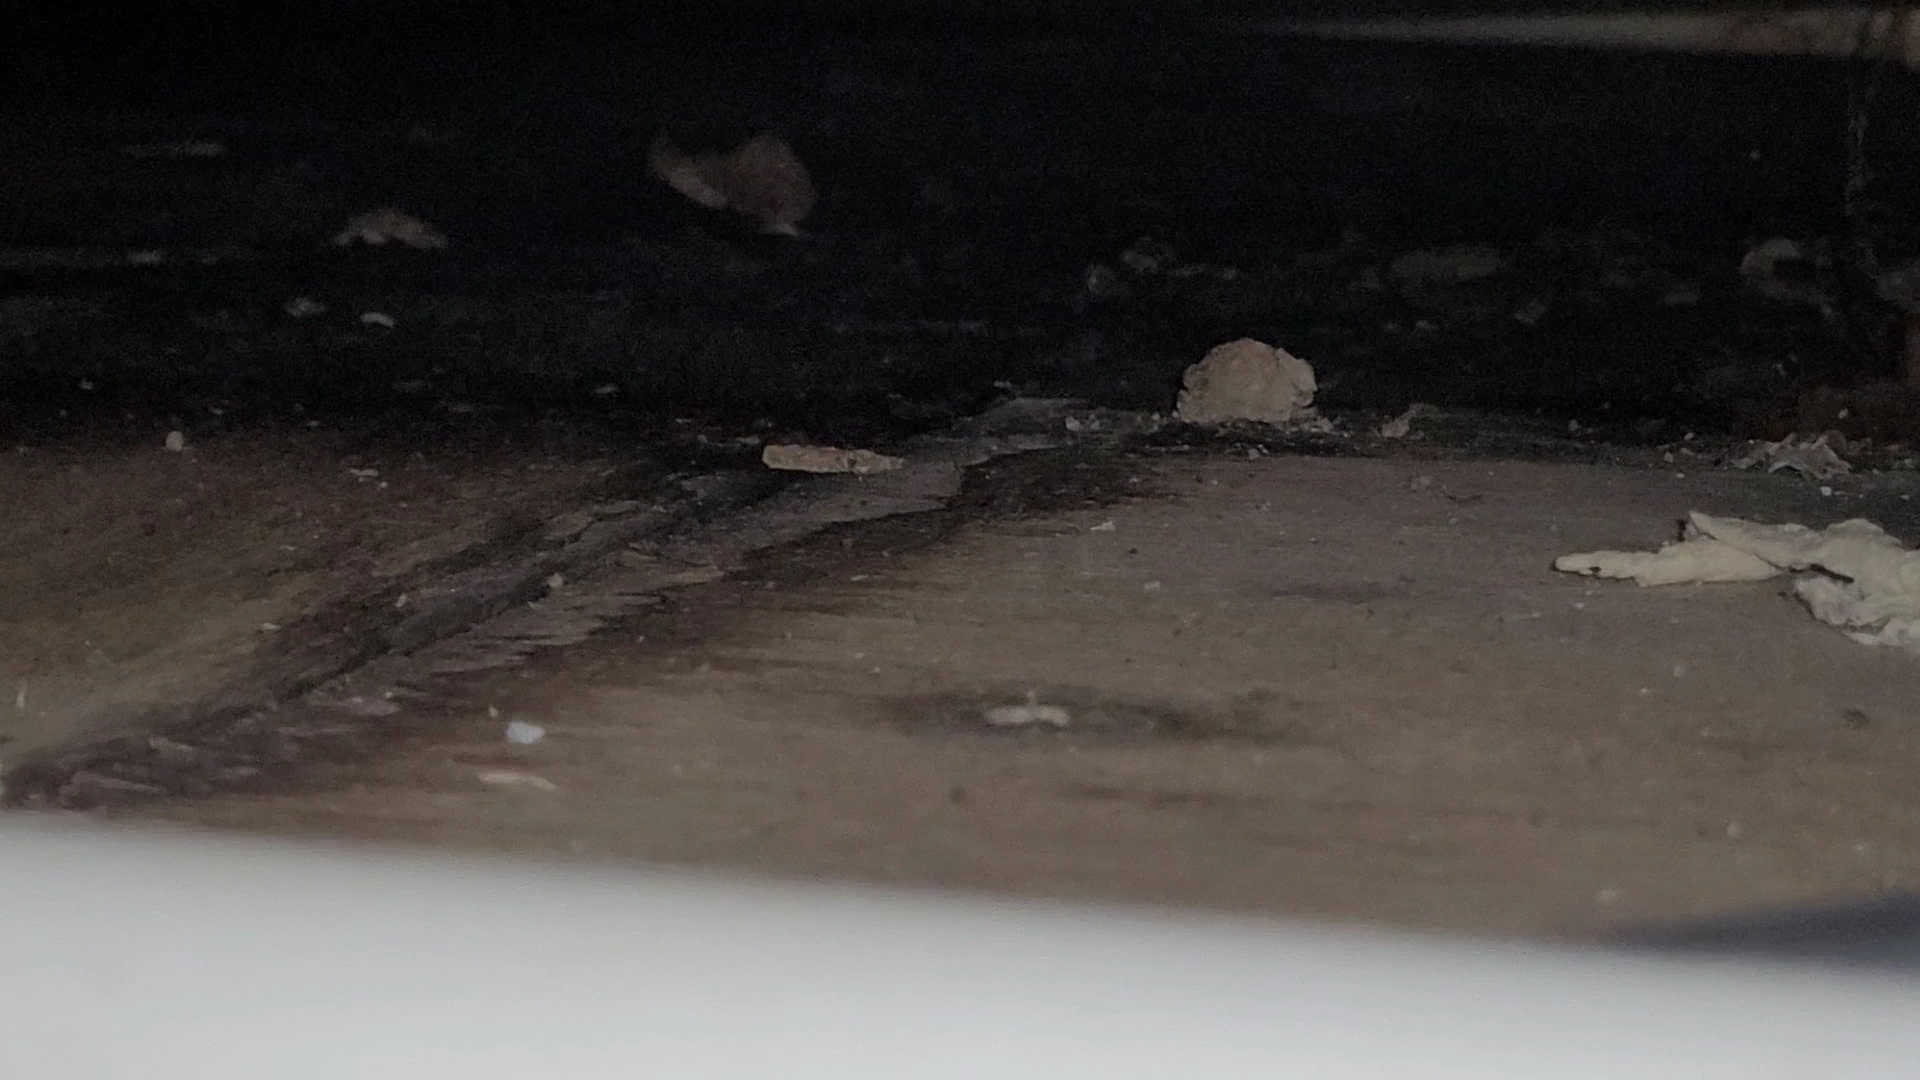
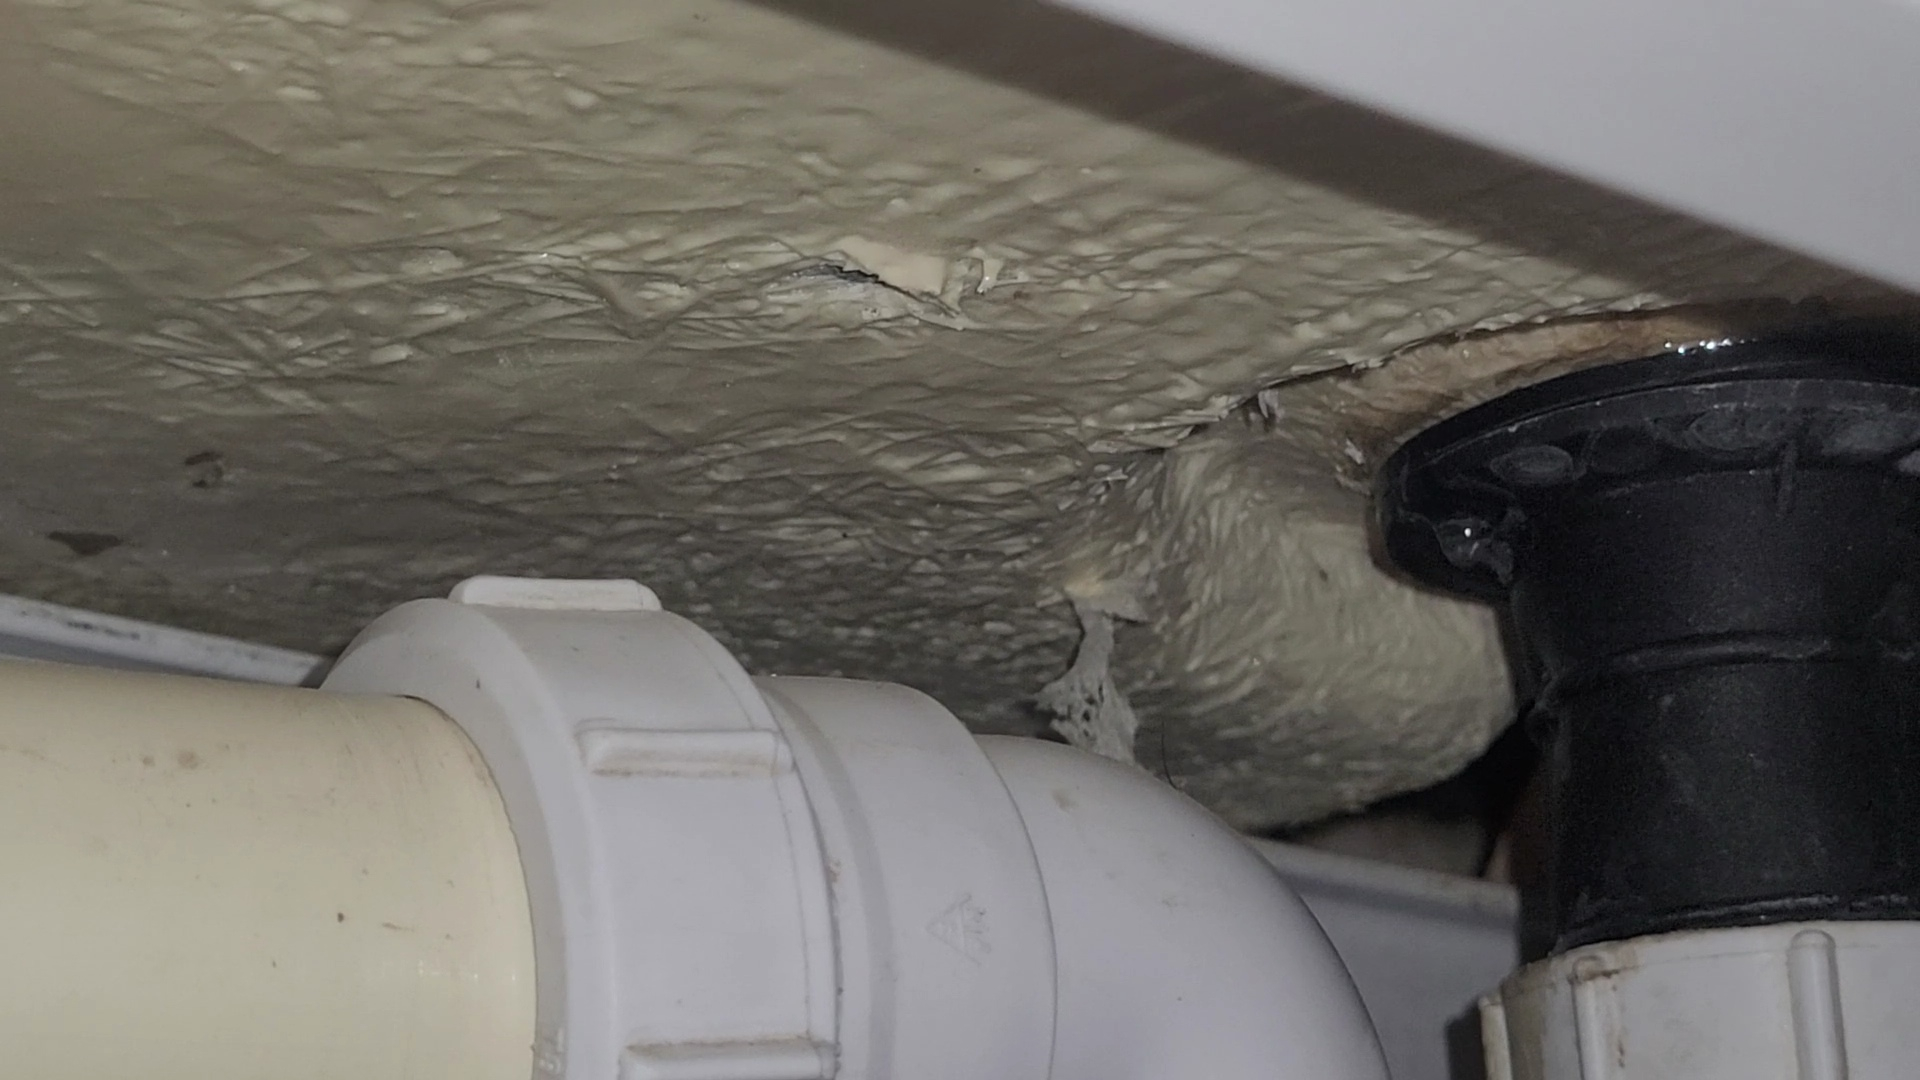
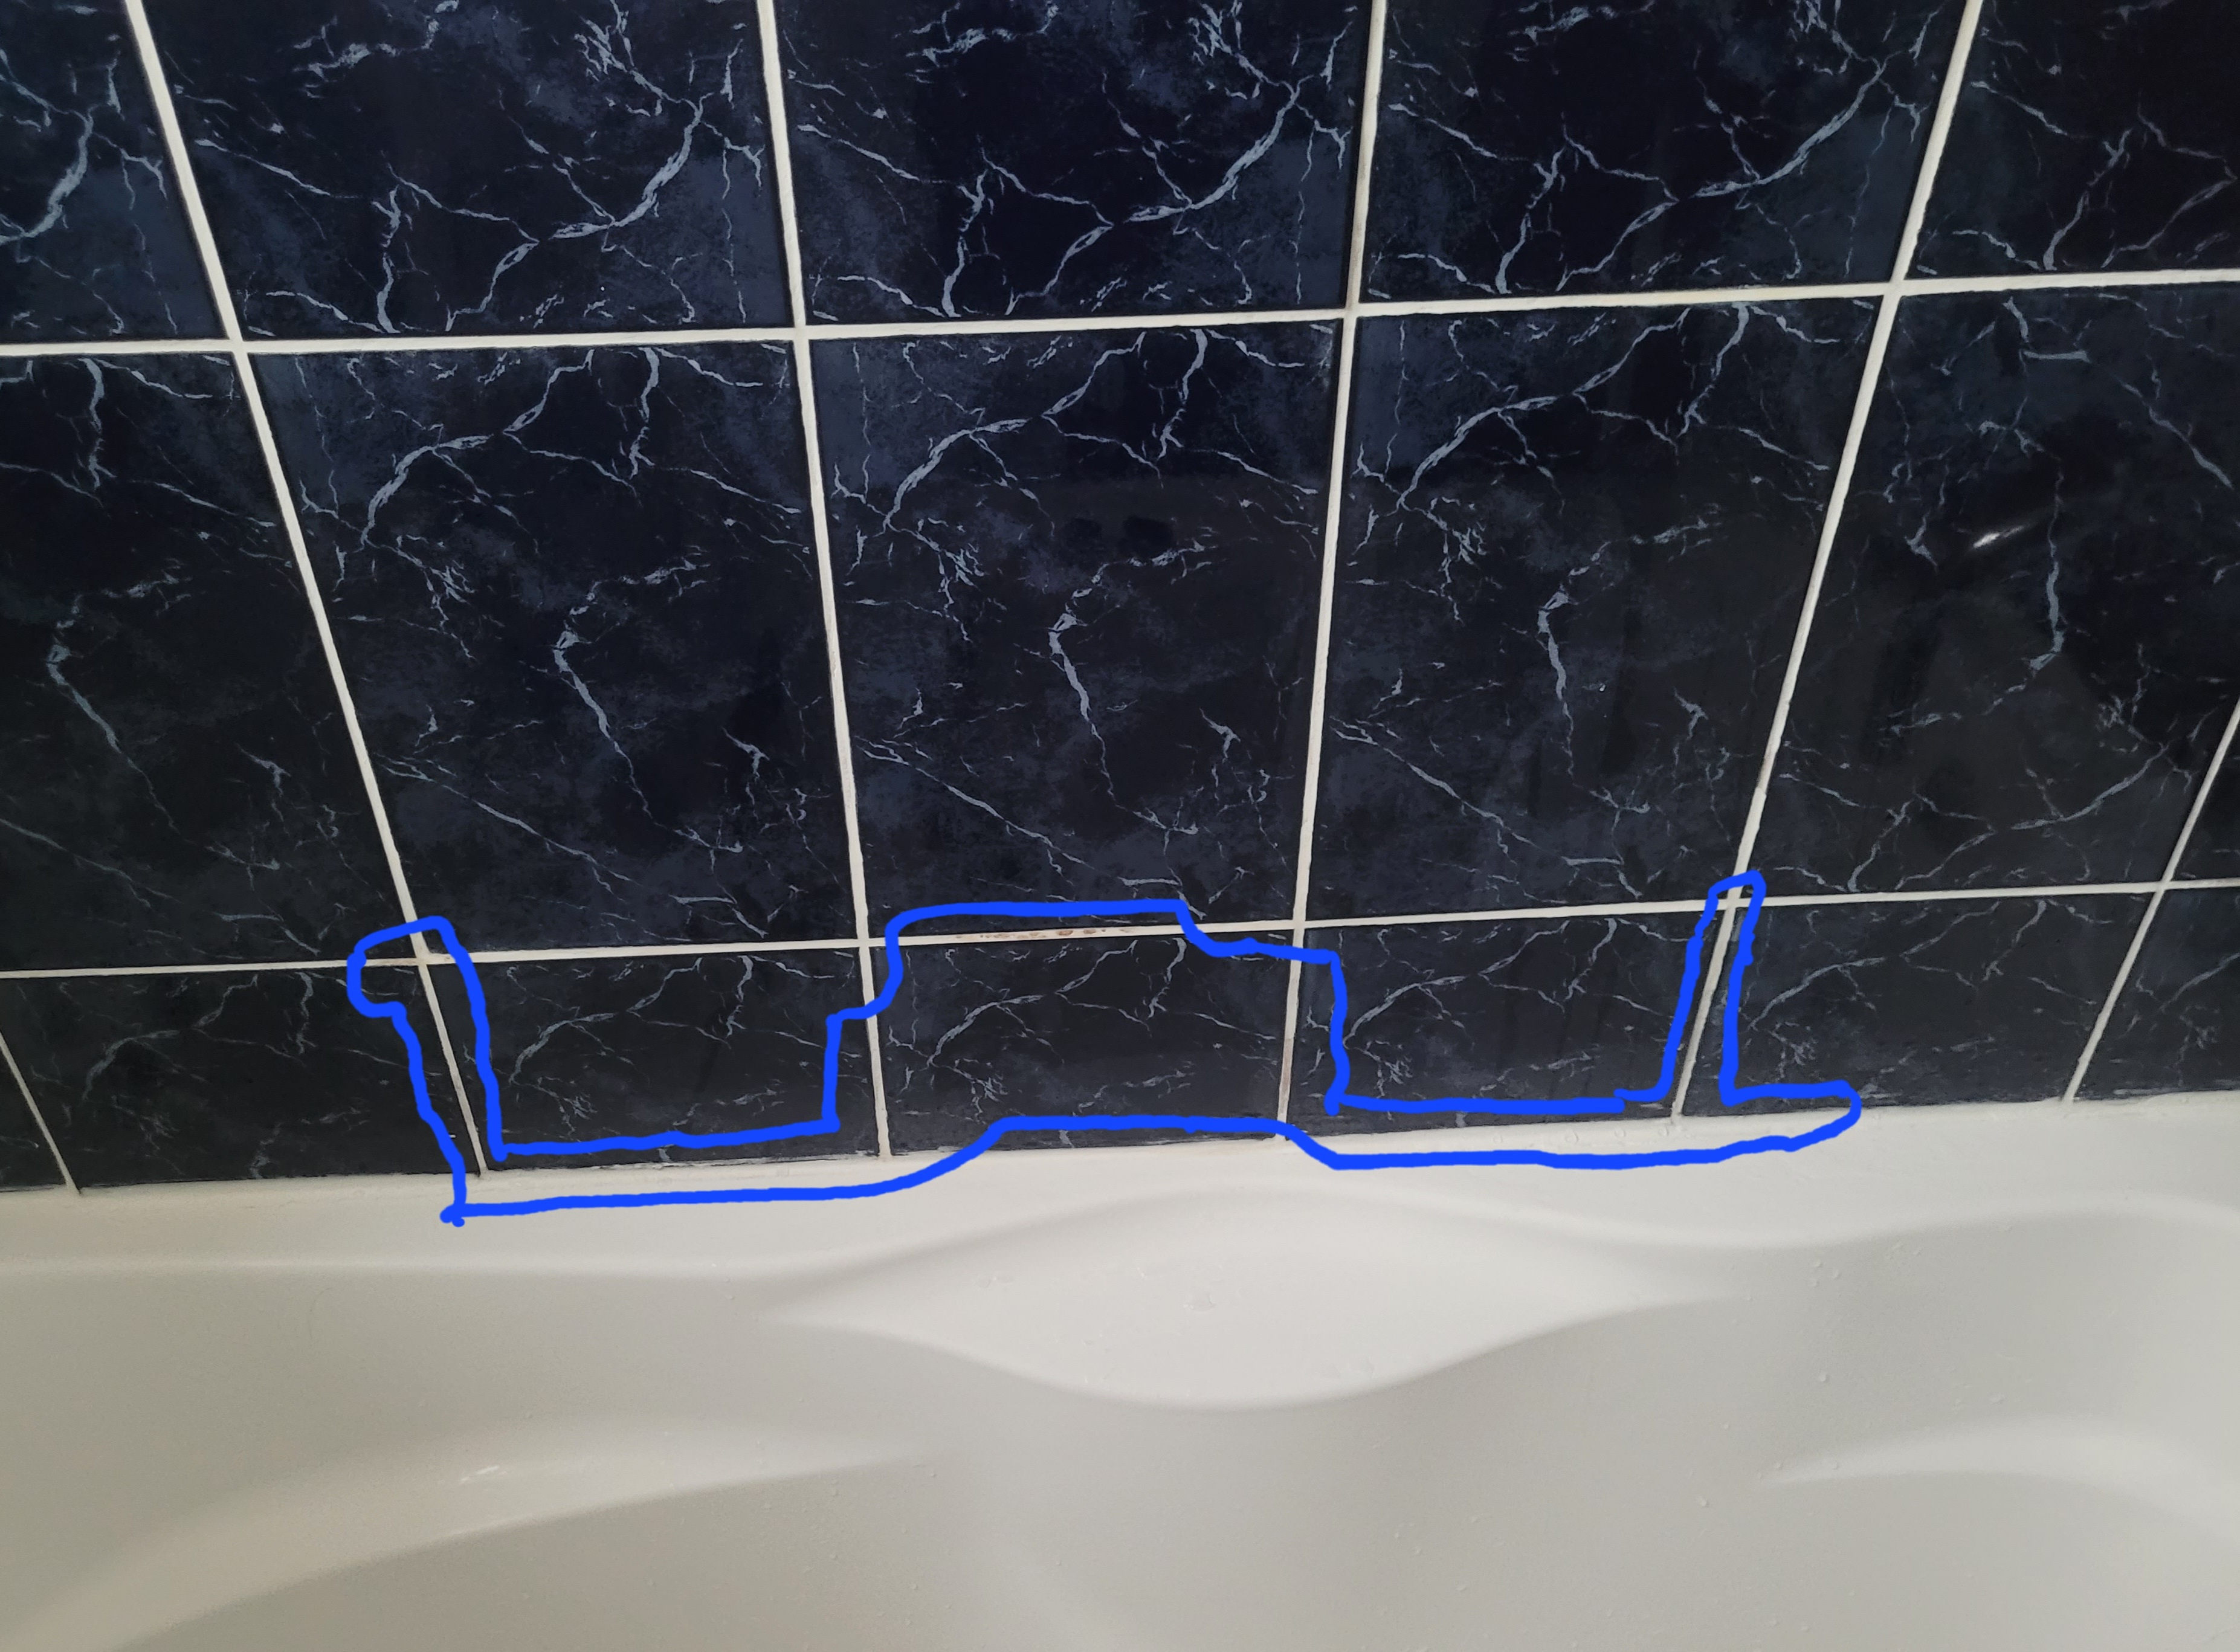
The water actually leaks a bit from A (pictures 2 and 3) as identified in the previous thread, a lot from B (picture 4 and 5) which I identified shortly after the previous thread, and quite a bit from C (picture 6), which I just discovered today and I think has sprung up recently.
It is so fustrating that regrouting and resealing hasn't fixed A and B. I am trying to call someone to regrout and reseal again as surely that is where the issue is. Any recommendations on material and tradespeople would be appreciated.
Regarding C, is it possible to apply some sealant to this joint between the wastepaper and bathtub?
Any help appreciated!
Pics 2 and 3
Pics 4 and 5

Pic 6
Further to my post a year ago (https://forums.moneysavingexpert.com/discussion/6297893 ), I am still having issues with water leaking from shower into my kitchen.
6 months ago, we got the bathtub resealed again and the bath area regrouted.
In July, we also got the shower totally replaced. This solves the thermostat issue we were having. However, though sealing around the shower plate had prevented that particular leak, it now leaks again when I spray water there. As you can see from picture 1, the top of the plate is further away from the wall than the bottom, which requires a thick application of sealant. Any ideas here?
However, this is not where the water seems to be leaking from on a regular basis.
The water actually leaks a bit from A (pictures 2 and 3) as identified in the previous thread, a lot from B (picture 4 and 5) which I identified shortly after the previous thread, and quite a bit from C (picture 6), which I just discovered today and I think has sprung up recently.
It is so fustrating that regrouting and resealing hasn't fixed A and B. I am trying to call someone to regrout and reseal again as surely that is where the issue is. Any recommendations on material and tradespeople would be appreciated.
Regarding C, is it possible to apply some sealant to this joint between the wastepaper and bathtub?
Any help appreciated!
Pics 2 and 3
Pics 4 and 5
Pic 6
0
Comments
-
-
I feel your pain! I have been helping my daughter with a leak like this at her house. We have finally got it solved, but I had to spend a long time finding the leaks. There were three in the end, and each one needed a different solution.
Your leak at C around the bath waste can certainly be sealed. The best option is to remove the existing waste, clean/remove all the old silicone, and refit it using Fernox LS-X. (Although described as a "leak sealer", LS-X is really just a thick silicone sealant.)
The thick sealant shouldn't really be necessary for the shower valve, but if the tiles are heavily imbossed rather than smooth/flat, you might need more silicone, but it should be an even bead all the way around. It looks like the shower valve isn't installed so that it is perfectly vertical, or possibly the plate was bent during the installation. If it is leaking, the only thing you can really do, other than replacce the valve, is to refit it. In my experience, you need to apply silicone in concentric lines so that you have a number of dams between the wet and areas.
I used a small watering can to wet very precise areas of the shower to find where the leaks were coming from and where they were not. There were a couple of areas of grout that had failed, and water was leaking behind the shower valve, but the design was different, so a different solution was needed in my daughter's case.
Grout isn't perfectly waterproof and needs to be sealed after it has set. I've had good success with Mapei Grouts and ZEP Grout Sealer (from Screwfix).The comments I post are my personal opinion. While I try to check everything is correct before posting, I can and do make mistakes, so always try to check official information sources before relying on my posts.1 -
Many thanks for your suggestions.tacpot12 said:I feel your pain! I have been helping my daughter with a leak like this at her house. We have finally got it solved, but I had to spend a long time finding the leaks. There were three in the end, and each one needed a different solution.
Your leak at C around the bath waste can certainly be sealed. The best option is to remove the existing waste, clean/remove all the old silicone, and refit it using Fernox LS-X. (Although described as a "leak sealer", LS-X is really just a thick silicone sealant.)
The thick sealant shouldn't really be necessary for the shower valve, but if the tiles are heavily imbossed rather than smooth/flat, you might need more silicone, but it should be an even bead all the way around. It looks like the shower valve isn't installed so that it is perfectly vertical, or possibly the plate was bent during the installation. If it is leaking, the only thing you can really do, other than replacce the valve, is to refit it. In my experience, you need to apply silicone in concentric lines so that you have a number of dams between the wet and areas.
I used a small watering can to wet very precise areas of the shower to find where the leaks were coming from and where they were not. There were a couple of areas of grout that had failed, and water was leaking behind the shower valve, but the design was different, so a different solution was needed in my daughter's case.
Grout isn't perfectly waterproof and needs to be sealed after it has set. I've had good success with Mapei Grouts and ZEP Grout Sealer (from Screwfix).
While researching, I came across epoxy grouting (Mapei also does this) as a superior grouting product for waterproofing. Do you have any experience with this?0 -
Epoxy grout is much better especially for wet areas (albeit more expensive and bit tricky to apply)- but that said normal grout that has been applied correctly and sealed shouldnt cause leaks. If I was redoing a bathroom and tiling from new I’d always use it but to rake it all out and re do it with epoxy would be difficult and a massive amount of grief.rvnmax said:
Many thanks for your suggestions.tacpot12 said:I feel your pain! I have been helping my daughter with a leak like this at her house. We have finally got it solved, but I had to spend a long time finding the leaks. There were three in the end, and each one needed a different solution.
Your leak at C around the bath waste can certainly be sealed. The best option is to remove the existing waste, clean/remove all the old silicone, and refit it using Fernox LS-X. (Although described as a "leak sealer", LS-X is really just a thick silicone sealant.)
The thick sealant shouldn't really be necessary for the shower valve, but if the tiles are heavily imbossed rather than smooth/flat, you might need more silicone, but it should be an even bead all the way around. It looks like the shower valve isn't installed so that it is perfectly vertical, or possibly the plate was bent during the installation. If it is leaking, the only thing you can really do, other than replacce the valve, is to refit it. In my experience, you need to apply silicone in concentric lines so that you have a number of dams between the wet and areas.
I used a small watering can to wet very precise areas of the shower to find where the leaks were coming from and where they were not. There were a couple of areas of grout that had failed, and water was leaking behind the shower valve, but the design was different, so a different solution was needed in my daughter's case.
Grout isn't perfectly waterproof and needs to be sealed after it has set. I've had good success with Mapei Grouts and ZEP Grout Sealer (from Screwfix).
While researching, I came across epoxy grouting (Mapei also does this) as a superior grouting product for waterproofing. Do you have any experience with this?
I do find it really hard to follow the info, photos and cross references to previous threads tbh. I would agree that using a small watering can or similar is the best way of pinpointing the leaks.1 -
Thanks again.benson1980 said:
Epoxy grout is much better especially for wet areas (albeit more expensive and bit tricky to apply)- but that said normal grout that has been applied correctly and sealed shouldnt cause leaks. If I was redoing a bathroom and tiling from new I’d always use it but to rake it all out and re do it with epoxy would be difficult and a massive amount of grief.rvnmax said:
Many thanks for your suggestions.tacpot12 said:I feel your pain! I have been helping my daughter with a leak like this at her house. We have finally got it solved, but I had to spend a long time finding the leaks. There were three in the end, and each one needed a different solution.
Your leak at C around the bath waste can certainly be sealed. The best option is to remove the existing waste, clean/remove all the old silicone, and refit it using Fernox LS-X. (Although described as a "leak sealer", LS-X is really just a thick silicone sealant.)
The thick sealant shouldn't really be necessary for the shower valve, but if the tiles are heavily imbossed rather than smooth/flat, you might need more silicone, but it should be an even bead all the way around. It looks like the shower valve isn't installed so that it is perfectly vertical, or possibly the plate was bent during the installation. If it is leaking, the only thing you can really do, other than replacce the valve, is to refit it. In my experience, you need to apply silicone in concentric lines so that you have a number of dams between the wet and areas.
I used a small watering can to wet very precise areas of the shower to find where the leaks were coming from and where they were not. There were a couple of areas of grout that had failed, and water was leaking behind the shower valve, but the design was different, so a different solution was needed in my daughter's case.
Grout isn't perfectly waterproof and needs to be sealed after it has set. I've had good success with Mapei Grouts and ZEP Grout Sealer (from Screwfix).
While researching, I came across epoxy grouting (Mapei also does this) as a superior grouting product for waterproofing. Do you have any experience with this?
I do find it really hard to follow the info, photos and cross references to previous threads tbh. I would agree that using a small watering can or similar is the best way of pinpointing the leaks.
Why would Epoxy be more of a hassle for regrouting than at the time of initial grouting?
Apologies for any confusion, don't worry about the previous thread. I linked in case any of the posters thought my thread seemed familiar.
TL;DR:
A year ago, I identified leaks through the shower plate as well as both the grout and the silicon beading in different areas which the pictures show.
I have had professionals redo the shower plate, grouting and silicon.
But the same areas are still leaking and now there is a new area (waste pipe connection to drain).
I felt at the time that the professionals maybe didnt do a good job.
I'll try and have another go at finding someone better and make sure they do every step properly i.e. clear previous grouting, use quality product and method, leave to set, apply sealer, leave to set again.
The only other thing I've considered is whether our cleaning methods are destroying the grouting and silicone...
0 -
Because you need to remove the old grout first, completely. It’s not the easiest of jobs and you have quite wide grout joints. When you say you had it regrouted, did they literally remove it all and start again?rvnmax said:
Thanks again.benson1980 said:
Epoxy grout is much better especially for wet areas (albeit more expensive and bit tricky to apply)- but that said normal grout that has been applied correctly and sealed shouldnt cause leaks. If I was redoing a bathroom and tiling from new I’d always use it but to rake it all out and re do it with epoxy would be difficult and a massive amount of grief.rvnmax said:
Many thanks for your suggestions.tacpot12 said:I feel your pain! I have been helping my daughter with a leak like this at her house. We have finally got it solved, but I had to spend a long time finding the leaks. There were three in the end, and each one needed a different solution.
Your leak at C around the bath waste can certainly be sealed. The best option is to remove the existing waste, clean/remove all the old silicone, and refit it using Fernox LS-X. (Although described as a "leak sealer", LS-X is really just a thick silicone sealant.)
The thick sealant shouldn't really be necessary for the shower valve, but if the tiles are heavily imbossed rather than smooth/flat, you might need more silicone, but it should be an even bead all the way around. It looks like the shower valve isn't installed so that it is perfectly vertical, or possibly the plate was bent during the installation. If it is leaking, the only thing you can really do, other than replacce the valve, is to refit it. In my experience, you need to apply silicone in concentric lines so that you have a number of dams between the wet and areas.
I used a small watering can to wet very precise areas of the shower to find where the leaks were coming from and where they were not. There were a couple of areas of grout that had failed, and water was leaking behind the shower valve, but the design was different, so a different solution was needed in my daughter's case.
Grout isn't perfectly waterproof and needs to be sealed after it has set. I've had good success with Mapei Grouts and ZEP Grout Sealer (from Screwfix).
While researching, I came across epoxy grouting (Mapei also does this) as a superior grouting product for waterproofing. Do you have any experience with this?
I do find it really hard to follow the info, photos and cross references to previous threads tbh. I would agree that using a small watering can or similar is the best way of pinpointing the leaks.
Why would Epoxy be more of a hassle for regrouting than at the time of initial grouting?
Apologies for any confusion, don't worry about the previous thread. I linked in case any of the posters thought my thread seemed familiar.
TL;DR:
A year ago, I identified leaks through the shower plate as well as both the grout and the silicon beading in different areas which the pictures show.
I have had professionals redo the shower plate, grouting and silicon.
But the same areas are still leaking and now there is a new area (waste pipe connection to drain).
I felt at the time that the professionals maybe didnt do a good job.
I'll try and have another go at finding someone better and make sure they do every step properly i.e. clear previous grouting, use quality product and method, leave to set, apply sealer, leave to set again.
The only other thing I've considered is whether our cleaning methods are destroying the grouting and silicone...
I wouldn’t just look to redo what you have already had redone. You need to take a bit of time having a proper look and test various areas- I’m not clear on whether you are just taking photos of areas directly above where the leak is evident underneath, or you have tested that area to see whether it is actually allowing water through. The finest of hairline cracks in grout for example can cause a substantial leak.From personal experience I wouldn’t always trust a professional plumber or bathroom fitter to diagnose a leak before they start suggesting just ripping stuff out, resealing everything etc. Partly because it takes a bit of time and a methodical approach.
The waste should be an easy one to solve at least, as has been described.1 -
Having quickly read your previous thread, and mention of tiles cracking? Is there some movement that is opening up cracks within tiles/grout. That obviously doesn’t just happen and it sounds like there is a more underlying issue.
some of the grout in pic 3 above, having zoomed in, looks suspicious.1 -
Bottom right of "pic 3" - do you have sealant cross that right hand wall? It looks darker, mould? or a gap?1
-
Thanks for the reply, I hadn't realised that you were not the original responder.benson1980 said:
Because you need to remove the old grout first, completely. It’s not the easiest of jobs and you have quite wide grout joints. When you say you had it regrouted, did they literally remove it all and start again?rvnmax said:
Thanks again.benson1980 said:
Epoxy grout is much better especially for wet areas (albeit more expensive and bit tricky to apply)- but that said normal grout that has been applied correctly and sealed shouldnt cause leaks. If I was redoing a bathroom and tiling from new I’d always use it but to rake it all out and re do it with epoxy would be difficult and a massive amount of grief.rvnmax said:
Many thanks for your suggestions.tacpot12 said:I feel your pain! I have been helping my daughter with a leak like this at her house. We have finally got it solved, but I had to spend a long time finding the leaks. There were three in the end, and each one needed a different solution.
Your leak at C around the bath waste can certainly be sealed. The best option is to remove the existing waste, clean/remove all the old silicone, and refit it using Fernox LS-X. (Although described as a "leak sealer", LS-X is really just a thick silicone sealant.)
The thick sealant shouldn't really be necessary for the shower valve, but if the tiles are heavily imbossed rather than smooth/flat, you might need more silicone, but it should be an even bead all the way around. It looks like the shower valve isn't installed so that it is perfectly vertical, or possibly the plate was bent during the installation. If it is leaking, the only thing you can really do, other than replacce the valve, is to refit it. In my experience, you need to apply silicone in concentric lines so that you have a number of dams between the wet and areas.
I used a small watering can to wet very precise areas of the shower to find where the leaks were coming from and where they were not. There were a couple of areas of grout that had failed, and water was leaking behind the shower valve, but the design was different, so a different solution was needed in my daughter's case.
Grout isn't perfectly waterproof and needs to be sealed after it has set. I've had good success with Mapei Grouts and ZEP Grout Sealer (from Screwfix).
While researching, I came across epoxy grouting (Mapei also does this) as a superior grouting product for waterproofing. Do you have any experience with this?
I do find it really hard to follow the info, photos and cross references to previous threads tbh. I would agree that using a small watering can or similar is the best way of pinpointing the leaks.
Why would Epoxy be more of a hassle for regrouting than at the time of initial grouting?
Apologies for any confusion, don't worry about the previous thread. I linked in case any of the posters thought my thread seemed familiar.
TL;DR:
A year ago, I identified leaks through the shower plate as well as both the grout and the silicon beading in different areas which the pictures show.
I have had professionals redo the shower plate, grouting and silicon.
But the same areas are still leaking and now there is a new area (waste pipe connection to drain).
I felt at the time that the professionals maybe didnt do a good job.
I'll try and have another go at finding someone better and make sure they do every step properly i.e. clear previous grouting, use quality product and method, leave to set, apply sealer, leave to set again.
The only other thing I've considered is whether our cleaning methods are destroying the grouting and silicone...
I wouldn’t just look to redo what you have already had redone. You need to take a bit of time having a proper look and test various areas- I’m not clear on whether you are just taking photos of areas directly above where the leak is evident underneath, or you have tested that area to see whether it is actually allowing water through. The finest of hairline cracks in grout for example can cause a substantial leak.From personal experience I wouldn’t always trust a professional plumber or bathroom fitter to diagnose a leak before they start suggesting just ripping stuff out, resealing everything etc. Partly because it takes a bit of time and a methodical approach.
The waste should be an easy one to solve at least, as has been described.
Okay, I got your point on that. Only, my plan was to redo all the grouting, and so in that case there is no downside with epoxy as I understand.
I was at work at the time, but from what I heard from my mum, we're pretty sure they didn't remove the old grouting; they just slathered it on top of the bottom half of the wall where and did not apply any grout sealer.
So, if I can get someone to do it properly this time as per the steps outlined in previous post, its probably worth it.
I have pin pointed the following areas in blue of grout and silicone that have water clearly flowing through them, and I had shared the relating evidence of water flow in th earlier accompanying pics of beneath the bath tub. My testing included immediately surrounding areas going up us high as the middle of the second tile and I could see no evidence of water leakage.
I may have included some areas due to the inaccuracies of my spraying method. And I haven't got around to resting the areas higher up as the technique to not hit the lower areas is quite time consuming, but I would do it if I were to go ahead with the spot-fix method.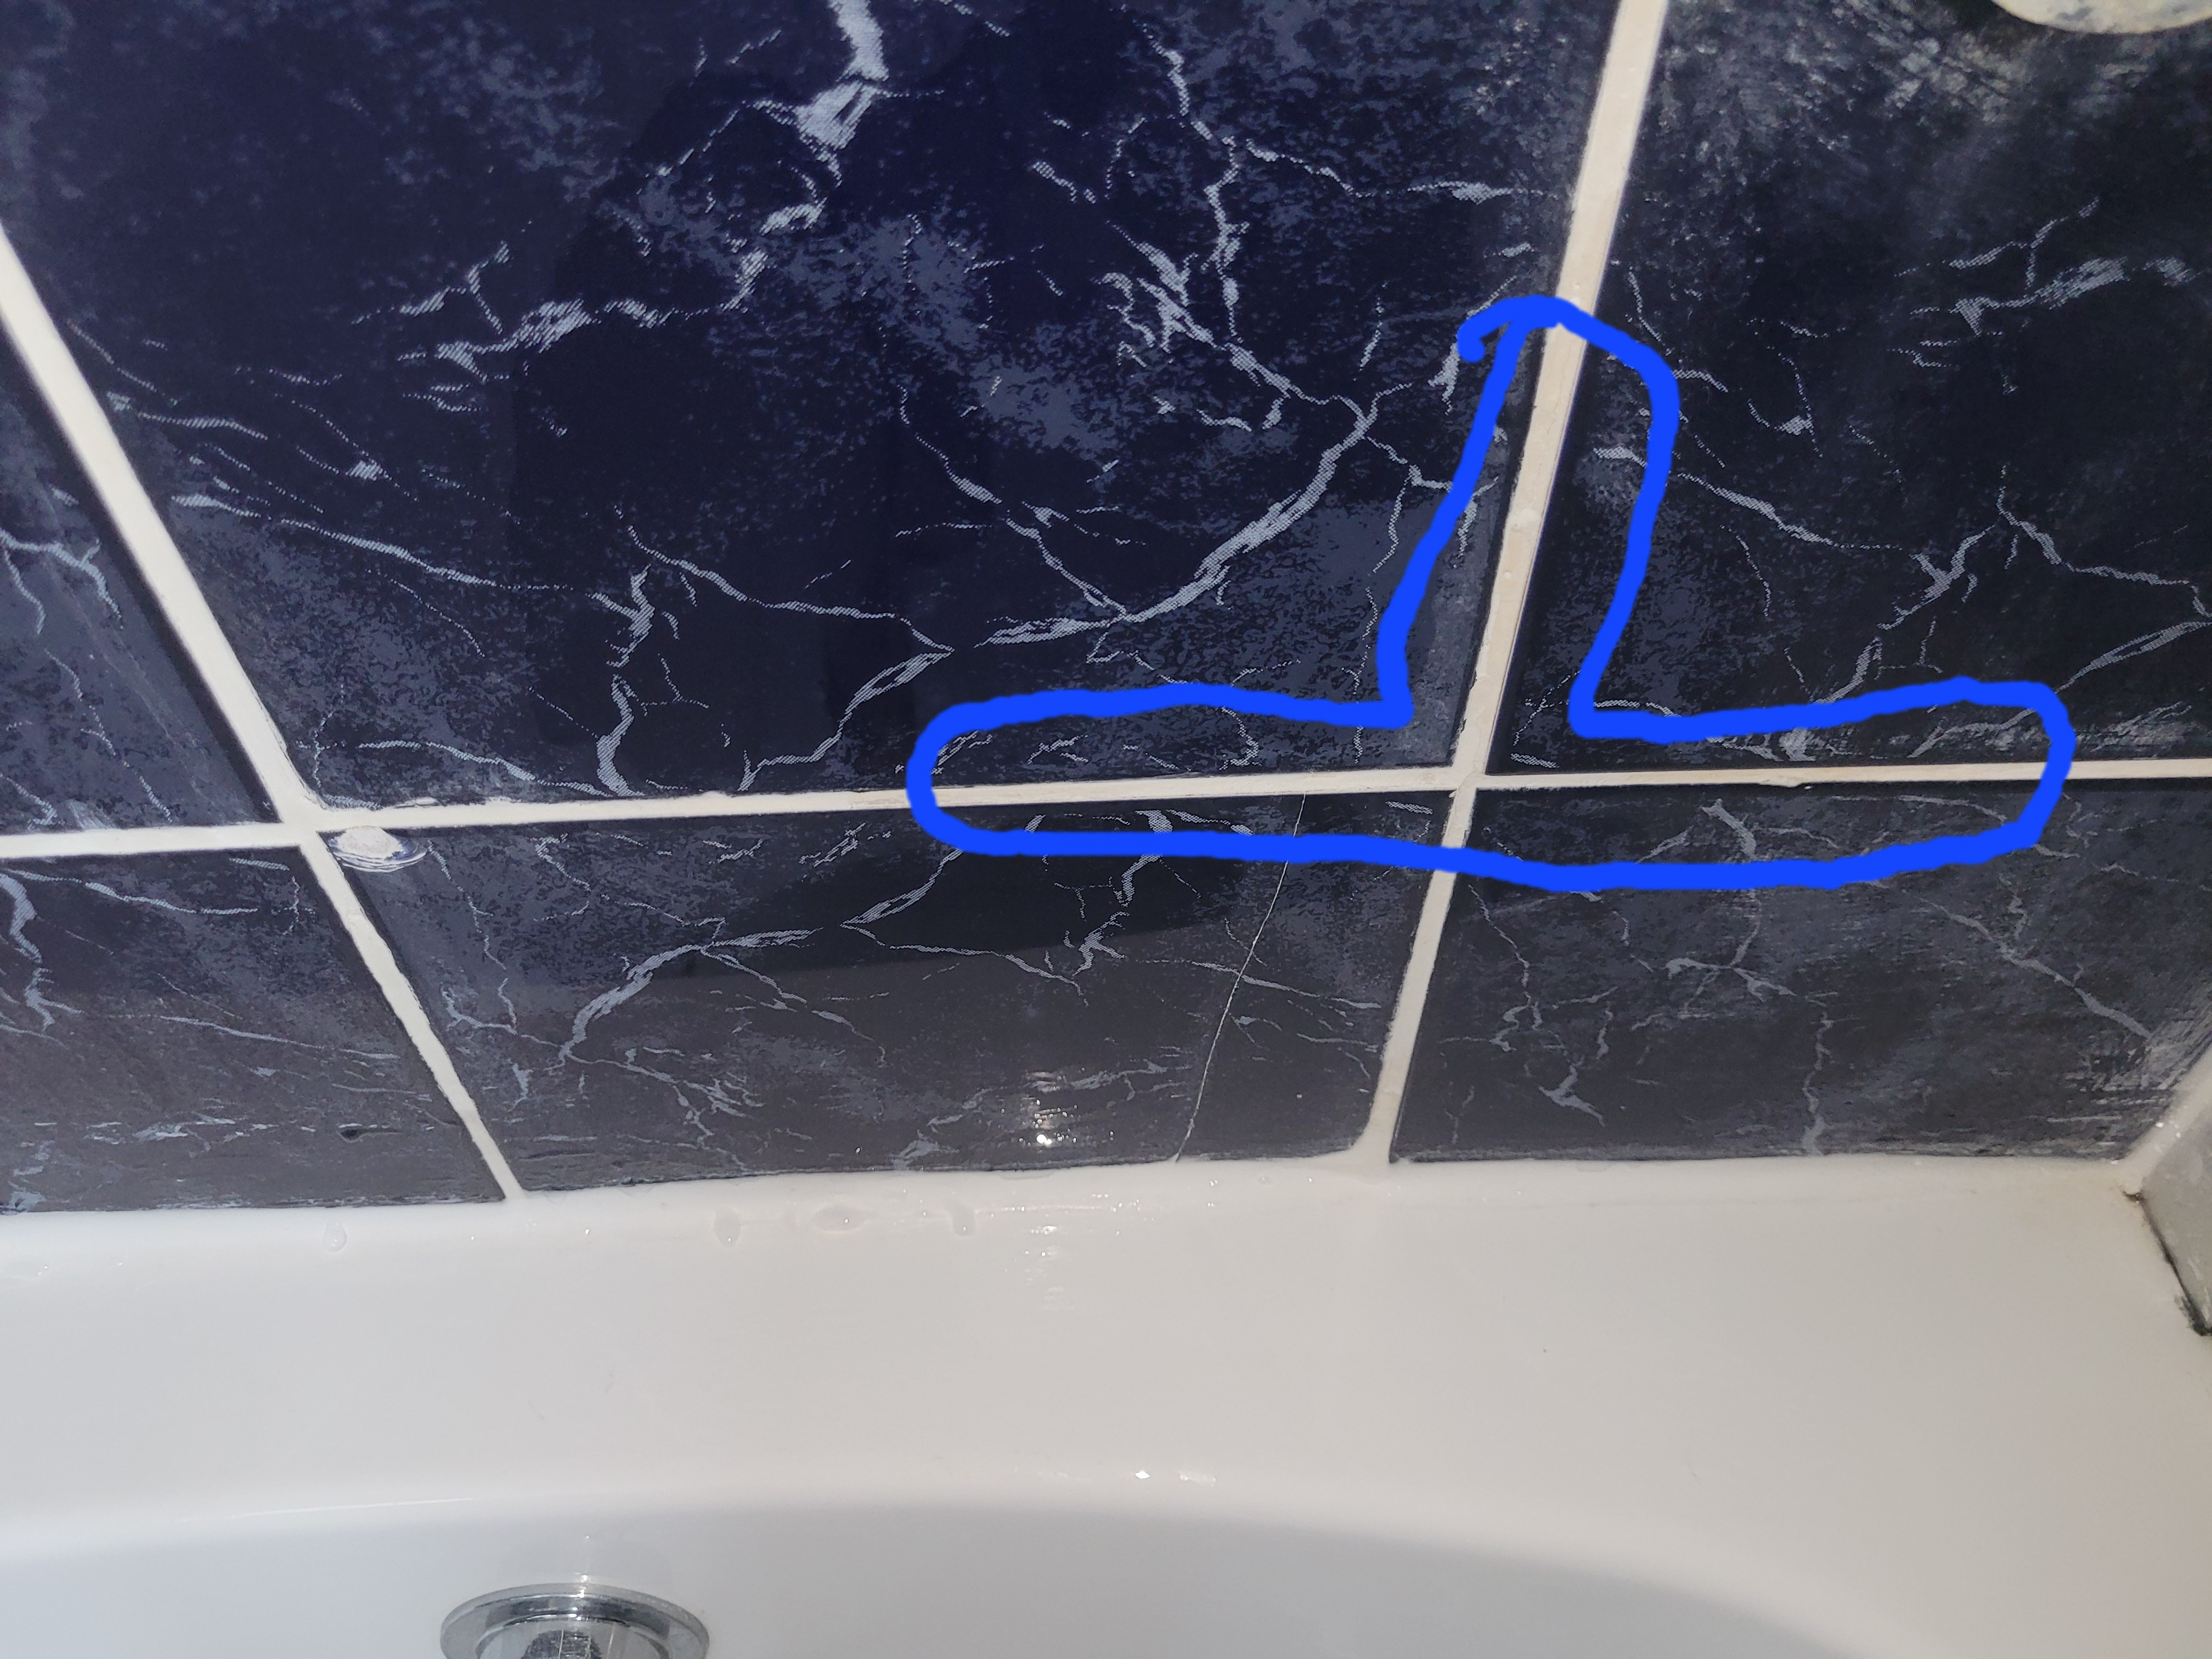
0 -
To clarify, there is one tile cracked in a couple of places. From reading my post from last year, I didn't know for sure where the leak was exactly, which means I wasn't testing very accurately.benson1980 said:Having quickly read your previous thread, and mention of tiles cracking? Is there some movement that is opening up cracks within tiles/grout. That obviously doesn’t just happen and it sounds like there is a more underlying issue.
some of the grout in pic 3 above, having zoomed in, looks suspicious.
You can see those cracks are now white as we grouted them also. Regardless, currently there is no leak from those cracks.
However, the surrounding grouting is leaking as per pic in above post.
Regarding "movement", I haven't noticed anything particular within the bathroom or tiles. I dont believe the builder that said my tiles were coming off from the walls with a quick knock. All the tiles on the three internal walls sound the same as they are all thin. The tiles on the one exterior wall all sound a but firmer. However, i wouldnt be totally surprised if there was some movement due to subsidence on that side of the house as the the adjacent rooms have cracks in them which we got repaired last year.
Although, I doubt these particular cracked tiles are anything to with that they have also been there since I can remember. Unfortunately, I can't find any pics of the newly renovated bathroom to check the tiling quality against, but the builder was so dodgy that we had leaks straight away and he left without completing.
You are correct, all the points where I have seen leaking have visibly defective grouting.
0


Confirm your email address to Create Threads and Reply

Categories
- All Categories
- 354.8K Banking & Borrowing
- 254.6K Reduce Debt & Boost Income
- 455.6K Spending & Discounts
- 247.7K Work, Benefits & Business
- 604.6K Mortgages, Homes & Bills
- 178.7K Life & Family
- 262.3K Travel & Transport
- 1.5M Hobbies & Leisure
- 16.1K Discuss & Feedback
- 37.7K Read-Only Boards