We’d like to remind Forumites to please avoid political debate on the Forum.
This is to keep it a safe and useful space for MoneySaving discussions. Threads that are – or become – political in nature may be removed in line with the Forum’s rules. Thank you for your understanding.
📨 Have you signed up to the Forum's new Email Digest yet? Get a selection of trending threads sent straight to your inbox daily, weekly or monthly!
The Forum now has a brand new text editor, adding a bunch of handy features to use when creating posts. Read more in our how-to guide
Filling gap in plasterboard

Gavin83
Posts: 8,757 Forumite


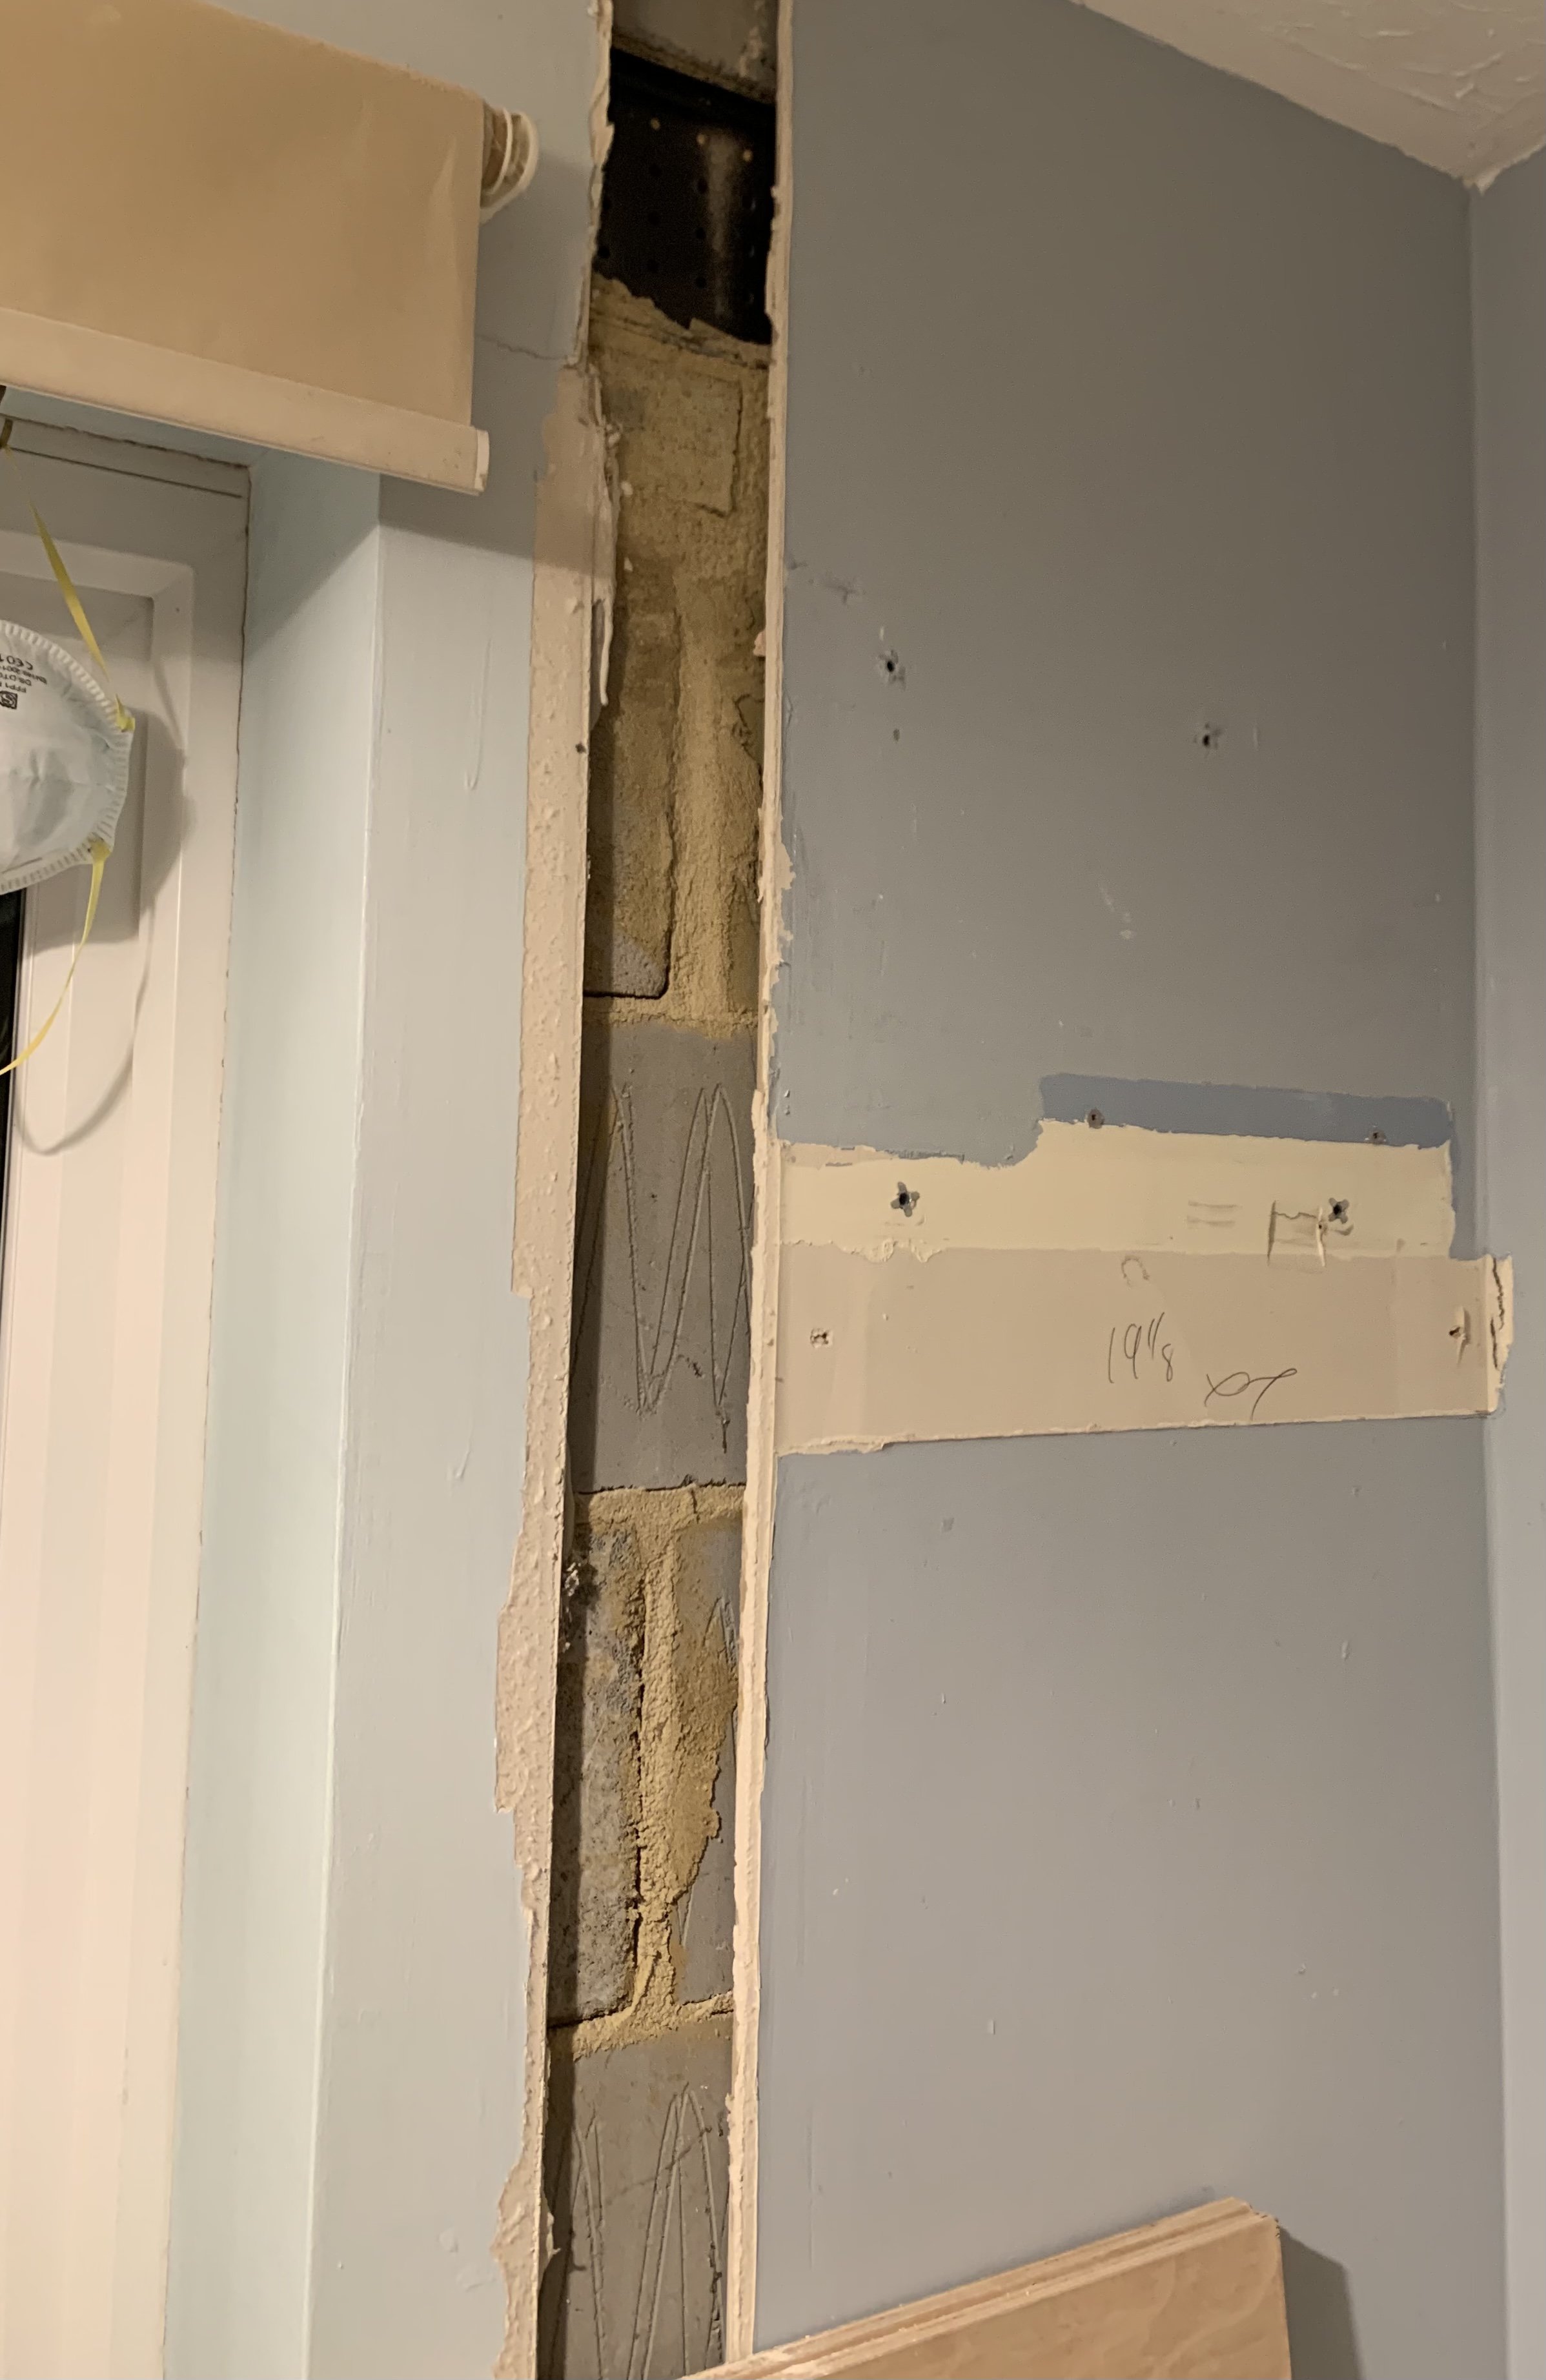
Hi all. I recently took down a stud wall that’s now left a gap between the underlying brickwork and the top plasterboard. The surrounding plasterboard was originally attached via dot and dab as shown in the photo below.
I have plasterboard. What I don’t have is dot and dab tools/Adhesive/PVA. Now I appreciate the correct method would be to follow whats already been done but is there an alternative that saves me buying all the above just for that small gap? Could I fix some thin battens behind and attach it to that? Any other option?
Thanks all.
Thanks all.
0
Comments
-
Adhesive costs just about £7. There are some foams, but they cost more.The only alternative I know is hardwall undercoat plaster . Is it a hole at the top? If so, you'll need a piece of plywood or plasterboard there.1
-
Is the total width from the room corner less then a standard piece of plasterboard?
If yes, then consider removing the section of plasterboard in your picture and replacing it with a new piece.
That might make fixing it easier and may eliminate the risk of a join showing up.
Maybe not so money saving but maybe worth it.A man walked into a car showroom.
He said to the salesman, “My wife would like to talk to you about the Volkswagen Golf in the showroom window.”
Salesman said, “We haven't got a Volkswagen Golf in the showroom window.”
The man replied, “You have now mate".3 -
You can cut a piece of plasterboard and try it on in the place that needs boarding up, then put some blobs of grip fill, no more nails or something ( anything ) similar on the wall ( 2 small blobs above and say 4 or 5 slightly bigger under ) and then firmly push plasterboard in place .Quicker and cleaner that mixing 1/4 of a bag of adhesive as that can be a messy job when you never done it before....Use some mesh tape over joints to prevent it cracking later and fill with easyfill and rub down.1
-
See this is the sort of tip I was looking for. Hadn’t considered no more nails and I just happen to have a tube of it kicking around awaiting a use. I just didn’t particularly wish to buy a large bag of adhesive for such a small space. Thanks!floppydisk1 said:You can cut a piece of plasterboard and try it on in the place that needs boarding up, then put some blobs of grip fill, no more nails or something ( anything ) similar on the wall ( 2 small blobs above and say 4 or 5 slightly bigger under ) and then firmly push plasterboard in place .Quicker and cleaner that mixing 1/4 of a bag of adhesive as that can be a messy job when you never done it before....Use some mesh tape over joints to prevent it cracking later and fill with easyfill and rub down.0 -
Don't use GripFill.
Use a proper adhesive. IE https://www.screwfix.com/p/soudal-adhesive-foam-hand-held-750ml/9633h
Mike1 -
It might look neater if you pull the other piece down and replace the whole section. If not, then dot and dab over the gap. For the top, bridge across with a piece of timber, eg 2x1 batten screwed through the existing board either side and then fix the top of the new piece to that. Some fine filler, you may be able to hide the repair, more easily if it were the whole piece from window frame to corner of the room.Signature on holiday for two weeks1
-
Gavin83 said:Hi all. I recently took down a stud wall that’s now left a gap between the underlying brickwork and the top plasterboard. The surrounding plasterboard was originally attached via dot and dab as shown in the photo below.I have plasterboard. What I don’t have is dot and dab tools/Adhesive/PVA. Now I appreciate the correct method would be to follow whats already been done but is there an alternative that saves me buying all the above just for that small gap? Could I fix some thin battens behind and attach it to that? Any other option?
Thanks all.The existing p'board doesn't look as tho' it's been skimmed at all, so the corner and the outside edge of the door reveal on the left must have been done using reinforced tape which was then blended in using filler like this:That makes filling on a flat surface a bit more tricky, I think, as any tape will add extra thickness to the wall surface, which will need feathering-in in both directions. If the plaster had been skimmed, then you could carefully cut a narrow edge of skim away from either side of the joins, bed down a tape below finish level, and then skim back up to 'surface' level. Instead, you'll be starting at 'surface' level, so will need to carefully blend this slightly-raised bit in over a few inches either side.So, you'll be doing something like this (tho' others might suggest a different approach, or type of tape):(These have been chosen at random - there's lots of info out there.)First, how to fill that gap. At the top, you'll need something to span that gap for the plasterboard strip to bond on to. The simplest way is probably to cut a piece of p'board that'll fit in there, and span beyond each side by a couple of inches. Remove any rough edges from the backs of the hole, attach a piece of string to the centre of the p'board piece, coat the 'overlapping' parts with a good dollop of PVA, insert it in the hole and pull it forwards using the string until the glued parts are making good contact with the p'board sheets either side. Hold in place (use a batten across the front or similar) until set.Then cut a strip of p'board to neatly fit the gap - doesn't have to be perfect. Lots of different adhesives that'll secure this. I tend to use solvent-free adhesive (no-nonsense type stuff) for this as it is water-based and can be used along with PVA, and it doesn't 'skin'. Ie, I'd first give that whole bare wall a slightly-watered down coat of PVA as some of these surfaces are 'sucky'. A good bead of adhesive - zig-zag down, and dabs - and press the board into place, using a batten across the front to get it flush with the surrounding walls. Leave to fully set. (For the very top section, possibly PVA on its own will do, or a thin bead of adhesive, as there's no contact gap to fill).Once set, you then need to fill the joints and smooth them off. The proper way is to use tape as shown above. First, sand down the area around the joints to get them perfectly flat - you can see raised edges there from old filler, for example. Use 120 grit, and be careful when you reach the paper level - try not to damage that too much, but try and get it smooth. Then apply the filler - squished right in to fill the gaps first - apply the tape, knife it down flat, a further skim on top, blended in to both sides. Allow to dry, and sand smooth. Don't be surprised if further fills are needed in places.Alternatively, and this might work since the boards have been D&Ded on to a solid wall, so no movement; trim the four exposed p'board joint edges to tidy them up and give them a gentle bevel - a V-shape. Brush well with slightly watered-down PVA to coat the edges and the blockwork behind (if there are gaps). Fill the bottom of the V with the solvent-free adhesive, and press and smooth it well so it coats the back and p'board edges. Leave to dry. Important - with a damp cloth, wipe away - whilst it's still wet - any PVA or adhesive that gets on to the top p'board surface. Once set, fill up to surface level with filler. There's a 'good' chance you'll get away with this type of repair, and it would be much simpler. But it will be more likely to hairline-crack if thumped.2 -
The hole looks like the back of a Catnic lintel.1
-
If you Google Vancouver carpenter he has some of the best videos on tape and fill.1
-
Why am I wrong to think I would just fill with bonding plaster?No reliance should be placed on the above! Absolutely none, do you hear?1


 https://www.youtube.com/watch?v=riq6r3x5fBc
 https://www.youtube.com/watch?v=fuES0VA6JlQ

Confirm your email address to Create Threads and Reply

Categories
- All Categories
- 354.8K Banking & Borrowing
- 254.5K Reduce Debt & Boost Income
- 455.6K Spending & Discounts
- 247.6K Work, Benefits & Business
- 604.5K Mortgages, Homes & Bills
- 178.6K Life & Family
- 262.1K Travel & Transport
- 1.5M Hobbies & Leisure
- 16.1K Discuss & Feedback
- 37.7K Read-Only Boards