Bathroom sink leak
Options
Comments
-
I'm sure the OP will come back soon but I'm looking at the way the bottom, around the fitting, seems to be moulded deeper round the back - behind the chrome bits.
I think the sink base comes down lower here, to accommodate the internal waste channel and I'm wondering if this brings a part of the ceramic base lower than, or on the same level as, the black sealing ring and would allow water to track across.
Very difficult without more pictures.0 -
The top seal on the plug hole is leaking, the water is getting in the hollow porous part of the sink and draining through.
Take the plug out and replace the top sealI do Contracts, all day every day.0 -
OP here. The area around the waste feels dry. The wet area is just the area that I've highlighted.
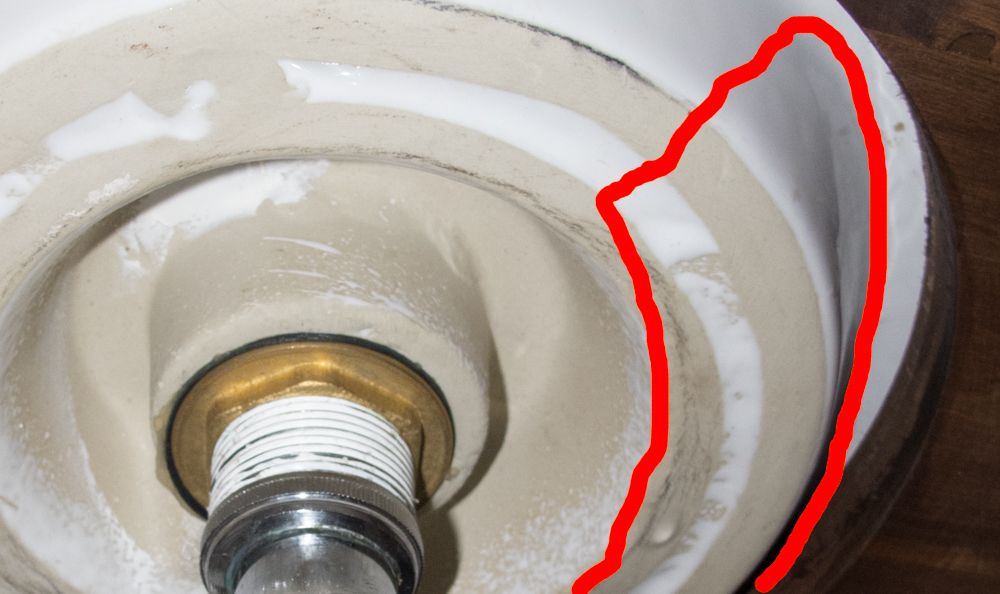
I've drawn an outline of the sink as it feels to me: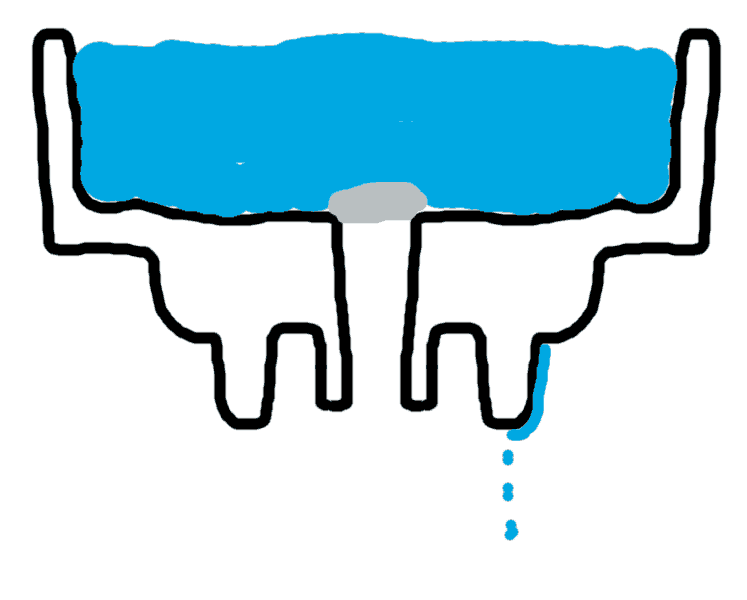
The leak does seem to extend from one side of the waste channel to near the front. The area is wet. The water is definitely not coming from around the waste under the sink. No idea if it might be coming from around the waste on the other side of the sink.
If you need more photos, please let me know what you need them of or what angle and I'll try to get them. There's shelves under the sink which make it difficult to get a direct view from underneath but I'll try in the daylight tomorrow.0 -
This is what I think is going on. There are no cracks that I can see but am going to try to get photos from behind the waste (under the taps).Marktheshark wrote: »The top seal on the plug hole is leaking, the water is getting in the hollow porous part of the sink and draining through.
Take the plug out and replace the top seal
I know how to take the click-clack plug bit off, and I gather the spindle it sits on just needs twisting off. But how do I remove the top bit of the plug and reseal it?
Also should I reseal using silicone, plumber's mait/putty or a rubber washer type thing?0 -
What has confused you is the construction of the bowl, it is hollow inside, if the top seal on the waste plug leaks the hollow part in the center will fill up and unless glazed, it drains straight through.I do Contracts, all day every day.0
-
This is very odd.
OK, it's not leaking past the black sealing washer but my understanding of these fired clay sinks is that, even if not glazed, they would be non porous. OK, perhaps not totally so but like a clay plant pot, not likely to let water through to that extent.
Perhaps the firing was faulty or there is a hairline crack?0 -
It has a top washer and a bottom washer, the top one is leaking, it is hollow, yes it is porous and the bottom is made open so it fits on the mold and sealed afterwards.I do Contracts, all day every day.0
-
You obviously know how this sink is made. So am I right in thinking that the sink is made first, with a huge hole in that bottom bit and a smaller sink hole, then glazed? Then a separate bit, moulded on its own, is put in place and sealed on somehow (with the glazing first having been ground off both parts where they join)?
If so, perhaps the joint between the two is faulty. (Sorry, I still can't accept that fired clay is porous enough to let drips of water through).0 -
Right guys, big update time.
I removed the waste trap. The basin wasn't secured down in any manner, so I just lifted it up.
This is the underside view: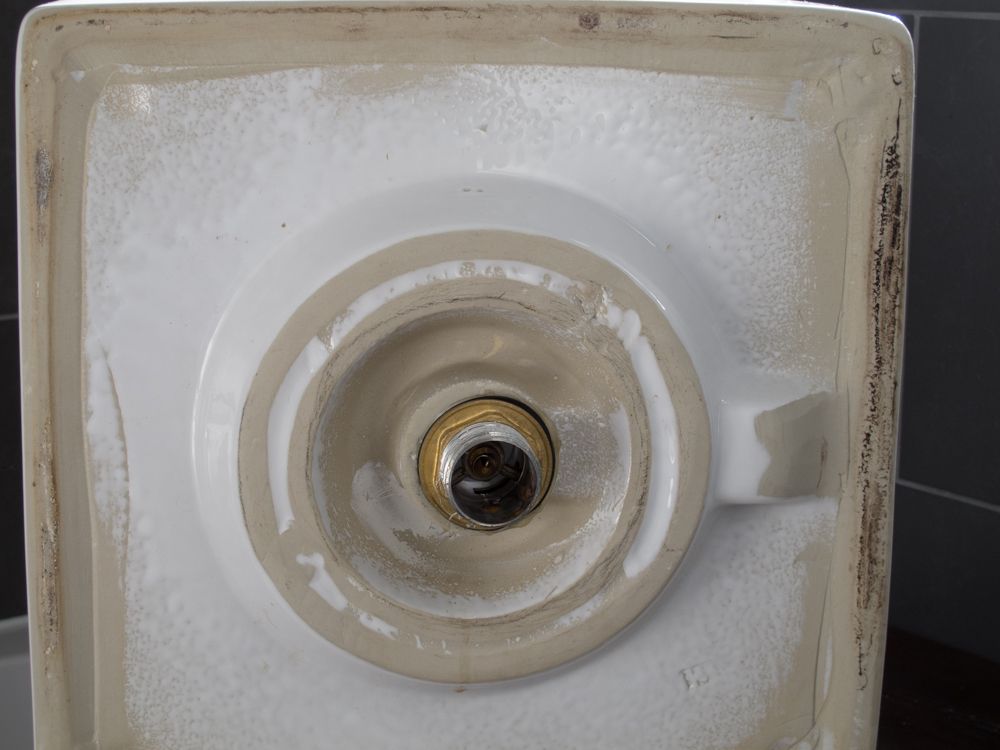
You can see the overflow at the back.
And here's what I saw on closer inspection: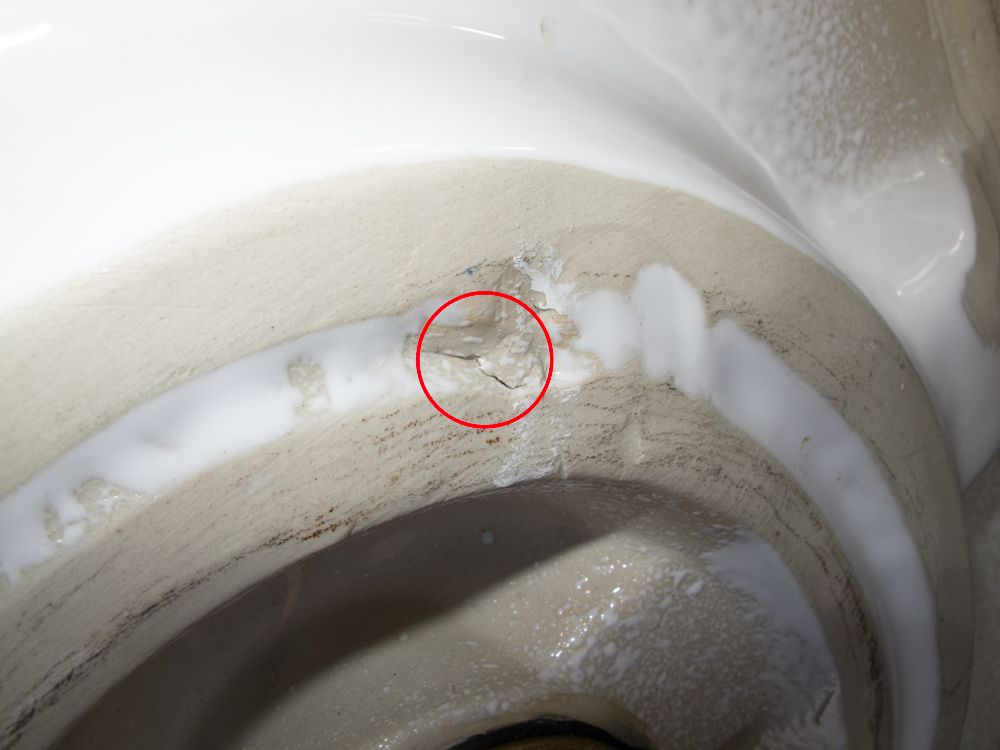
This is the area that's been wet all this time. The leak has been coming out from here for sure. I've closely examined the rest of the sink and can't find any other cracks.
I removed the large nut at the bottom: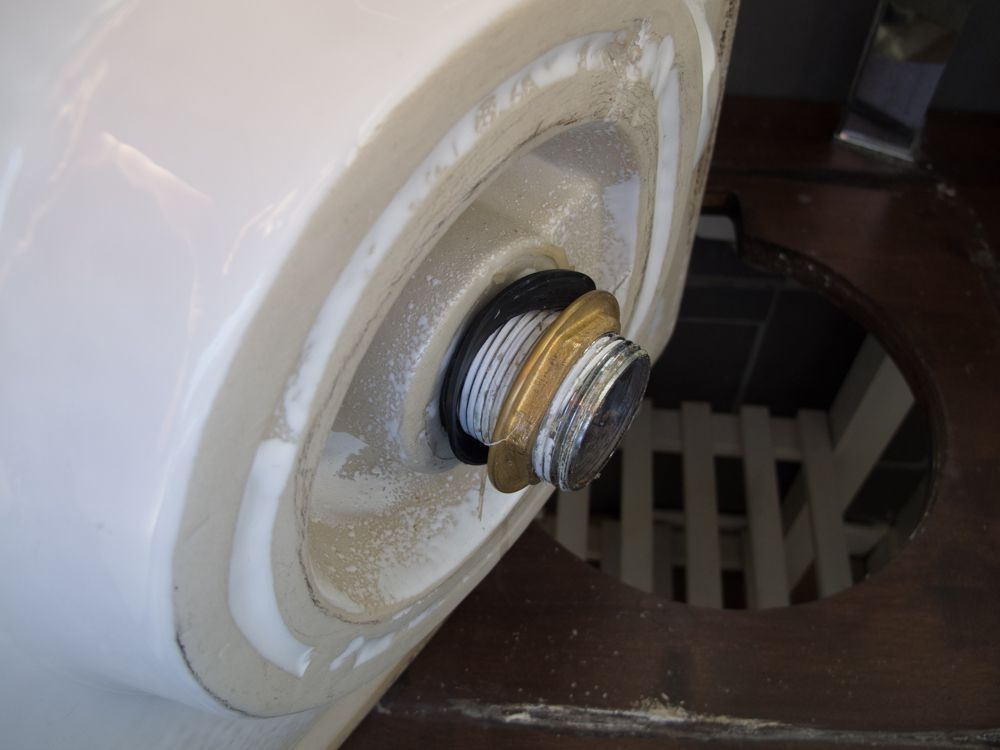
There was some silicone there.
This is what was left when I removed the waste flange: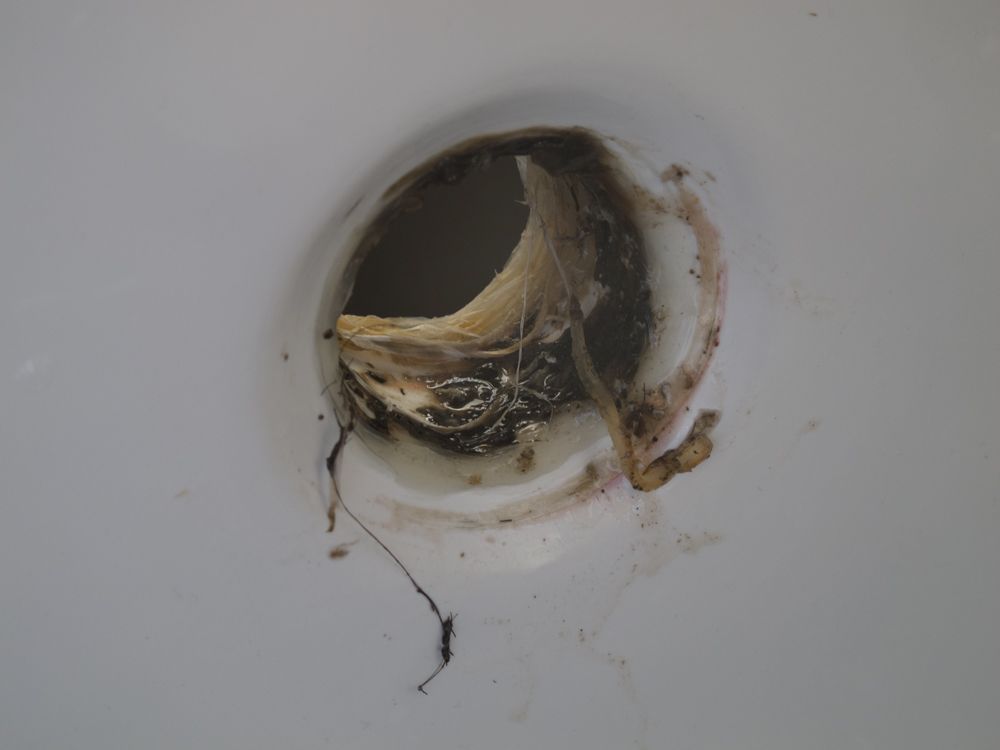
And after I cleaned it up: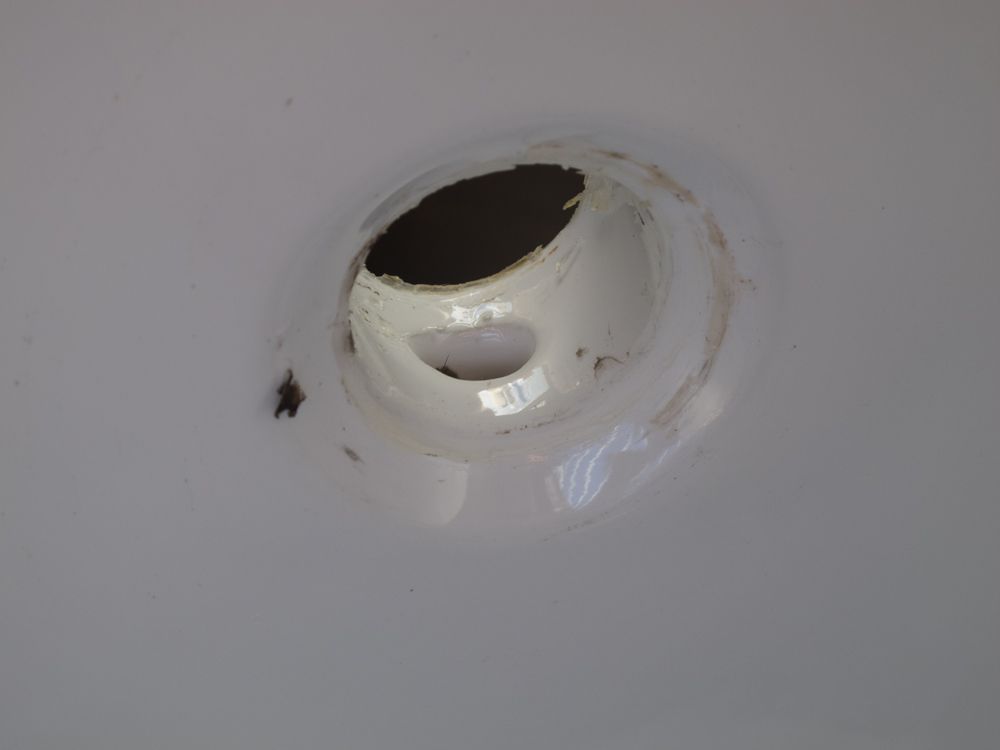
I can't see any cracks anywhere in the basin. The overflow empties into the main drain. Is it possible that water is backtracking and enters the interior of the sink at some point and then leaks through the crack?
I plan to refit the waste flange and put everything back together.
1. How do remove the remnants of silicone? I've scraped what I can off with a stanley knife. Or should I just leave it?
2. Do I use new rubber washers?
3. There's a rubber washer that fits between the waste flange and the basin on the top side. I've seen a youtube video where the chap just uses silicone instead of a washer here.
4. Before I replace the bottom washer, should I use silicone here too?
5. Should I bung up the overflow spout with silicone?
6. What can I do with the crack? Leave it or silicone it or do something else?
Apologies for all the questions but I really need some help and advice on what to do next. Wasn't planning to do any bathroom renovations until 2018 and we were going to get the whole bathroom refurbished.0 -
Right, so it's faulty manufacture. Presumably it's out of warranty, or you didn't buy it?
Here are my thoughts as a DIY'er, not a plumber.d0nkeyk0ng wrote: »1. How do remove the remnants of silicone? I've scraped what I can off with a stanley knife. Or should I just leave it?
I've heard about a product that is supposed to soften the grip of silicone. If you think there's too much remaining, you could try that.d0nkeyk0ng wrote: »2. Do I use new rubber washers?
Probably not, if the existing ones are still flexible and not cracked.d0nkeyk0ng wrote: »3. There's a rubber washer that fits between the waste flange and the basin on the top side. I've seen a youtube video where the chap just uses silicone instead of a washer here.
I would use silicone - you probably won't find a suitable size of washer, if one exists.d0nkeyk0ng wrote: »4. Before I replace the bottom washer, should I use silicone here too?
No harm but not usually necessary.d0nkeyk0ng wrote: »5. Should I bung up the overflow spout with silicone?
No, I would try to fix the crack.d0nkeyk0ng wrote: »6. What can I do with the crack? Leave it or silicone it or do something else?
Hmmm. Well, you can't get at the inside so I would clean and dry around the crack area and use silicone. I'd use a hair drier on it to ensure it was as dry as poss inside the crack. I would try working as much silicon as poss into the crack and then apply a larger amount around that area, smearing it hard against the surface at first then applying another layer on top. Leave it to set for at least 24 hrs before using the basin.
That's my opinion anyway. Others may have better ideas. Of course, replacing the basin with a cheap alternative until you get the bathroom refurb'ed would be a better solution but finding a cheap one that would slot in without too much bother might be a nuisance.
Good luck with it.0


This discussion has been closed.
Categories
- All Categories
- 343.2K Banking & Borrowing
- 250.1K Reduce Debt & Boost Income
- 449.7K Spending & Discounts
- 235.3K Work, Benefits & Business
- 608.1K Mortgages, Homes & Bills
- 173.1K Life & Family
- 247.9K Travel & Transport
- 1.5M Hobbies & Leisure
- 15.9K Discuss & Feedback
- 15.1K Coronavirus Support Boards