We’d like to remind Forumites to please avoid political debate on the Forum.
This is to keep it a safe and useful space for MoneySaving discussions. Threads that are – or become – political in nature may be removed in line with the Forum’s rules. Thank you for your understanding.
📨 Have you signed up to the Forum's new Email Digest yet? Get a selection of trending threads sent straight to your inbox daily, weekly or monthly!
The Forum now has a brand new text editor, adding a bunch of handy features to use when creating posts. Read more in our how-to guide
'Heritage Bathroom' Flush Issues ..

sujsuj
Posts: 828 Forumite


I previously resolved another type flush issue here, so hope this time too I will get help.
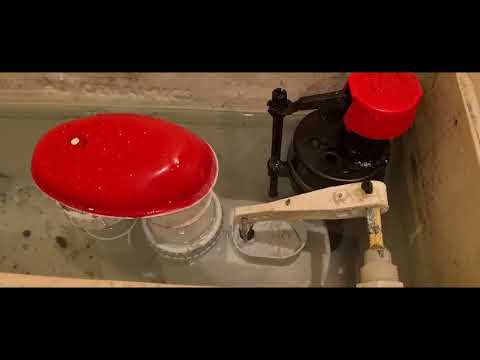
'Heritage Bathroom' Flush is not pushing water continuously when it is turned. See video and photos any suggestion where/what could be the issue, Mechanism is different compared to other ones i have seen. So keen to understand how this works and what name for this type of flush mechanism..?
 https://www.youtube.com/watch?v=64NMhWLQaKw


'Heritage Bathroom' Flush is not pushing water continuously when it is turned. See video and photos any suggestion where/what could be the issue, Mechanism is different compared to other ones i have seen. So keen to understand how this works and what name for this type of flush mechanism..?
https://www.youtube.com/watch?v=64NMhWLQaKw0
Comments
-
-
It's a 'syphon' type flush, and the plastic diaphragm inside is almost certainly torn.
Very DIYable, but the most awkward bit is removing the flush mechanism.
Some can be removed from the cistern without first having to remove the whole cistern, but others - most - cannot.
Ah, I think yours can! See the vertical pipe on the LH side that heads down from the red top and goes towards the pan, does that have a knurled unscrew able collar on it? Looks like it has.
Anyhoo, YouTube will tell you everything you need to know, so that this thread can be concluded within one page 1
1 -
Good to know how it works:
 https://youtu.be/zXsEJK3I1x8?feature=shared
And the guy has other bids, I believe, on how to remove it. But first check whether yours has this disconnecting nut half way down that pipe - mega-bonus if you do.1 -
After seeing these comments + videos this was the easiest DIY job!.
Yes it was damaged plastic diaphragm (pic-3), which I replaced with a plastic used for binding books (pic-2).
I hope this will last but worst case there is a screwfix mechanism for £6
What amazed me another piece which I broke while fixing diaphragm (pic-1). This is part of flush handle mechanism.
It already provided a fall back option!. If first part is broken as you can see in photos it got another hole to put
lever...So ultimately issue fixed without spending a penny and took 1 hr to complete whole job.
Thanks everyone here.


0 -
No way! Just no way this thread is done...

Nice job - really neat.
You want to avoid having the replace the whole Syphon, as that's a cistern off job, unless you can find the exact same model.
You can buy replacement diaphragms, but they'll likely need some trimming, so what you've done is spot on.
I don't believe it! 1
1 -
Yes..We did it. Thanks everyone.1
-
sujsuj said:What amazed me another piece which I broke while fixing diaphragm (pic-1). This is part of flush handle mechanism.
It already provided a fall back option!. If first part is broken as you can see in photos it got another hole to putlever...
Just for info, the second square hole, and the other wee round ones, are there to cope with differing distances between the cistern handle and the position of the syphon's 'pump'.You ideally want the wire connecting link to be near-vertical, so that it pulls as directly upwards on the plunger shaft as it can. (In theory, in the 'resting' position, the chosen round hole will be fractionally too long, and it then moves thro' completely vertical and finally fractionally too short as the lever is depressed fully down, as the white lever end moves in an arc. You'll see this if you observe the action as you flush the lever.)If you watch your video again, you can see that the two very-furthest-apart points of the white lever were originally chosen, and these are 'correct' as it then pulls directly upwards on the syphon's plunger - yes? Now that you have had to choose the inner square point, I think you'll find there will be a sideways-pulling force on the plunger shaft, and this will cause wear, as well as making it less-than-smooth.So, your work here is not complete! I'd strongly recommend buying a new white lever, making sure it's as long as the old one :-)
1


Confirm your email address to Create Threads and Reply

Categories
- All Categories
- 353.5K Banking & Borrowing
- 254.2K Reduce Debt & Boost Income
- 455K Spending & Discounts
- 246.6K Work, Benefits & Business
- 602.9K Mortgages, Homes & Bills
- 178.1K Life & Family
- 260.6K Travel & Transport
- 1.5M Hobbies & Leisure
- 16K Discuss & Feedback
- 37.7K Read-Only Boards